
You can join the growing DIY trend and craft personalized home decor. The desire for unique, custom spaces has never been stronger. Explore these eight unique designs for affordable diy acrylic frames to get started.
- Floating Botanical Frames
- Layered 3D Photo Box
- DIY LED-Lit Acrylic Frames
- Painted Abstract Frame Ideas
- Suspended Thread Art
- Vinyl Decal Story Frames
- Geometric DIY Wall Art
- Interactive QR Code Frames
Each tutorial guides you through these acrylic framing projects, turning your art into frame worthy displays. These acrylic projects inspire other ideas for your acrylic picture frames, from succulent displays to gemstone frames.
Floating Botanical Frames

The Concept
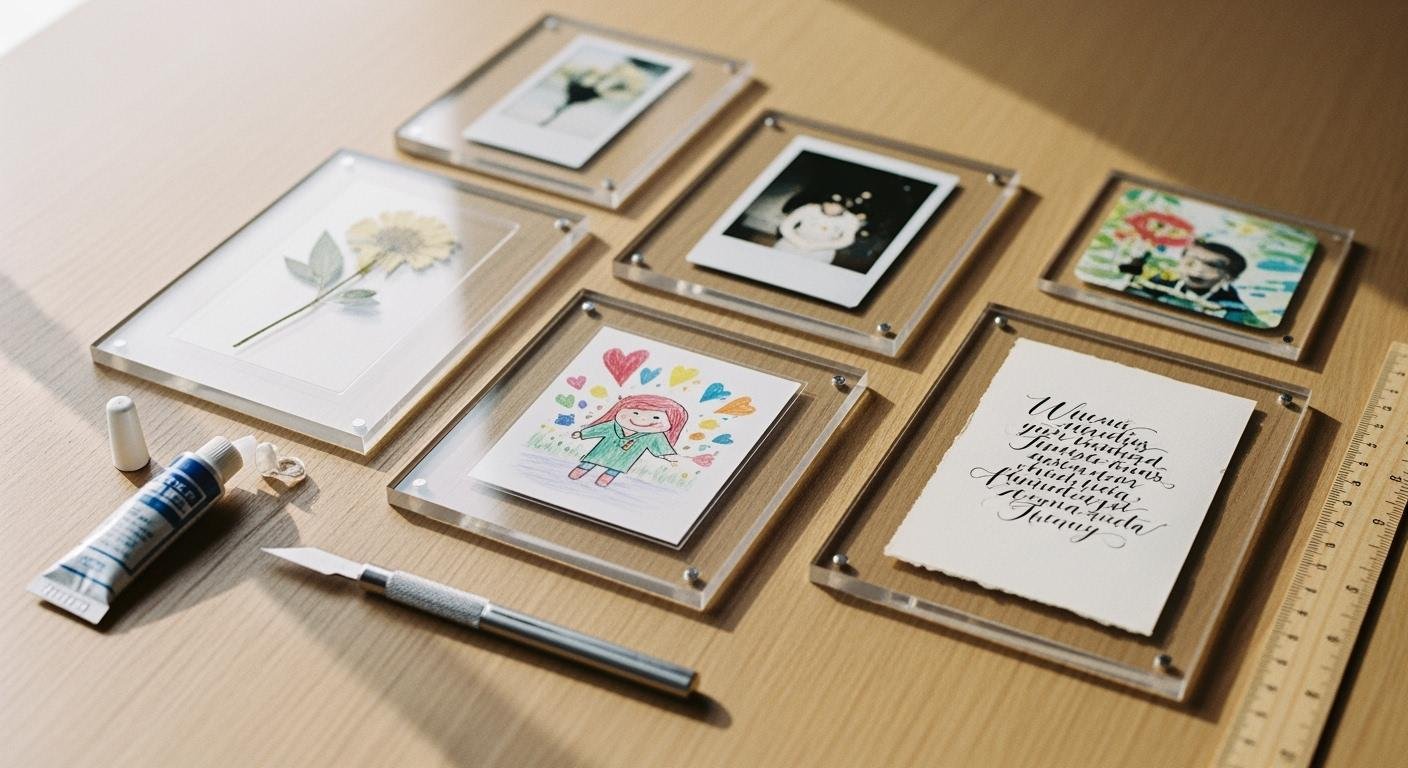
This design creates a stunning, museum-quality display right in your home. By sandwiching pressed flowers, leaves, or other thin objects between two clear acrylic sheets, you achieve a beautiful “floating” effect. The transparent background makes your chosen botanicals the star of the show. This project is incredibly versatile. You can create floating acrylic picture frames with more than just flowers. Try using small shells, vintage buttons, thin fabric swatches, or even a small collage of inspirational quotes to make a unique memorabilia collection.
Materials List
Ready to get started? Here is what you will need:
- Two identical sheets of clear acrylic
- Pressed and dried botanicals (flowers, leaves, ferns)
- Frame hardware (standoff bolts or a wooden base)
- A soft, lint-free microfiber cloth
- Mild soapy water
Choosing Your Acrylic 💡 The type of acrylic you choose can enhance your project. For a professional finish, consider frame-grade acrylic, which offers UV protection to prevent your botanicals from fading. A 1/8″ thickness is a popular and sturdy choice for most standard-sized frames.
Type of Acrylic Sheet Thickness Key Properties & Use Cases Frame Grade Acrylic 1/8″ Crystal clear, lightweight, and impact-resistant. Ideal for all framing. OP3 UV-filtering Acrylic Varies Filters harmful UV light to protect your artwork from sun damage. P99 Non-glare Acrylic Varies Reduces glare and reflections for better viewing in bright rooms.
Step-by-Step Guide
Creating your floating botanical frame is simple. Follow these easy steps for a flawless result.
- Prepare Your Botanicals: To press your flowers, place them between two sheets of parchment paper inside a heavy book. Add more weight on top and let them dry for 2-4 weeks in a dark space. Fresher, smaller flowers often keep their color best.
- Clean Your Acrylic Sheets: Gently wipe both acrylic sheets with a soft microfiber cloth and a bit of soapy water. Avoid paper towels or ammonia-based cleaners, as they can scratch or cloud the surface. Let them air dry completely.
- Arrange Your Design: Lay one acrylic sheet on your work surface. Carefully arrange your dried botanicals on top. Take your time to create a composition you love. This is your chance to be creative!
- Assemble the Frame: Place the second sheet of acrylic directly on top of your arrangement, creating a sandwich. Align the edges perfectly. Secure the two sheets together using your chosen hardware, like standoff bolts for a modern floating wall mount.
These beautiful acrylic picture frames add a touch of nature to any room. Enjoy your new piece of custom art!
Layered 3D Photo Box
The Concept
This project takes your memories from flat to fantastic. A layered 3D photo box uses spacers between sheets of acrylic to create real depth. You can place photos and small keepsakes at different levels. This turns a simple picture frame into a dynamic shadow box. For example, one person made a beautiful keepsake for their daughter’s first year. A standard frame made the items look flat and awkward. By using a deep 3D design, they placed a tiny sock in the foreground and photos at various depths behind it. This created a wonderful timeline effect.
You can build these 3D frames around any theme. It’s a perfect way to tell a story. Here are a few ideas to get you started:
- Travel Memories: Layer postcards, foreign currency, and small souvenirs.
- Concert Experience: Combine ticket stubs, wristbands, and photos.
- Wedding Keepsakes: Arrange invitations, dried flowers, and lace.
- Sports Highlights: Display signed photos, tickets, and patches.
Materials List
You will need a few specific items to build your 3D box:
- Two sheets of clear acrylic (for the front and back)
- Strips of acrylic (for the sides to create depth)
- Acrylic cement or strong clear glue
- Spacers or small clear blocks
- Your chosen photos and small memorabilia
- A soft microfiber cloth
Pro Tip on Spacing 💡 You can buy pre-made acrylic spacers or make your own by cutting small, clear squares from a thicker acrylic sheet. These are key to creating the floating, multi-level effect inside your box.
Step-by-Step Guide
Let’s build your 3D memory box. Follow these four easy steps.
- Build the Box: Take your back acrylic sheet. Glue the four acrylic strips around its edges to form the walls of your box. Let the cement cure completely.
- Plan Your Layers: Lay your open box on a table. Arrange your photos and items inside without glue. Plan what goes in the back, middle, and front.
- Attach Your Items: Start with the back layer. Glue your background photo or items directly onto the back panel. Next, glue spacers onto the background layer, then attach your middle-layer items to the spacers. Repeat for the front layer.
- Seal the Frame: Clean the front acrylic panel. Apply a thin line of acrylic cement to the top edge of the box walls. Carefully place the front panel on top to seal your display.
DIY LED-Lit Acrylic Frames
The Concept
Ready to make your art shine? This project adds a vibrant, modern twist to your displays. A DIY LED-lit frame uses a subtle light source integrated around the edges of an acrylic sheet. This creates an ethereal glow, making your photos or designs appear ‘lit from within.’ The light refracts off any engraved parts, making your custom design pop. These glowing frames are perfect for adding a cool ambiance to bedrooms, home theaters, or office lounges. You can display a favorite quote, a simple line drawing, or a custom logo.
Materials List
Here is what you need to light up your creation:
- One sheet of clear acrylic
- LED strip lights (USB-powered or battery-powered)
- A base to hold the acrylic sheet (wood or 3D printed)
- An etching or engraving tool (like a Dremel or a craft knife)
- Your design printed on paper
- Tape
Pro Tip: Choosing Your LEDs 💡 For a clean look, find an LED strip that is the same width as your acrylic sheet’s thickness. This allows it to sit flush within the base and illuminate the panel evenly.
Step-by-Step Guide
Let’s bring your glowing art to life.
- Etch Your Design: Tape your printed design to the back of the acrylic sheet. Use your engraving tool to carefully trace the design onto the front surface. The deeper the etch, the brighter it will glow.
- Assemble the Base: Create a slot in your wooden or 3D-printed base that is wide and deep enough to hold your acrylic panel securely.
- Install the LEDs: Place the LED strip inside the slot in your base. Make sure the lights are facing up, ready to shine into the edge of the acrylic.
- Put It All Together: Slide the bottom edge of your engraved acrylic panel into the slot, directly on top of the LEDs. Connect your LEDs to a power source and watch your design light up!
The magic of these frames comes from how light travels. The LEDs at the edge shoot light into the panel. This light is engineered to exit in a controlled way, creating a uniform glow across your design.
Painted Abstract Frame Ideas
The Concept
This project lets you become an abstract artist. You will transform a simple sheet of acrylic into a vibrant piece of modern art. The secret is a technique called reverse painting. You paint on the back of the acrylic sheet. When you flip it over, the front has a perfectly smooth, high-gloss finish. This method protects your design behind the clear acrylic, giving your art a professional, gallery-like quality. These abstract frames look amazing on their own. You can also upcycle them later by silk-screening a cool design or a favorite quote onto the front surface.
Materials List
To create your own abstract masterpiece, you will need:
- One sheet of clear acrylic
- Acrylic paints in various colors
- Paintbrushes or a foam applicator
- Primer designed for plastics (optional, but recommended)
- Clear acrylic sealant spray
- Painter’s tape
Choosing Your Paint 🎨 You can use either brush-on acrylics or spray paints for this project. Spray paints are great for creating smooth gradients and covering large areas quickly. Brush-on paints give you more control for detailed patterns and textures.
Step-by-Step Guide
Ready to unleash your inner artist? Follow these steps to create your custom frame.
- Prepare the Surface: First, clean your acrylic sheet thoroughly to remove any dust or fingerprints. If you want to keep the edges clear, apply painter’s tape around the border on the side you will be painting.
- Apply Your Paint: Now for the fun part! Apply your paints to the back of the sheet. Create any abstract design you like—swirls, splatters, or color blocks. Let each layer dry before adding another to prevent colors from getting muddy.
- Build Up Layers: Apply two to three thin coats of paint for a solid, rich color. Remember, the first layer you paint will be the one seen closest to the front.
- Seal Your Art: Once your final paint layer is completely dry, spray a coat of clear sealant over the painted side. This protects your artwork from scratches. After it dries, your beautiful abstract art is ready to be displayed in one of your new frames.
Suspended Thread Art
The Concept
This project turns simple thread into a stunning piece of modern art. You will create intricate geometric patterns by weaving colorful thread between anchor points on a clear acrylic sheet. The transparent background makes your design look like it is floating in mid-air. This method gives a delicate, almost web-like appearance to your creation. You can design anything from a simple starburst to a complex, overlapping geometric shape. These unique frames add a pop of color and texture to any wall.
Materials List
Gather these items to start your thread art project:
- Two identical sheets of clear acrylic
- Colorful embroidery floss or thin string
- Small nails or escutcheon pins
- A drill with a very small drill bit
- A printed paper template of your design
- Ruler and marker
Design Tip ✍️ You can find countless geometric string art patterns online. Print one out and tape it to your acrylic sheet. This gives you a perfect guide for drilling your holes accurately.
Step-by-Step Guide
Follow these steps to weave your own masterpiece.
- Prepare Your Panel: Place your paper template behind one acrylic sheet. Use a marker to mark the drill points. Carefully drill small holes through the acrylic at each mark. Go slow to avoid cracking the material.
- Set Your Anchors: Gently push a small nail or pin into each hole. These will be the anchor points for your thread. Make sure they are secure but do not poke out too far on the back.
- Weave Your Design: Tie your thread to a starting pin. Begin wrapping the thread from pin to pin, following your pattern. Pull the thread taut to create clean, straight lines. This is where your art truly comes to life.
- Complete the Frame: Once your design is finished, tie off the thread securely. Place the second sheet of acrylic on the back. This protects the back of your work and completes the clean, floating look of the frame.
Vinyl Decal Story Frames
The Concept
This project lets you add a personal touch with words and graphics. You can turn a simple piece of acrylic into a custom sign or picture frame using vinyl decals. It is a fantastic way to display a favorite quote, a family name, or a special date. The clean look of the decal on the clear acrylic creates a modern and professional finish.
You can use this idea to create beautiful story frames that tell a little tale.
- Family Tree: Add names branching out from a central point.
- Milestone Marker: Display a baby’s birth stats (name, date, weight).
- Inspirational Quote: Showcase a motto that motivates you daily.
For a more luxurious feel, try using metallic vinyl. A gold or silver decal on an acrylic sheet can create a high-end decorative item. This style works well for elegant gifts or even as custom menu boards in a coffee shop to enhance the atmosphere.
Materials List
Here is what you will need to get started:
- One sheet of clear acrylic
- Adhesive vinyl in your chosen color(s)
- A vinyl cutting machine (like a Cricut or Silhouette) or pre-cut decals
- Transfer tape
- A weeding tool and a scraper (or a credit card)
- Your design (digital or a sketch)
Pro Tip: Choosing Your Vinyl 💡 Permanent vinyl is best for a long-lasting design. If you want to change your design later, removable vinyl is a great option. It lets you update your frames for different seasons or occasions.
Step-by-Step Guide
Let’s create your custom decal frame.
- Create Your Design: Design your quote or graphic using your cutting machine’s software. Make sure to measure your acrylic panel and size your design to fit perfectly.
- Cut and Weed the Vinyl: Load your vinyl into the cutting machine and let it work its magic. After cutting, use a weeding tool to carefully remove the excess vinyl from around your design.
- Apply Transfer Tape: Cut a piece of transfer tape slightly larger than your design. Peel the backing off and carefully lay it over your vinyl decal. Use a scraper to press it down firmly.
- Transfer to Acrylic: Clean your acrylic sheet. Peel the backing off the vinyl, making sure the decal sticks to the transfer tape. Position it on the acrylic and use the scraper to smooth it down. Slowly peel the transfer tape away, leaving your beautiful design behind.
Geometric DIY Wall Art
The Concept
This project helps you create a stunning piece of modern diy wall art that looks like it belongs in a gallery. You will use translucent paints on clear acrylic to make a vibrant, color-blocked design. When light shines through, your wall art will glow like stained glass. You can create amazing effects by overlapping different colored shapes. For example, layering a yellow shape over a blue one creates a new green section. This technique adds depth and makes your wall art dynamic.
You can arrange multiple acrylic panels to create a large, multi-layered display on your wall. Imagine brilliantly colored half-moon shapes mounted with standoffs for a floating effect. For a different style, you can add perforated metal accents to your frame. This gives your diy wall art a cool modern or rustic feel. This project turns simple materials into a sophisticated piece of wall art for any room.
Materials List
Here is what you need for this colorful project:
- One or more sheets of clear acrylic
- Translucent acrylic paints in various colors
- Painter’s tape
- Paintbrushes or foam applicators
- Frame hardware (like standoff bolts)
- Optional: Perforated metal sheets and small hardware
Color Tip 🎨 Choose two or three primary colors that you love. When you overlap them, you will create a whole new set of secondary colors for your design. This is a great way to build a rich color palette.
Step-by-Step Guide
Let’s make your beautiful geometric wall art.
- Plan Your Design: Lay your acrylic sheet on a piece of paper. Sketch out your geometric design of overlapping shapes. This will be your guide for taping.
- Tape Your Sections: Apply painter’s tape to the acrylic, following the lines of your design. Press the tape down firmly to prevent paint from bleeding underneath.
- Paint the Colors: Paint inside your taped-off sections with translucent paint. Let the first color dry completely before you remove the tape and create your next section. This is how you create clean lines and new, overlapping colors.
- Assemble and Mount: Once your art is dry, your custom frame is ready. You can mount the single panel to the wall. For a more complex look, arrange multiple painted frames on your wall to complete your unique display. These frames will transform your wall.
Interactive QR Code Unique Designs
The Concept
This project merges your physical decor with the digital world. You will create a frame that does more than just sit on a wall—it tells a story. By adding a QR code to a sheet of acrylic, you create a gateway to online content. A simple scan can lead friends and family to a wedding video, a vacation photo gallery, or a favorite music playlist. The physical frame makes the QR code stand out and tells people why they should scan it. This removes any hesitation and encourages them to engage.
Museums and major brands use this idea to create interactive experiences. You can bring that same magic home with these unique designs. Imagine a frame that links to:
- An audio recording of your child’s first words.
- A digital business card (vCard) for your home office.
- A secret message or a fun online game.
Materials List
Here is what you need to build this bridge between art and technology:
- One sheet of clear acrylic
- A computer or smartphone to generate a QR code
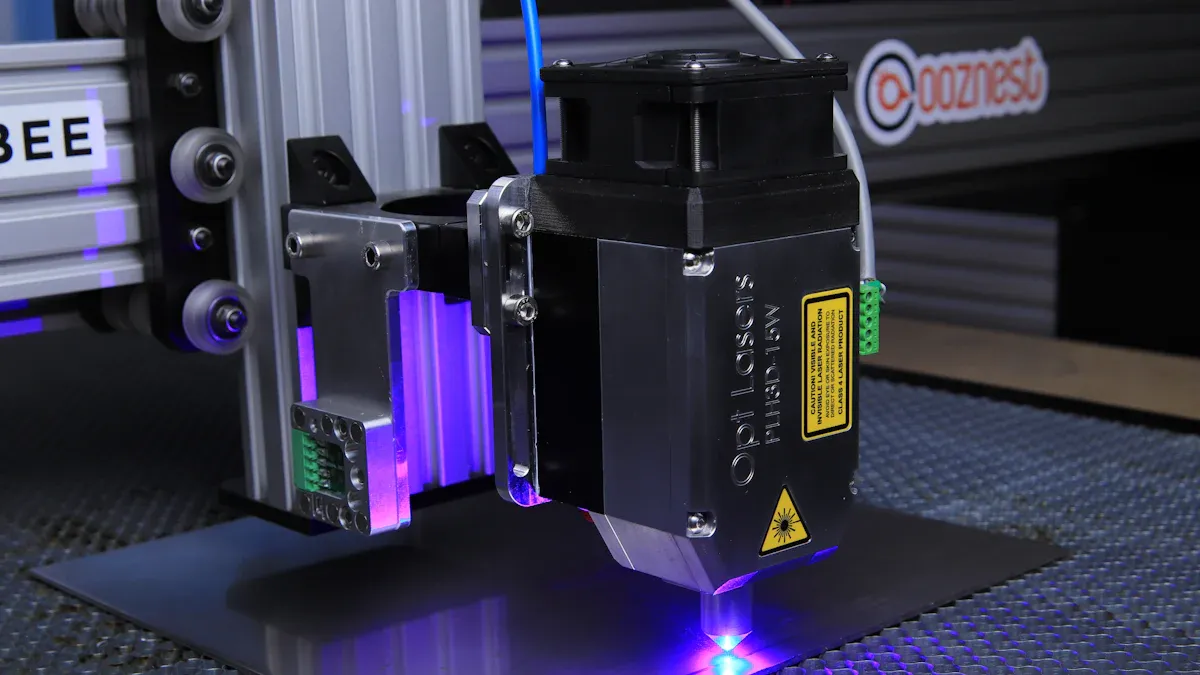
- A method to apply the code (laser engraver or adhesive vinyl)
- Frame hardware or a base
QR Code Ideas 💡 Many free online generators let you create a QR code that links to almost anything. You can direct people to a website, an image gallery, a PDF document, or even your Wi-Fi network for guests.
Step-by-Step Guide
Let’s create your interactive art piece.
- Generate Your QR Code: Use a free online QR code generator. Choose what you want to link to, like a YouTube video or a Google Photos album. The tool will create a unique image file for you.
- Prepare Your Acrylic: Make sure your acrylic sheet is clean and free of dust. This ensures your code will be applied smoothly and scan correctly.
- Apply the Code: For the best results, you can have your QR code laser engraved onto the acrylic. This creates a precise and permanent design that is easy to scan. Alternatively, you can print your code onto high-quality adhesive vinyl and apply it carefully.
- Display Your Frame: Mount your finished piece on the wall or place it in a stand. Your interactive art is now ready. You have created one of the most modern and unique designs for your home, connecting your physical space to your digital memories.
You have seen the amazing range of unique designs for DIY acrylic frames. These projects show how versatile acrylic is. You can create everything from organic botanical frames to interactive QR code acrylic picture frames. You now have the inspiration for affordable diy acrylic frames. You can craft a unique piece of art that is truly frame worthy. These unique designs go beyond anything you can buy in a store. Your new acrylic frame will be frame worthy.
What are you waiting for? Choose your favorite of these DIY projects and start your acrylic craft today. We would love to see your creations!
FAQ
What is the best way to clean acrylic without scratching it?
You should use a soft microfiber cloth with mild soapy water. Gently wipe the surface to remove dust and smudges. Avoid using paper towels or harsh chemicals like ammonia. These can easily scratch or cloud your acrylic projects.
Can I cut acrylic sheets at home for my projects?
Yes, you can cut thinner acrylic sheets at home. Use a scoring knife to make a deep line, then snap the sheet over a hard edge. For thicker sheets or complex shapes, a power saw with a fine-toothed blade works best.
Where can I find ideas for more acrylic projects?
You can find inspiration everywhere! This tutorial offers great starting points. You can also look at home decor magazines or online craft communities. Many artists share their unique projects, giving you fresh ideas for your next craft.
What kind of glue should I use for acrylic?
💡 For the strongest and cleanest bond, you should use acrylic cement. This solvent-based adhesive chemically welds the pieces together. It creates a nearly invisible seam. For simpler projects, a strong, clear super glue can also work well.
See Also
Ten Ingenious Home Decor Ideas Using Compact Acrylic Trays
Elevate Your Decor: Ten Chic Applications for Acrylic Serving Trays
Exploring Circular Acrylic Tray Designs and Their Versatile Applications
Innovative Display Solutions: Acrylic Tabletop Stands for Showcasing Items
Your Comprehensive Handbook to Mastering Acrylic Table Display Stands

