

You perfected a single DIY box. Now, you are ready to scale up and mass produce your design. You picked a great time for this project. The acrylic box market is expanding rapidly, with a projected 4.90% annual growth rate. This guide contains essential tips for first-time diyers. It breaks the process down into five core stages.
- Design & Templating
- Sourcing Materials
- How to Cut Panels
- Assembly
- Finishing & QC
A Step-by-Step Tutorial: Design & Templating
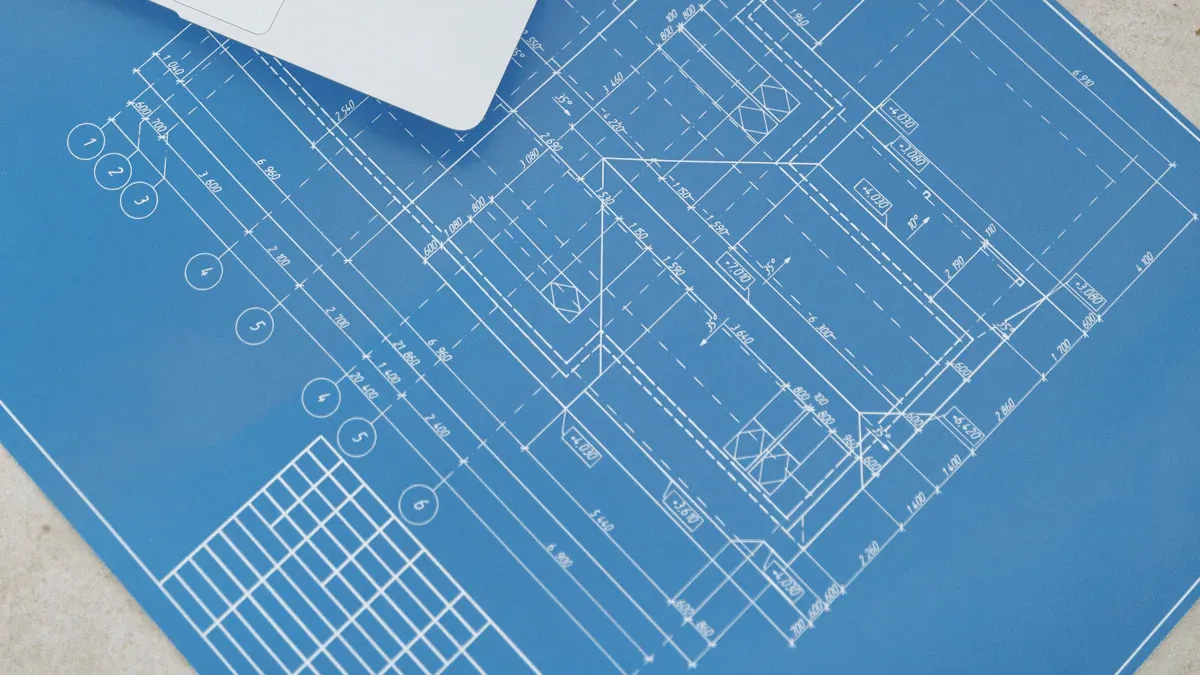
Your design is the foundation of your project. This step-by-step tutorial shows you how to create a blueprint that is ready for mass production. A smart design saves you time, material, and money.
Optimizing Designs for Efficient Production
You should simplify your box design first. Minimalist designs use less material and reduce production time. One great simplification is using interlocking tabs, or finger joints. These tabs allow panels to snap together, which speeds up assembly. For a tight press-fit, you must account for the laser’s “kerf.” Kerf is the tiny groove the laser makes during cutting. A common starting kerf value is 0.007 inches. Adjusting this value helps you achieve the perfect friction fit for your acrylic parts.
Creating a Precise Digital Vector File
Laser cutters need a specific type of file to work. You must create a vector file, like an SVG or DXF, using software such as Inkscape or Fusion 360. These files tell the machine exactly where to cut.
Pro Tip: Avoid Common File Errors To ensure a clean cut, always check your design file for these issues:
- Open Paths: All shapes must be fully closed.
- Duplicate Lines: Remove any overlapping lines to prevent the laser from cutting the same spot twice.
- Text: Convert all text into outlines or shapes.
Adapting for a DIY Acrylic Donation Box
You can easily adapt a basic design for a specific purpose. For a diy acrylic donation box, you need to add a few features. Add a slot to the top panel. A standard slot size is 4 inches long by 0.25 inches wide. This size accepts bills and coins easily. For security, you can modify the design to include a hinged lid with a cam lock. This makes your diy acrylic donation box both functional and secure. This simple diy project is a great way to practice your design skills.
Sourcing Bulk Acrylic Sheets
Selecting the right material is a critical step for your production run. Your choice of acrylic and supplier directly impacts your costs, product quality, and manufacturing efficiency. This section guides you through sourcing bulk acrylic sheets like a pro.
Choosing the Right Acrylic Type
You have two main types of acrylic to consider: cast and extruded. Cast acrylic is harder, more scratch-resistant, and produces a beautiful frosty-white finish when laser engraved. Extruded acrylic is less expensive and more dimensionally consistent. However, it is softer and can melt during machining. For a high-quality laser-cut box, cast acrylic is the superior choice.
Pro Tip: Material Thickness For small boxes, a thickness of 1/8 inch (3mm) offers a great balance of durability and cost. This thickness is sturdy enough for most applications without being overly expensive.
While cast acrylic can cost 30-50% more than extruded acrylic, its performance benefits often justify the price. See how the two types of acrylic compare:
| Feature | Cast Acrylic | Extruded Acrylic |
|---|---|---|
| Laser Engraving | Preferred; frosty look | Less desirable; clear mark |
| Strength | Harder, high impact resistance | Softer, less impact resistant |
| Scratch Resistance | More scratch resistant | Less scratch resistant |
| Chemical Resistance | Better chemical resistance | Good chemical resistance |
Finding and Vetting Bulk Suppliers
You can find bulk suppliers online with a quick search. Companies like Piedmont Plastics and Professional Plastics are major distributors in North America. When you contact a supplier, always request material samples. This lets you test the acrylic with your laser cutter before committing to a large order.
Negotiating price is key to lowering your per-unit cost. Your purchase volume is your biggest advantage. Let suppliers know your estimated annual need to show your potential as a long-term customer. Do not just focus on the price per sheet. Consider the Total Cost of Ownership (TCO), which includes shipping fees and material quality. A slightly more expensive acrylic that cuts cleanly and reduces errors can save you money in the long run. Always ask for bulk discounts to ensure you get the best possible price for your acrylic box project.
Selecting Your Production Method
You have a great design and your materials are ready. Now you must choose how to cut and prepare the acrylic panels. Your choice of cutting method depends on your budget, desired quality, and production volume. Each method offers unique advantages for your project.
DIY Cutting: Score-and-Snap Method
The score-and-snap method is a low-cost option for your first diy project. You use a special scoring tool to create a deep scratch in the acrylic. Then, you snap the sheet along the line. This technique works best for straight cuts on thin material.
- This method is ideal for acrylic sheets between 1mm and 3mm (1/8 inch) thick.
- You can cut 4mm sheets, but this requires more effort and scoring passes.
- This method is not recommended for acrylic thicker than 4mm due to the high risk of cracking.
Laser Cutting for Speed and Precision
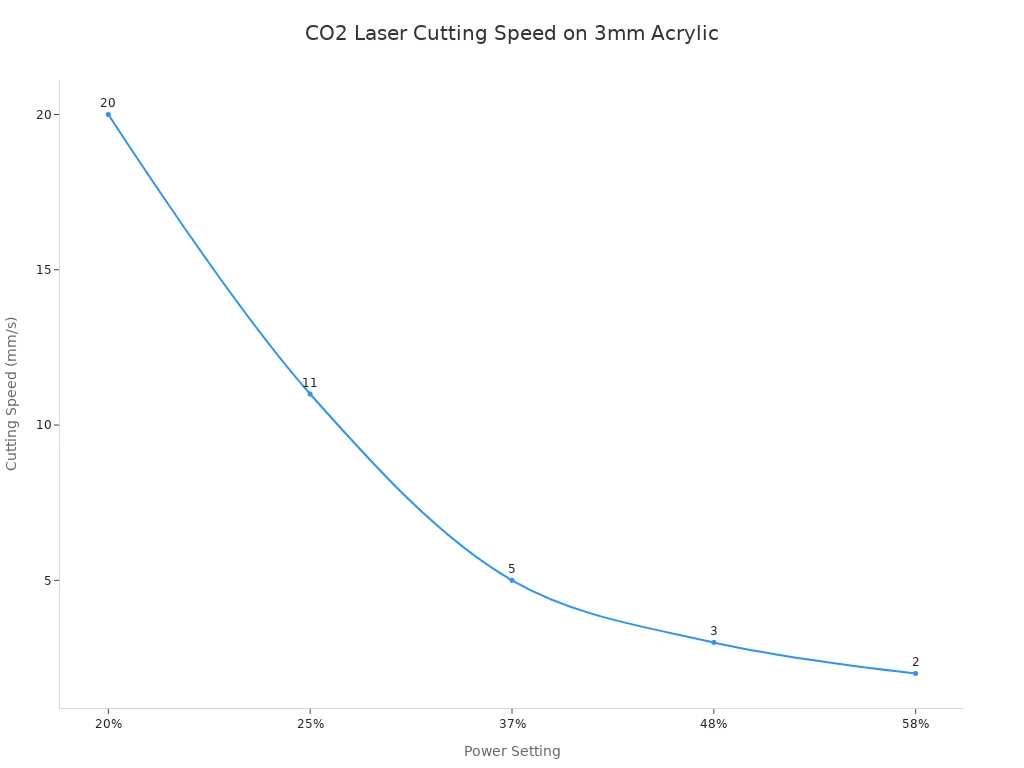
Laser cutting offers incredible speed and precision. A laser cutter follows your vector file exactly, producing perfect parts every time. This is the best method for complex shapes and interlocking joints. You can rent time on a commercial laser cutter for around $13-$20 per hour. Some makerspaces charge by the minute. A laser produces a beautiful, flame-polished edge on the acrylic. The speed of cutting the acrylic depends on the laser’s power.
CNC Routing for Thicker Materials
A CNC router is another excellent option for cutting acrylic. It uses a spinning bit to cut the material. This method is great for thicker sheets where a laser might struggle. You must use the right bit, like a single O-flute bit, to prevent the plastic from melting. A CNC router leaves a crisp, matte edge finish.
| Feature | Laser Cutting | CNC Routing |
|---|---|---|
| Edge Finish | Smooth, flame-polished | Crisp, matte edge |
| Post-processing | Usually none needed | May require sanding |
Streamlining Assembly to Mass Produce

A consistent assembly process is vital when you mass produce any product. Cutting perfect panels is only half the battle. You need a repeatable system for putting everything together quickly and accurately. This section covers the tools and techniques for professional-level assembly.
Building an Assembly Jig System
An assembly jig is a custom-made guide that holds your box panels in the correct position for bonding. Using a jig is the secret to making every box identical. You can create a highly accurate jig using a CNC-machined acrylic template. This makes your jig lightweight and precise.
Jig Assembly Tips 💡
- Use heavy metal blocks to press panels against your jig. This ensures perfect 90-degree angles.
- Tape intricate pieces to a card to hold them steady while the glue sets.
- A well-designed jig dramatically speeds up your workflow to mass produce your acrylic box.
Efficient Solvent Bonding Techniques
Solvent cement is the best choice for bonding acrylic. It works by chemically melting the surfaces of the acrylic, creating a strong, seamless weld as it evaporates. This method is much stronger than using regular glue. When you are assembling the box, you must choose the right solvent. Weld-On 3 and Weld-On 4 are popular choices. They have been reformulated to be safer without harmful chemicals.
| Feature | Weld-On 3 | Weld-On 4 |
|---|---|---|
| Flammability | Non-flammable | Somewhat flammable |
| Blush Resistance | May sometimes blush | Less likely to blush |
| Open Time | Shorter (faster set) | Longer (slower set) |
Adding Hardware like Hinges
Adding hardware like hinges and locks is the final step. You must attach them correctly to avoid damaging the acrylic. If you use screws, always drill oversized holes. This allows the acrylic to expand and contract with temperature changes. Use pan head screws instead of countersunk ones to prevent stress cracks. Alternatively, you can use a structural silicone adhesive. This creates a strong bond without drilling. Mechanical attachments are generally more durable, so choose the best method for your specific box design. This final touch is critical when you mass produce a quality product.
Finishing and Quality Control
You are now in the final stage of production. This is where you ensure every box meets your high standards. A good finishing and quality control (QC) process guarantees a professional product that customers will love. This step is essential when you make display boxes.
Creating a QC Checklist
A quality control checklist is your best tool for consistency. You should inspect every box before it is ready for sale. Your checklist ensures each product is perfect. This simple step saves you from costly mistakes and unhappy customers.
Your QC Checklist Should Include:
- Dimension Check: Does the box match the design specifications?
- Surface Inspection: Are there any scratches, chips, or glue marks on the acrylic?
- Joint Strength: Are all seams strong and fully bonded?
- Hardware Function: Do hinges and locks work smoothly?
Finishing for a Museum Quality Acrylic Display Box
A flawless finish separates a good box from a great one. You can achieve a professional look with a few techniques. Flame polishing is one method to create beautiful, clear edges on your acrylic box.
- First, prepare the acrylic edge by removing any saw marks.
- Use a hydrogen-oxygen torch to create a fine blue flame.
- Pass the flame quickly and evenly across the edge.
- This melts the surface just enough to smooth out imperfections.
Scratches can happen during assembly. You can easily remove them. Use an abrasive acrylic polish like Novus No. 2. Apply the polish with a clean, soft rag. Rub the area with consistent pressure in a circular motion until the scratch disappears. This final polish will give you a museum quality acrylic display box. A perfect finish makes your final product look stunning.
You now have the blueprint to scale your diy project. The five steps are Design, Source, Cut, Assemble, and Finish. A systematic plan helps you avoid errors, ensuring every cut is precise. Companies in aerospace and medicine used these principles to mass produce their products. Now, you can cut with confidence and build your perfect box. Start your production run today!
PREGUNTAS FRECUENTES
What is the best glue for acrylic boxes?
You should use solvent cement instead of regular glue. It chemically welds the acrylic pieces together. This process creates a very strong and nearly invisible bond. Weld-On 3 and Weld-On 4 are popular and effective choices for your project.
How can I prevent my acrylic from cracking?
You can prevent cracks by drilling oversized holes for screws. This gives the acrylic space to expand and contract with temperature changes. You should also use pan head screws instead of countersunk screws to reduce stress on the material.
What is the most common mistake for beginners?
The most common mistake is an inaccurate design file. A flawed vector file causes cutting errors, wasted material, and assembly problems.
Remember: Always double-check your digital file for open paths and duplicate lines before you send it to the cutter.
Can I use materials other than acrylic?
Yes, you can use other plastics. Polycarbonate is a stronger, more impact-resistant alternative. However, it is more expensive and does not laser cut as cleanly as cast acrylic. You should always test new materials before starting a large production run.
See Also
Top Multi-Purpose Circular Acrylic Serving Trays for 2025 Gatherings
Acrylic Boxes and Cases: Understanding Their Design, Uses, and Structure
Your Comprehensive Handbook to Selecting the Perfect Acrylic Table Stands
Effortless Coffee Table Choices: A Designer’s Simple Selection Handbook
Choosing and Maintaining White Acrylic Trays: A Complete Care Guide

