
You can create a compliant 2×2 photo for your passport right from home. This guide answers how to take a passport photo and how to take a passport photo with an iPhone or Android. You will save time and money on your passport application. Retailers charge a fee for a passport-size photo.
| Retailer | Cost (for two printed copies) |
|---|---|
| Walgreens | $14.99 |
| CVS | $16.99 |
Knowing how to take a passport photo at home and how to create a passport-size photo is a useful skill. This guide on how to take a passport size photo on mobile makes your passport renewal easier.
Understand Official Photo Rules
Your passport photo must follow strict government rules. You need to submit a color photo taken within the last six months. This ensures the photo accurately shows your current appearance. Following the official us passport photo requirements is the most important step for a successful passport application.
Size and Resolution
Your final image must meet specific size and quality standards. A physical passport photo is a 2×2 photo, which measures 2 x 2 inches (51 x 51 mm). Your head size, from chin to the top of your hair, must be between 1 and 1 3/8 inches.
For online submissions, your digital file has its own rules.
- Dimensions: The image must be a perfect square. The pixel size should be at least 600×600.
- File Format: You must save the file as a JPEG (
.jpg). - File Size: The final file size must be between 54 kilobytes and 10 megabytes.
Background Requirements
The background for your passport photo is very important. You must use a plain white or off-white background. It cannot have any patterns, textures, or shadows.
Quick Background Check: ✅ Is the background completely plain white or off-white? ✅ Are there no shadows on you or the wall? ✅ Are there no other people or objects in the picture?
To avoid shadows, stand a few feet away from the wall. This simple trick helps create a clean background for your passport.
Pose and Expression
Your pose helps facial recognition technology identify you. You must face the camera directly with both eyes open. A neutral expression or a slight, closed-mouth smile is required for your passport.
| Aspect | Requirement |
|---|---|
| Face | Face the camera directly. |
| Head | Do not tilt your head. |
| Eyes | Keep both eyes open and visible. |
| Expression | Use a neutral look or a gentle smile. |
Clothing and Accessories
What you wear in your passport photo matters. You should wear normal, everyday clothing. Do not wear uniforms or camouflage. Avoid wearing white or light-colored shirts that could blend into the background. The correct clothing helps create a valid passport-size photo. You cannot wear glasses, hats, or headphones in your passport photo. You may only wear a head covering for religious reasons. The size of your head must still be visible.
Set Up Your Photo Space

Creating the right environment is a key part of how to take a passport photo at home. You need a space with good lighting and a simple background. This setup ensures your final passport photo is clear and compliant. A proper setup will help you get a valid passport.
Find Bright, Natural Light
Good lighting is the most important factor for a quality passport photo. You should use bright, natural light from a window. Avoid using your camera’s flash. Overcast days are excellent for this, as clouds diffuse the sunlight and create soft, even light. This type of light reduces the appearance of blemishes and wrinkles.
Lighting Pro-Tip: 💡 Face the brightest light source in the room, like a large window. This provides flattering illumination on your face. It also minimizes shadows under your nose and chin for your passport. Midday can be a good time to shoot if you are in a shaded area away from direct sun.
Prepare a Plain Background
Your passport photo requires a plain white or off-white background. You can easily create this at home. Look for household items to use for your passport background.
- A plain white wall without any pictures or decor.
- A white poster board or foam core board.
- A smooth, wrinkle-free white bedsheet or tablecloth.
To prevent shadows on the background, you should stand about 5 to 6 feet from the wall. This distance ensures your shadow does not reach the background, which is a common reason for a passport photo rejection.
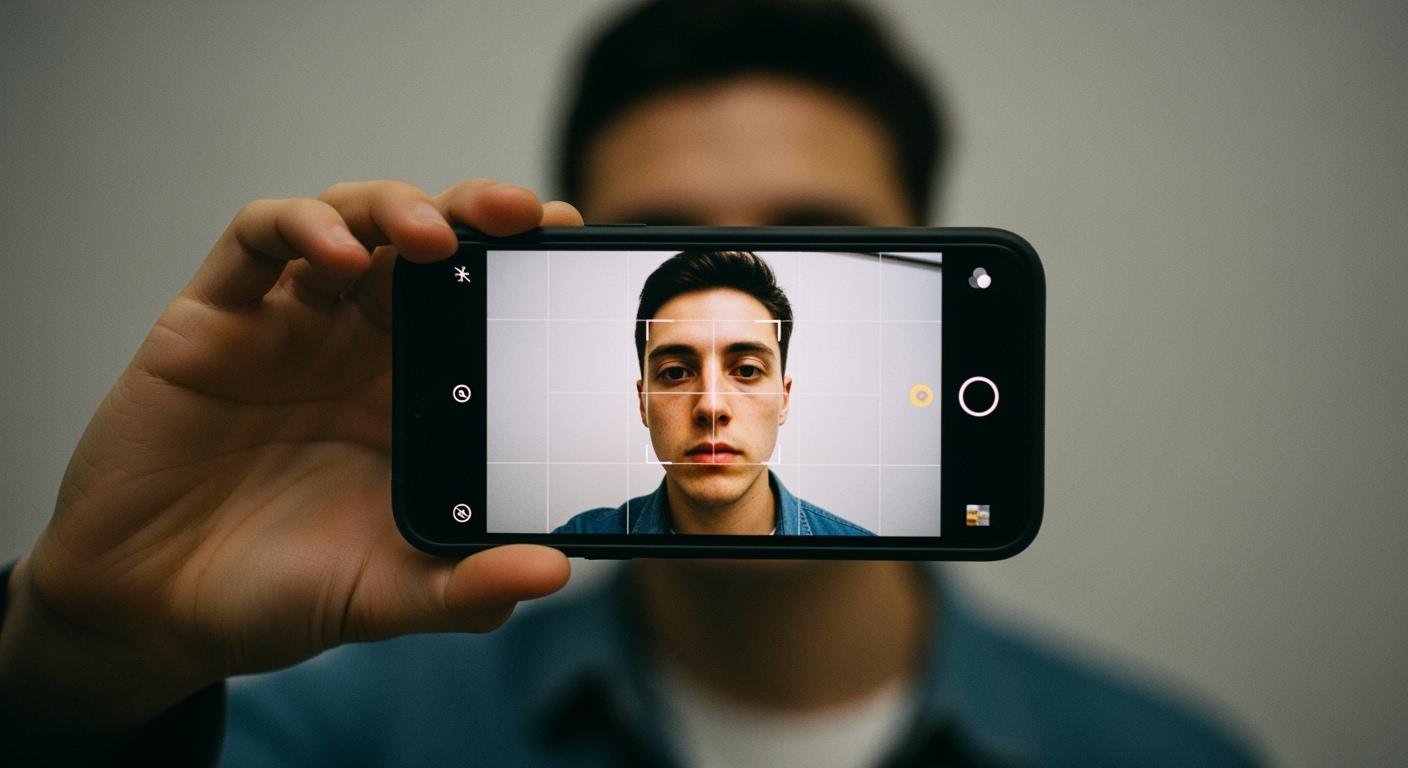
Position Your Smartphone
Proper phone placement is the final step in knowing how to click passport-size photos. You need a steady camera to avoid a blurry passport picture. If you do not have a tripod, you can place your phone on a stable object. Use a stack of books on a table or lean your phone against a computer monitor. Make sure the camera is at the same level as your face.
The distance between you and the camera is also critical for your passport. Stand between 3 and 7 feet away from your phone. This range prevents facial distortion and gives you enough space in the frame for cropping later. Taking a good photo is essential for your passport.
Create a Compliant 2×2 Photo
You are now ready to take your picture. This part of the guide covers how to take a passport photo that meets official standards. Following these steps helps you create a valid photo for your passport application. Before you start, wipe your phone’s camera lens with a soft cloth for a clear, sharp image.
Use the Rear Camera
You should always use your phone’s rear camera for your passport photo. The rear camera has a much higher quality than the front-facing “selfie” camera. This ensures your final image is crisp and detailed. For Android users, a camera with at least 5 megapixels will produce a good quality passport picture.
Avoid Selfie Distortion! 🤳 Taking a selfie from a close distance (around 15-20 inches) can distort your facial features. This is a common mistake that leads to a rejected passport. A greater distance prevents this issue.
Frame Your Head and Shoulders
Proper framing is essential for a compliant passport. Your photo must show your full head, from the top of your hair to the bottom of your chin. You should also include your upper shoulders. Center your head in the frame. Your head, including your hair, should take up between 50% and 69% of the total image height. This leaves enough space for cropping into a perfect 2×2 photo later.
Look Directly at the Lens
Your position and expression are critical for your passport. You must look straight into the camera lens. Keep your head level and do not tilt it. Your eyes must be open and clearly visible. Maintain a neutral expression or a slight, natural smile with your mouth closed. This is a key step in how to click passport-size photos correctly for your passport.
Take Multiple Options
You should take several photos to have options. This increases your chances of getting a perfect shot for your passport. Ask a friend to help or use a tripod with a self-timer. This keeps the phone steady and prevents blurry pictures. Review the photos and choose the one that best meets all the passport requirements. A good selection ensures you have a great passport-size photo ready for the next step.
Format Your Photo with an App
You have a great picture. Now you need to format it correctly for your passport. Using a dedicated app is the easiest and most reliable way to guarantee your photo meets all government rules. These tools handle the technical details for you.
Choose a Photo Tool
Many excellent online tools and apps can format your passport photo. They automatically check for compliance issues. This step is the key to how to create a passport-size photo without errors. You can choose from several reliable options:
- CapCut Desktop Editor: A great tool for precise editing and cropping to the exact size.
- Slazzer Mobile App: Uses AI to create a professional-quality passport photo on your phone.
- Cutout.pro Photomaker: An online tool that removes backgrounds and enhances your image.
These tools ensure your photo has the correct head size and background for your passport application.
Upload and Auto-Format
The process is simple. You upload your best photo to the tool you chose. The software then automatically crops the image to the correct size and verifies compliance. While you can manually crop a photo, it is very risky.
Manual Cropping Dangers ⚠️ Manually changing the photo size can lead to instant rejection. Common mistakes include incorrect head positioning, cutting off your shoulders, or failing to create the exact 2×2 photo size. A specialized tool prevents these issues for your passport.
The app ensures your head size is correct, which is a critical rule for every passport.
Save the Digital File
After the app formats your photo, you can save the digital file. For online passport submissions, you must follow specific file requirements. The image must be a perfect square with a minimum size of 600×600 pixels. The final file size should be small enough for upload. Most passport agencies require a JPEG file.
| Feature | JPEG | PNG | HEIC |
|---|---|---|---|
| Resolution | 600×600 pixels | 600×600 pixels | 600×600 pixels |
| File Size Limit | Small, usually compliant | Larger, may need resizing | Smallest, high quality |
| Compatibility | Universally accepted | Accepted sometimes | Not always recognized |
Always save your final passport-size photo as a JPEG to ensure it will be accepted. You now have a compliant digital file ready for your passport.
You now have a compliant digital file ready for your passport. You can upload this file directly for an online passport application. For a physical passport-size photo, you can create a 4×6 template to print your passport photo for under a dollar. Creating your passport-size photo at home is reliable.
Printing Tip 🖨️ Some tools can help you create a 4×6 template with multiple copies of your 2×2 photo. This makes printing at a local store easy and very affordable for your passport.
Services even guarantee a 100% acceptance rate for your passport, ensuring your passport application is successful. This DIY method saves you time and money on your next passport. Your passport journey just got easier.
PREGUNTAS FRECUENTES
Can I wear glasses in my passport photo?
No, you must remove your glasses for your passport photo. This rule applies even if you wear them daily. Your eyes must be clearly visible without any glare or reflections from lenses. This ensures facial recognition systems can identify you correctly.
Can I smile in my passport photo?
You can have a slight, natural smile. However, a broad smile or showing your teeth is not allowed. Your expression should be neutral with your mouth closed.
Expression Tip 😊 Aim for a relaxed, friendly look. A neutral expression ensures your photo meets the official government requirements for your passport.
How do I print my 2×2 photo?
You can print your photo at most drugstores or retail chains.
- Save your 2×2 photo to your phone or a USB drive.
- Use the store’s photo kiosk to print it as a 4×6 inch photo.
- You can often fit two 2×2 photos on one 4×6 print.
What if my photo gets rejected?
If your photo is rejected, the passport agency will tell you why. You must take a new photo that fixes the specific problem. Using a recommended app helps prevent rejection by checking for compliance issues like background, head size, and lighting.
See Also
Your Comprehensive Handbook to Mastering Acrylic Table Stand Displays
A Complete Guide to Choosing and Caring for White Acrylic Trays
Effortless Coffee Table Selection: A Designer’s Simple Guide to Perfection
Ten Ingenious Ideas for Styling Your Small Acrylic Trays at Home
Exploring Round Acrylic Tray Designs and Their Many Practical Applications

