
You can definitely use command strips for your acrylic items. You are part of a growing trend, as the market for damage-free hanging solutions continues to expand.
| Metric | Value |
|---|---|
| Market Value (2024) | US$2.9 Billion |
| Projected Market Value (2030) | US$4.4 Billion |
| CAGR (2024-2030) | 7.1% |
The secret to a strong bond on acrylic involves three simple steps: proper cleaning, a specific application method, and full curing time. This guide gives you the exact process for a secure hold on your new acrylic wall art.
Choosing the Right Command Strips
Not all strips are created equal. Your success starts with choosing the right product for the job. The good news is that the adhesive in Command Strips is a perfect match for your acrylic items. They use a special type of adhesive called VHB™, or Very High Bond.
This adhesive has a unique acrylic chemistry. It is extremely durable and creates a strong bond with the smooth surface of your acrylic. The closed-cell acrylic foam core also helps create a seal against moisture. This makes the bond reliable over time. Selecting the correct strips ensures you get the best performance from this powerful adhesive.
Match Strip to Item Weight
You must check the weight of your acrylic item before you buy your strips. Each package of command strips clearly states its maximum weight capacity. Exceeding this limit is a recipe for disaster. An overloaded strip can fail suddenly, even months after you hang the item, causing your decor to fall and break.
Always choose a strip rated for more weight than your item. This gives you a safety margin.
Pro Tip: If your item is close to the maximum weight limit of one set of strips, use an extra set to distribute the load and ensure a secure hold.
Here is a general guide for common strip sizes:
| Strip Size | Weight Capacity (per set) |
|---|---|
| Small | 1 pound |
| Medium | 3 pounds |
| Large | 4 pounds |
Select Strips for Smooth Surfaces
Your acrylic sign or frame has a perfectly smooth, non-porous surface. This is ideal for adhesion. Smooth surfaces allow the adhesive to make full contact, creating a strong and stable bond. In contrast, adhesives struggle to stick to rough or textured walls because there are too many gaps for air to get in.
VHB acrylic adhesives are designed for superior long-term performance on non-porous materials like plastic and glass. This makes them a much better choice for an acrylic project than standard rubber-based adhesives, which work better on porous items like cardboard. Always use strips intended for smooth surfaces to get a reliable grip on your acrylic.
Preparing Your Acrylic Surface
A clean surface is the foundation of a strong bond. You must prepare both the wall and your acrylic item correctly. This step removes any dust, oils, or residues that could prevent the adhesive from making full contact.
Clean with Isopropyl Alcohol
First, you need to clean the intended spot on your wall. You also need to clean the back of your acrylic frame or sign. Use a clean cloth lightly dampened with isopropyl alcohol for this job.
Why Isopropyl Alcohol? While studies show its limits for full medical sterilization, 70% isopropyl alcohol is excellent for surface prep. It effectively removes oils and contaminants. It also evaporates quickly, which leaves a perfectly clean and dry surface ready for adhesion. Just remember that it is flammable.
Gently wipe both surfaces and wait at least one minute. You must let the alcohol dry completely before moving to the next step. Do not touch the cleaned areas with your fingers.
Mark Your Placement
You should always measure twice and stick once. Planning your placement prevents crooked results and the need to reposition your item.
Use simple tools for perfect alignment:
- Measuring Tape: Measure from the floor or ceiling to get the correct height.
- Bubble Level: A level ensures your acrylic art will hang perfectly straight.
- Painter’s Tape: You can use this to create a temporary outline on the wall without causing damage.
To mark the exact spot, you can use a light pencil mark or a special non-permanent marker. Certain markers work very well on smooth surfaces and are easy to remove. For example, a Bistro Chalk Marker wipes away with a dry towel. This makes it easy to adjust the placement for your new piece of acrylic.
Applying Strips for a Perfect Hold
You have prepared your surfaces. Now you will apply the strips correctly. This method ensures the strongest possible bond for your acrylic decor.
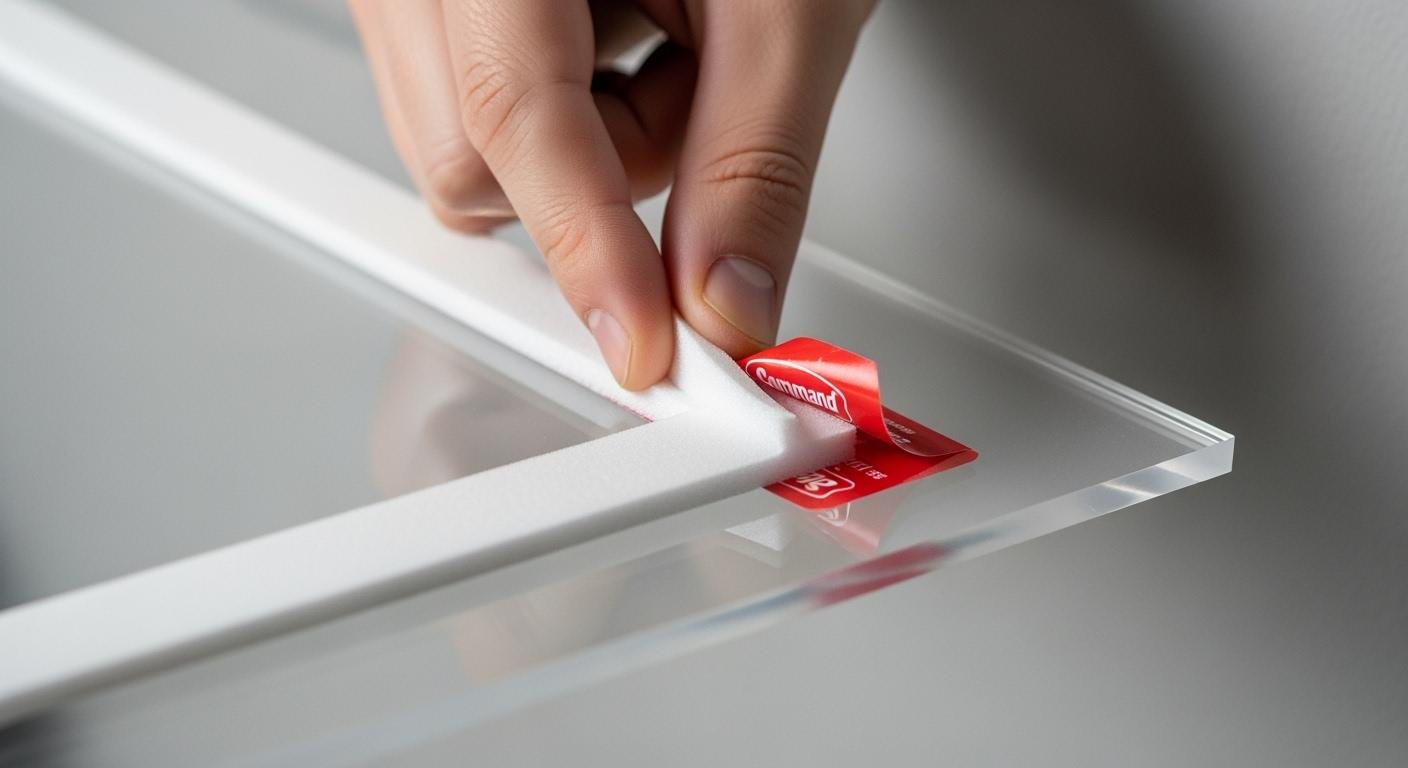
Attach Strips to the Acrylic
First, you need to pair up your strips. Take two strips and press the hook-and-loop sides together until you hear a distinct click. This sound confirms they are locked together. Repeat this for each pair you plan to use.
Next, follow these steps:
- Peel the paper liner from one side of a paired strip.
- Press this sticky side firmly onto the back of your acrylic item.
- Apply one pair of strips to each top corner. Add more pairs for heavier items as needed.
- Press each strip firmly against the acrylic for 30 seconds.
Press the Item to the Wall
Now you are ready to mount your item. Remove the remaining paper liners from the strips attached to your acrylic. Carefully position your item over the guide marks you made on the wall.
Press the entire item firmly against the wall. You should apply even pressure of about 15 PSI. This is similar to the force of a strong hand press. Hold this pressure for at least 30 seconds. This action activates the adhesive. It allows the glue to “wet out” and make full contact with the wall surface.
Reinforce the Adhesive Bond
This final step is the most important one for a secure hold. You must reinforce the adhesive bond directly with the wall.
Gently peel your acrylic item away from the wall. Pull from the bottom corners and lift upwards. The strips on the wall should separate from the strips on your item. Now, press each strip that is on the wall with your thumb for another 30 seconds. Rubbing the pads for this duration is an extremely important step. It gives the adhesive sufficient time to set and build a strong grip.
CRITICAL STEP: Wait 24 Hours You must wait a full 24 hours before hanging your acrylic wall art. This waiting period allows the adhesive on the command strips to cure and reach its maximum strength. Skipping this step is the most common reason for failure. After 24 hours, you can reattach your acrylic by lining up the strips and clicking them firmly into place.
You now have the secret to a perfect hold. Following these steps removes all guesswork from hanging your acrylic decor.
Your Success Checklist:
- Choose the right strips for weight and surface.
- Clean the acrylic with alcohol.
- Use the press-and-reinforce method.
- Wait the full 24 hours.
These steps guarantee your command strips will work flawlessly. You can confidently create a beautiful gallery wall with your new acrylic wall art. Get ready to transform your space without any damage.
PREGUNTAS FRECUENTES
Can I remove Command Strips from acrylic without damage?
Yes. You can safely remove the strips from your acrylic. To do this, pull the exposed tab slowly and straight down against the wall. The strip stretches and releases. This process will not leave residue or damage your acrylic item.
Are Command Strips reusable?
The adhesive strips are for one-time use only. You cannot reuse them after removal. However, you can purchase Command™ Refill Strips. This allows you to hang your acrylic item again using the same secure method.
Does temperature or humidity affect the bond?
Yes, both factors are important. You should apply the strips in temperatures between 50°F and 105°F (10°C to 40°C). High humidity can weaken the adhesive. You should use Command™ Bath Strips for steamy rooms like bathrooms.
What can I use if I don’t have isopropyl alcohol?
Isopropyl alcohol is the best choice for cleaning. If you do not have it, you can use a cloth with mild soap and water. You must rinse the surface and let it dry completely. Any moisture will prevent a strong bond.
Remember: A clean, dry surface is essential for success! ✨
See Also
Choosing and Caring for White Acrylic Trays: A Complete Guide
Debunking Acrylic Tray Myths: Simple DIY Projects for Creative Decor
Your Essential Handbook to Selecting and Using Acrylic Table Stands
Transform Your Home: Ten Clever Styling Ideas for Small Acrylic Trays
Understanding Acrylic Blocks: Definition, Key Features, and Practical Uses

