
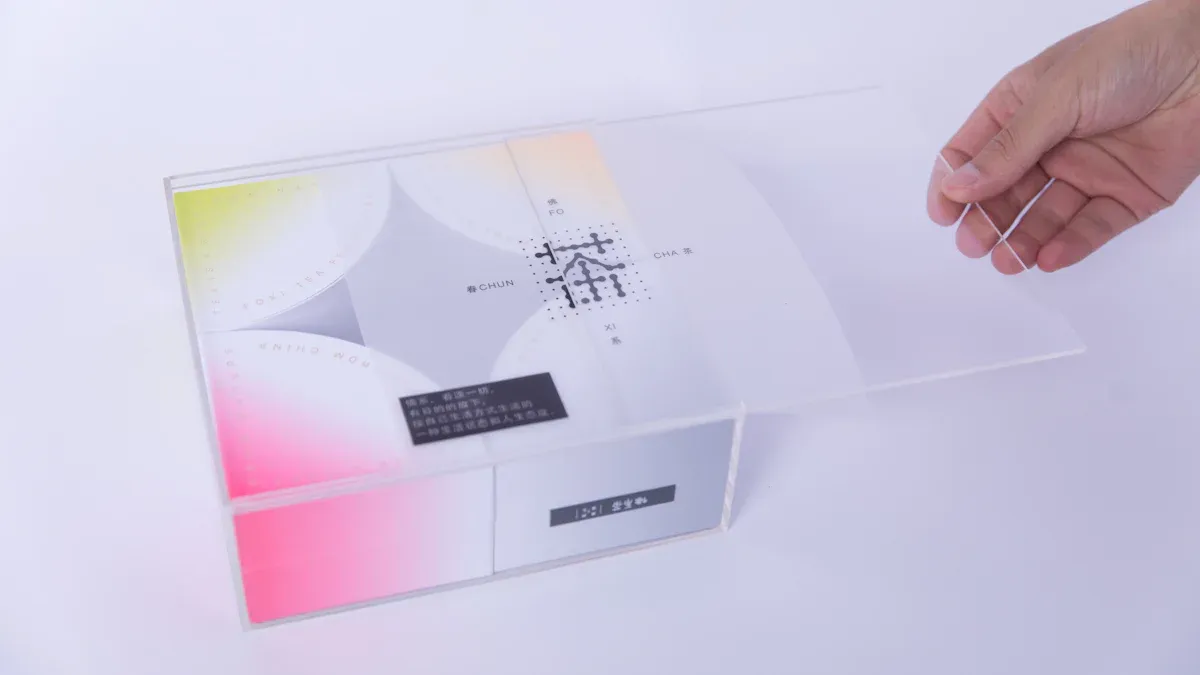
You can customize acrylic display boxes by following simple steps. First, consider what you want to showcase. Then, choose the right size, color, and features to customize acrylic display boxes that fit your needs. Many people customize acrylic display boxes for stores to highlight jewelry or electronics. Museums use them to protect art and artifacts safely. At home, you can customize acrylic display boxes for your collectibles or even as unique furniture pieces. With a few tools and some time, you can turn this DIY project into a personalized acrylic display case. If you want to learn how to make and customize acrylic display boxes for your collection or try a new DIY, these steps will help you get started. If you enjoy DIY projects, customizing acrylic display boxes can be both fun and rewarding.
Key Takeaways
- Start by deciding what you want to display and choose the right size, shape, and thickness of acrylic to protect and show off your items well.
- Pick colors and features like lids, locks, or custom printing to make your display box unique and fit your style or brand.
- Use proper tools and follow safe cutting, bonding, and polishing steps to build a strong and clear acrylic box that looks professional.
- Add special touches like logos, lighting, or secure openings to make your display stand out and keep your items safe.
- With careful planning and simple steps, you can create a custom acrylic display box that fits your needs and looks great.
Customize Acrylic Display Needs
Purpose
Think about what you want to show or protect before you start. The reason for your box changes your whole project. Do you want to keep collectibles safe at home? Maybe you need a strong acrylic display case for a store or museum. When you know why you need it, you can pick the right thickness, size, and features. If your items are fragile, you might want thicker acrylic and locks. For stores, you may want a clear box that shows off your products and gets attention. Acrylic is safer than glass, so you do not need to worry about sharp pieces if it breaks. It is also easy to clean and keeps your things looking nice.
Tip: Always make sure the box design fits your needs. A special design helps your display stand out and keeps your items safe.
Size and Shape
You have lots of choices for the size and shape of your acrylic display box. Standard sizes go from small boxes about 4 inches to big ones up to 18 inches. You can find boxes that are rectangular, cubic, or even five-sided. Some boxes have lids, bases, or special shapes for sports items or ballots. If you want something different, you can order custom display boxes in any size or shape you want.
| Feature Category | Details |
|---|---|
| Standard Size Ranges | Length, width, and height from 4 inches up to 18 inches |
| Common Shapes | Rectangular, cubic, 5-sided boxes, cubes |
| Types of Boxes | 5-sided boxes, boxes with lids (hinged, locking), display cases with bases |
| Display Styles | Floor standing, countertop, wall mount, mirrored boxes |
| Specialty Cases | Sports memorabilia, suggestion and ballot boxes |
| Customization | Custom sizes (long, slim, tall, short, small, large), custom printed graphics |
Color and Features
When you customize acrylic display boxes, you can pick from many colors and features. Clear acrylic is the most popular because you can see what is inside. You can also choose black, white, blue, green, or even special colors. Special features like sliding or hinged lids, locks, and engraved logos make your box different. Some bases look like wood, while others use bright colors. You can add custom printing or water resistance for more style and protection. These choices help you make display boxes that fit your brand or your own style.
| Category | Details and Examples |
|---|---|
| Color Options | Clear, black, white, blue, green, yellow, custom colors |
| Lid Types | Sliding lid, hinged lid, pinned lid |
| Locking Mechanisms | Cam locks (with keys), hasp locks |
| Bases | Acrylic, faux wood (mahogany, black), colored bases including fluorescent colors |
| Customization | Custom printing, engraving, custom sizes and shapes, monograms, water resistance |
With all these options, you can turn a simple diy project into a special acrylic display box that matches your ideas.
Materials for Acrylic Display Case
Acrylic Sheets
To start your diy acrylic display box, you need the right acrylic sheet. Acrylic sheets are not all the same. You want your acrylic display case to be clear and strong. Most projects use custom cut acrylic sheets between 6mm and 20mm thick. These sheets are strong and look nice. Thicker sheets, like 12mm or even 25mm, make your box stronger for heavy or special items. If you want your box to look like a museum display, cast acrylic is the clearest. You can also get custom cut acrylic sheets in many colors and finishes.
| Thickness Range | Typical Use Case | Durability and Suitability for Display Boxes |
|---|---|---|
| 1mm – 3mm | Thin sheets for indoor signage | Lightweight, flexible, less suitable for load-bearing display boxes |
| 4mm – 6mm | Acrylic barriers, sneeze guards | Balances transparency and impact resistance, minimal sagging |
| 6mm – 12mm | Shower panels, windows, skylights | Good insulation, optical clarity, and resistance to external forces |
| 8mm – 15mm | Furniture like tables and shelves | Adequate load-carrying capacity, maintains aesthetic appeal |
| 10mm – 20mm+ | Furniture, display cases | Strong enough to hold loads without bending, suitable for medium to thick display boxes |
| ≥ 25mm | Heavy-duty structures, barriers | Very durable and rigid, used in industrial or high-impact applications |
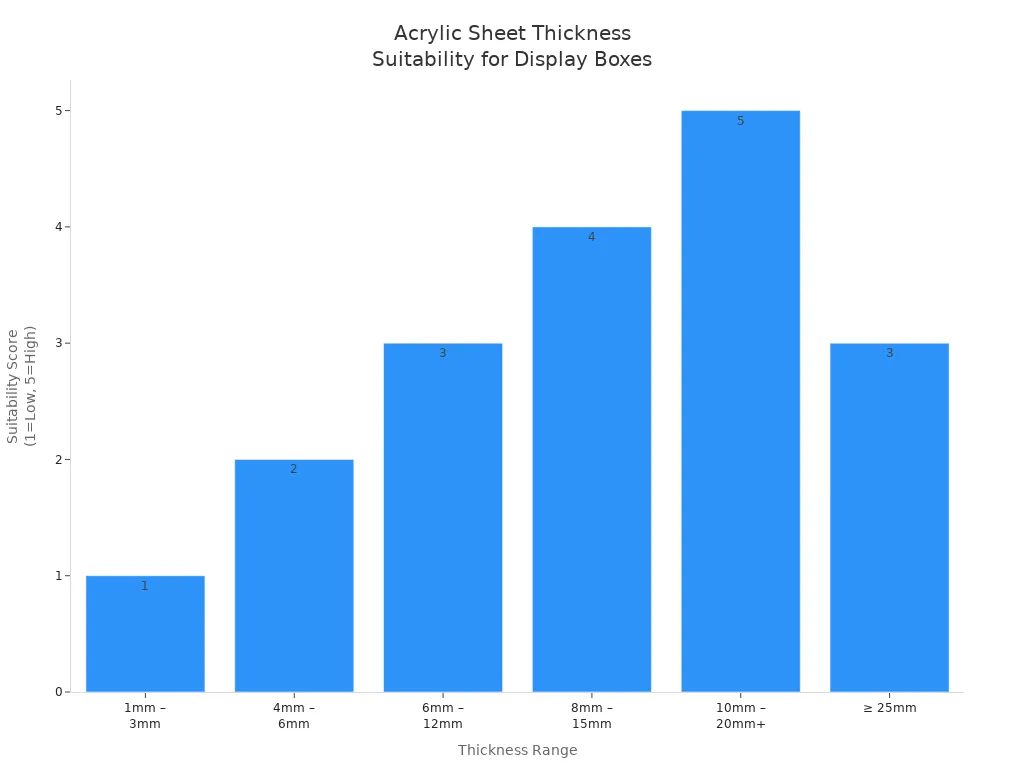
Tip: Thicker acrylic sheets last longer and keep your things safer, but the edges might not look as clear.
Tools
You do not need fancy tools to build an acrylic display box. You just need the right ones. Here is a simple list of what you need for a safe and neat build:
- Use a table saw or a utility knife to cut your acrylic sheets.
- Measure each piece with a steel scale to be exact.
- Use sandpaper to smooth sharp edges before building the box.
- Put acrylic glue on the sheets and hold them together until the glue dries.
- Polish the edges after you finish to remove scratches or glue marks.
Note: Always wear safety glasses when you cut or sand acrylic.
Sourcing
You can buy good acrylic sheets and supplies in many places. AmeriLux International works with Menards® to give you lots of choices. You can get clear, non-glare, or colored acrylic sheets for your acrylic display case. Local Menards® stores and their website have many sizes and thicknesses. If you need something special, you can order custom sizes, textures, or colors. Menards® also has guides and safety sheets to help you. If you have questions, you can ask AmeriLux International or Menards® for help.
Steps to Make an Acrylic Box
Making your own acrylic display box can feel like a big project, but you can do it if you follow the right steps. Here’s how to make an acrylic box that looks professional and fits your needs.
Design
Start with a plan. Think about what you want to display. List the items, measure their size and weight, and decide how you want them to look inside the box. You should also think about where you will put your acrylic display box. Will it sit in the sun? Will people touch it a lot? These details help you pick the right thickness and color for your acrylic.
- Write down the size and shape you need. Make sure the box is not too tight or too loose for your items.
- Choose a shape that fits your style. You can go with a simple cube, a rectangle, or even a creative geometric shape.
- Decide if you want clear, colored, or frosted acrylic. Clear acrylic shows off your items best, but colored or frosted sheets can add style.
- Plan for special features like hinges, locks, or ventilation if you need them.
- Think about how the box will fit with other displays or furniture.
You can use online tools like Pacdora to design your box. These tools let you pick a template, adjust the size, and see a 3D preview. When you finish, you can download the template and print it out. This makes the design process much easier, even if you are new to diy projects.
Tip: Always double-check your measurements before you start cutting. A small mistake can ruin your whole diy acrylic box.
Cutting
Cutting acrylic sheets takes patience and the right tools. If you want straight cuts, use a table saw with a fine-toothed blade made for plastics. For curves or special shapes, a jigsaw with a plastic blade works well. Mark your cut lines with a marker and cover them with masking tape. This protects the surface and helps you get a clean edge.
| Method | Tools Needed | Key Steps | Advantages | Disadvantages |
|---|---|---|---|---|
| Sawing | Table saw, jigsaw, fine-toothed blade, marker, masking tape, safety gear | Mark lines, tape, cut slowly, support sheet, sand edges | Precise, good for straight/curved cuts, affordable | Needs steady hand, mistakes waste material |
| Scoring | Ruler, scoring blade, clamp, safety gear | Score both sides, snap along edge | Simple, good for thin sheets | Not precise for thick sheets |
| Sanding | Sandpaper, sanding block, buffing machine | Sand edges after cutting | Smooth finish, easy tools | Time-consuming, needs care |
| Laser Cutting | Laser cutter, safety gear | Not detailed here | Very precise | Needs special equipment, safety risk |
When you cut, keep the acrylic sheet steady. Use clamps or sandwich it between boards. Move the saw slowly to avoid chipping or melting the plastic. If you cut for a long time, let the sheet cool down. After cutting, sand the edges with fine sandpaper to remove any rough spots.
Safety First: Wear safety goggles and a dust mask. Work in a well-ventilated area. Secure your acrylic so it does not move while you cut.
Bonding
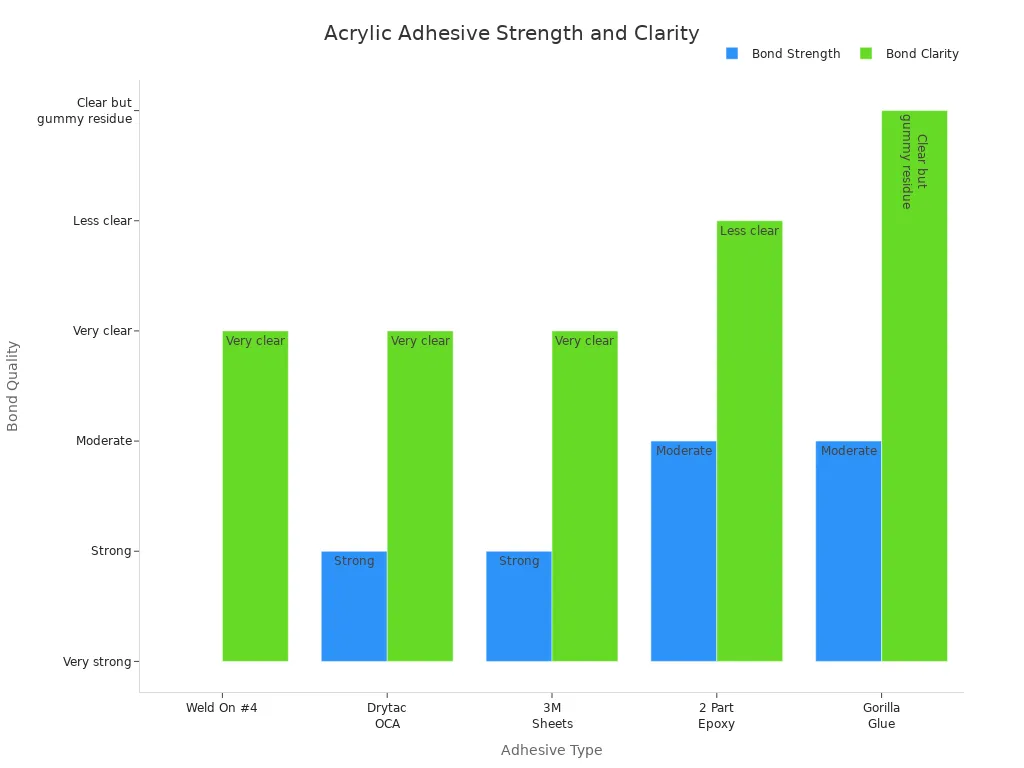
Bonding is the step where your acrylic display box starts to take shape. The best way to join acrylic panels is with a special acrylic cement like Weld On #4. This glue melts the edges together, making a strong and clear joint. You can also use pressure-sensitive adhesives like Drytac OCA or 3M sheets for a clean look.
Follow these instructions for the best results:
- Clean the edges with isopropyl alcohol. Remove all dust and grease.
- Use a fine applicator or syringe to apply a thin line of adhesive. Too much glue can cause bubbles or cloudiness.
- Hold the pieces together with clamps or masking tape. Let the glue cure as the label says.
- Work in a room with steady temperature and no direct sunlight. This helps the glue dry clear.
Tip: If you want to avoid glue, you can use special connectors or screws for a glue-free assembly. This works well for diy projects where you may want to take the box apart later.
Polishing
Polishing gives your diy acrylic box a smooth, shiny finish. Start by sanding the edges with 180-grit sandpaper. Wet the sandpaper and the acrylic to keep things cool and prevent scratches. Move to finer grits like 320 and then 600 for a glossy look.
After sanding, use a buffing wheel with a polishing compound like Red Rouge or Fabulustre. Hold the acrylic gently against the wheel and move it back and forth. If you want a glass-like edge, you can try flame polishing with a propane torch. Pass the flame quickly over the edge, but do not stay in one spot or you might melt the acrylic.
Note: Keep the protective film on your acrylic as long as possible during sanding and polishing. This keeps the main surfaces scratch-free.
Assembly
Now you get to put everything together. Remove any protective film from the inside surfaces first. Lay out all your pieces and check that they fit. Start by joining two sides, then add the rest one at a time. Use clamps or tape to hold the panels in place as you work.
If you want bent corners, you can use a heat gun to soften the acrylic and bend it over a form. This gives your box a seamless look, but it takes practice. You can also use mirrored sheets for a special effect or add features like hinges and locks.
When you finish, check all the joints. Wipe away any extra glue and polish the outside one more time. Your acrylic display box is now ready to use!
Tip: If you want to know how to make a plexiglass display case, you can follow these same steps. Plexiglass is just another name for acrylic.
Making a diy acrylic box takes time, but you can get great results if you follow these steps. With a little practice, you will know exactly how to make an acrylic box that looks just as good as a store-bought one.
Custom Acrylic Display Case Options
Logos and Graphics
You can make your display box special by adding logos or pictures. Many companies use digital UV or silk screen printing for this. They can put your logo, slogan, or colorful images right on the acrylic. You can pick clear, frosted, mirrored, or colored finishes. You can also choose a base color that matches your brand or style. If you want something unique, you can send your own digital art file for printing or engraving. This is great for stores, trade shows, or parties. You can ask for custom engraving if you want a frosted look or a design that lasts. UV printing and screen printing keep your graphics bright and sharp for a long time.
Tip: To keep your custom acrylic products looking good, ask how to clean and protect the printed surfaces.
Lighting
Lighting can make a simple box look amazing. You can add LED lights inside your custom acrylic display case. This makes your items stand out. LEDs come in many colors and brightness levels. Some have motion sensors or let you change colors with a remote. Clear or frosted acrylic spreads the light evenly, so everything inside glows softly. LED lighting looks modern, saves energy, and works indoors or outdoors. Many stores use lighted displays to get attention and help sell more. You can use non-glare or anti-reflective acrylic to keep your display easy to see under bright lights.
A well-lit display helps your logo and products stand out any time.
Special Openings
You have many ways to open your display box. Some boxes have doors that swing open with long hinges. Others use sliding lids, cam locks, or hidden locks for more security. Hinged lids make it easy to reach inside. Locks keep your valuables safe. You can add UV-resistant coatings to protect your items from sunlight. These features help you get both easy access and strong security.
| Opening Type | Features | Meilleur pour |
|---|---|---|
| Hinged Door | Easy access, can add locks | Retail, collectibles |
| Sliding Lid | Simple, quick to open | Ballot boxes, donations |
| Cam/Hasp Lock | Extra security | Jewelry, museum displays |
| Concealed Hinges | Clean look, hidden security | High-end or museum-quality |
If you want a museum-quality finish, look for UV-filtering acrylic, sealed cases, and hidden locks. Some special cases even have humidity control or gas lifters for smooth opening. These features keep your items safe and looking nice for a long time.
Customizing your own acrylic display box is easier than you might think. You get to pick the size, shape, and features that fit your items perfectly. Want a special color or your logo on the box? You can do that, too! Here’s why making your own is a great idea:
- You choose the exact look and fit for your stuff.
- You can add cool features like UV protection or scratch resistance.
- Your display stands out with custom logos and colors.
Give it a try! With a little planning, you can create a display case that looks professional and shows off your style.
FAQ
How do I clean my acrylic display box without scratching it?
Use a soft microfiber cloth and mild soap with water. Avoid paper towels or rough sponges. Never use window cleaner or ammonia-based products. These can scratch or cloud the acrylic. Gently wipe and dry for a clear, shiny finish.
Can I drill holes in acrylic for extra features?
Yes, you can drill holes in acrylic. Use a sharp drill bit made for plastic. Go slow and steady. Place the acrylic on a flat surface. This helps prevent cracks. Always wear safety glasses when drilling.
What should I do if the edges look cloudy after cutting?
You can sand the edges with fine-grit sandpaper. Start with 180-grit and move to 600-grit for a smoother finish. For a glass-like shine, use a buffing wheel or try flame polishing. Always keep the acrylic cool while working.
Is it possible to fix scratches on my acrylic box?
Small scratches come out with a plastic polish or a polishing compound. Rub gently with a soft cloth. For deeper scratches, sand lightly with fine sandpaper first. Then polish. If the scratch is too deep, you may need to replace the panel.

