
You can achieve a stunning, museum-quality display with floating acrylic frames. They give your art a clean, modern look. This popular style is part of a growing trend in home decor. Many people now prefer a hands-on diy project.
| Metric | Details |
|---|---|
| Historical Market Growth (CAGR 2019 to 2024) | 4.7% |
| DIY Home Improvement Market Size (2025E) | US$800 Billion |
| Projected Growth (CAGR 2025 to 2032) | 8% |
| Market Value Forecast (2032F) | US$1400.9 Billion |
You can create your own professional-looking floating acrylic picture frames. This guide makes building affordable diy acrylic frames a simple and satisfying task.
Supplies for Budget Floating Frames
You need the right supplies before starting your project. Gathering everything first makes the process smooth and enjoyable. This list covers all the essential materials for floating frame construction. You can find most of these items at your local hardware or craft store.
Materials Checklist
- Acrylic Sheet: The star of the show is your clear panel. You can purchase pre-cut acrylic sheets or a larger one to cut to your custom size. High-quality brands like ACRYLITE® offer excellent clarity and durability.
- Your Artwork or Photo: Choose the piece you want to display. This project works great for prints, photos, and even thin items like postcards or pressed flowers.
- Standoff Mounting Hardware: This hardware creates the “floating” effect. Standoffs come in various materials, including stainless steel, aluminum, and brass. Aluminum offers a great strength-to-weight ratio. You can choose from many diameters and lengths to fit your design.
- Wall Anchors and Screws: These come with most standoff kits. You should ensure they are appropriate for your wall type (drywall, plaster, or masonry).
- Adhesive: You need a way to secure your art to the acrylic. Removable glue dots or double-sided photo splits work perfectly. They hold the art in place without causing damage.
Pro Tip 📝: When selecting standoff hardware, consider the weight of your acrylic sheets and artwork. A standard 1/2″ or 3/4″ diameter standoff is a great choice for most home projects.
Tools Checklist
- Power Drill: You will use this tool to make holes in the acrylic and your wall.
- Drill Bits: Using the correct bit is crucial. Special acrylic drill bits or step bits are your best options. They create clean holes and prevent the plastic from cracking.
- Tape Measure: Accurate measurements are key to a professional look.
- Level: A level ensures your frame hangs perfectly straight.
- Pencil or Marker: You will need this for marking drill points on both the acrylic and the wall.
- Painter’s Tape: This helps protect the acrylic surface while you drill. It also helps hold your artwork in place for positioning.
Creating beautiful budget floating frames is simple with the right tools and materials.
Step 1: Drill Your Acrylic Sheet
Drilling is the most critical step for your project. You must handle the acrylic sheets with care to avoid cracks or scratches. A steady hand and the right technique will give you a perfect result. This step prepares your frame for mounting.
Protect and Mark the Acrylic
First, you need to protect your acrylic surface. Leave the protective film on both sides for now. You can apply painter’s tape over the areas where you will drill. This simple action helps prevent the drill bit from scratching the surface. Next, you will mark your drill points.
- Use a tape measure and a pencil to mark the four corners.
- Position each hole carefully for a balanced look.
- A good rule is to make the center of the hole at least 1.5 times the hole’s diameter away from the edge. This prevents the acrylic from splitting.
Drill Pilot Holes First
You should always start with a small pilot hole. This creates a guide for the larger drill bit.
- Place your acrylic on a flat, supportive surface, like a piece of scrap wood.
- Select a small drill bit, such as a 1/16-inch bit.
- Set your drill to a medium speed, around 500-1000 RPM.
- Drill through your marked points with light, steady pressure.
Caution ⚠️: Applying too much pressure can generate heat. This heat may melt the acrylic or cause it to crack. Let the drill do the work.
Enlarge Holes to Final Size
Now you will widen the pilot holes to fit your standoff hardware. A step drill bit is the best tool for this job. It enlarges the hole gradually and cleanly.
- Apply a drop of dish soap to the pilot hole for lubrication.
- Use the step drill bit to carefully expand the hole to the final size.
- Maintain light pressure to prevent the bit from catching in the acrylic sheets.
- After drilling, you might see small burrs around the edge of the hole. You can gently remove these with a utility knife or even a potato peeler for a perfectly smooth finish.
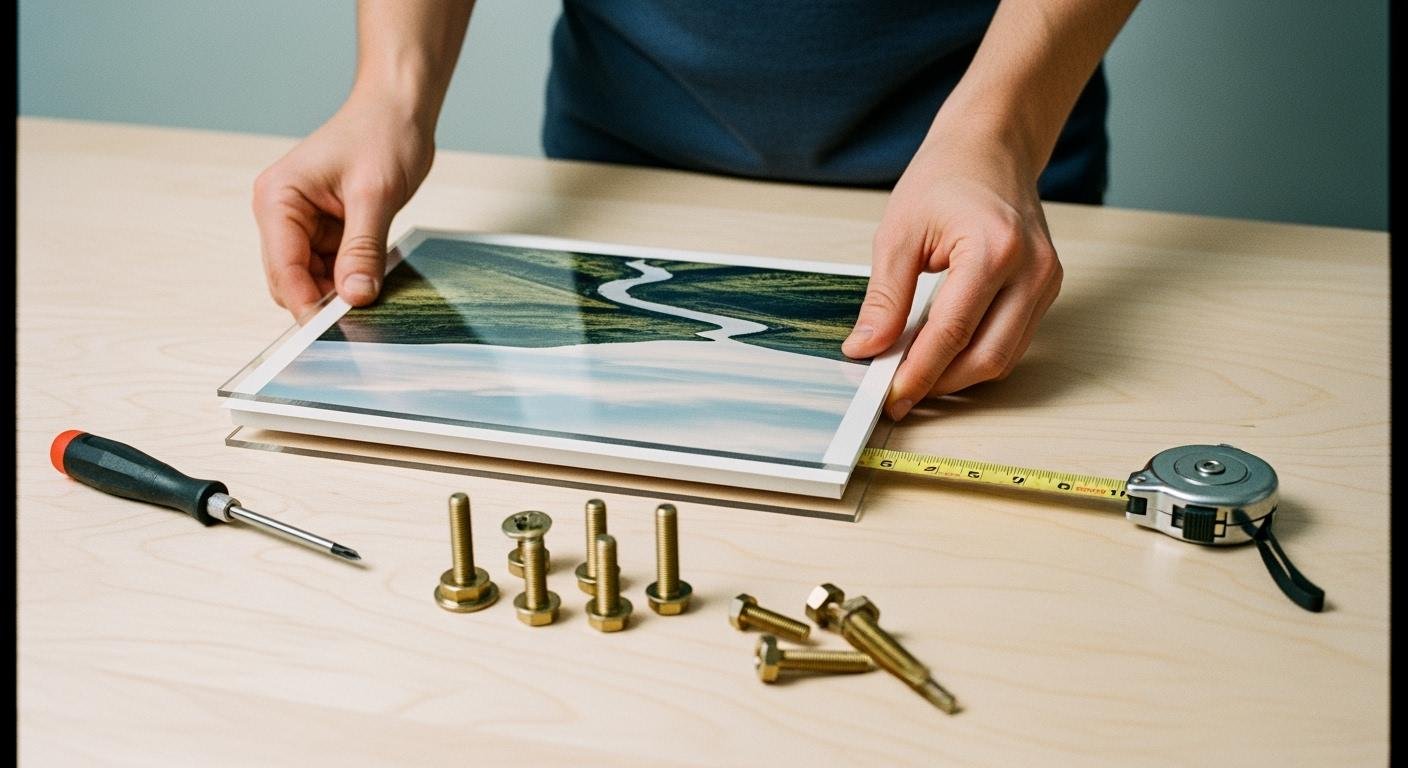
Step 2: Position Your Artwork
Now you will prepare the acrylic and place your art. This step requires a clean workspace and a careful touch. Proper placement ensures your final photo frame looks balanced and professional.
Peel the Inner Protective Film
You are ready to reveal the crystal-clear surface of your acrylic. First, identify which side of the acrylic will face the wall. You will only peel the protective film from the front side, where your art will sit. Leave the film on the back side to prevent scratches during the next steps.
Static electricity can attract dust and lint as you peel the film. You can manage this issue easily.
- Work in a room with higher humidity. Using a humidifier to raise the humidity above 50% helps reduce static.
- Wipe the surface gently with a microfiber cloth and an anti-static acrylic cleaner.
- Avoid ammonia-based cleaners. They can damage your acrylic sheets.
Tip for Valuables 🖼️: If you are framing a valuable print, consider using archival-safe materials. Options like Lineco Self-Adhesive Hinging Tissue are acid-free and non-yellowing. This method protects your art’s long-term value.
Center and Secure Art with Tape
Positioning your artwork is a crucial step. You want it to be perfectly centered for that high-end gallery look.
- Lay your artwork face down on the clean acrylic surface.
- Use a tape measure to check the borders on all four sides. Adjust the art until the measurements are equal.
- Once centered, you can secure it. You do not need to permanently glue artwork onto acrylic. Instead, use removable glue dots or double-sided photo splits. Apply them to the back corners of your artwork.
- Press the art firmly onto the acrylic. This creates a secure bond that holds it in place.
Step 3: Mark Your Wall
You are now ready to transfer your frame’s layout to the wall. This step ensures your artwork hangs straight and looks professionally installed. Accurate marking is the key to a perfect final placement. You will need a level and a pencil for this task.
Level and Position the Frame
First, you need to decide where your frame will hang. A good rule is to position the center of your artwork between 57 and 60 inches from the floor. This height is comfortable for most viewers.
- Above Furniture: If you hang the frame above a sofa or headboard, leave a gap of 4 to 8 inches. This creates a visual connection between the furniture and the art.
- Standard Height: For an empty wall, aim for the 57-60 inch center point. This is a standard used in many galleries.
A level is essential for this step. While a traditional bubble level works well, a laser level can make the job much easier. Cross-line laser levels are great for home DIY projects because they project perfect horizontal and vertical lines on your wall.
| Model | Key Features | Ideal For |
|---|---|---|
| Bosch GLL30 Cross-Line Laser Level | Affordable, highly precise, automatic leveling, compact | Hanging shelves, pictures, cabinets |
| DEWALT DW088K Self-Leveling Cross Line Laser | Durable, accurate, bright laser lines, magnetic base | Home renovation projects requiring precision |
| Black+Decker BDL220S Laser Level | Cost-effective, wall-mountable base, built-in stud sensor | Smaller household tasks, basic leveling jobs |
Mark Anchor Points Through Holes
With your position chosen, you can now mark the drill points. This process is simple and requires a steady hand.
- Hold the acrylic frame against the wall at your desired height.
- Place your level on top of the frame. Adjust the frame until the bubble is perfectly centered. If you are using a laser level, align the top edge of your frame with the laser line.
- Hold the frame firmly in place.
- Use a pencil or a fine-tip marker to mark the wall through each of the four holes you drilled in the acrylic. Make a clear, visible dot in the center of each hole.
- Set the frame aside in a safe place. You should now have four precise marks on your wall, ready for the next step. ✅
Step 4: Install Standoff Hardware
You are now on the home stretch. This step involves attaching the mounting hardware to your wall. A secure installation is vital for a safe and professional-looking display. Taking your time here ensures your frame will hang perfectly for years to come.
Drill Holes for Wall Anchors
Your pencil marks from the previous step show you exactly where to drill. Before you start, you must choose the correct wall anchor. The type of anchor you need depends on your wall’s material.
Choosing the Right Anchor 🤔 To select the best anchor, you need to know three things:
- What is your wall made of (drywall, plaster, brick)?
- How heavy is your acrylic frame?
- Will the frame be in a special environment, like a humid bathroom?
Most standoff kits include anchors, but you should confirm they are right for your wall. Here are some common types:
- Drywall and Plaster: Use conical plastic anchors for light frames. For hollow walls, toggle anchors (or butterfly anchors) provide excellent support because their wings expand behind the wall.
- Brick and Concrete: Wedge anchors are a strong choice for solid masonry. You insert them into the hole, and they expand for a tight fit.
Once you have the right anchors, select a drill bit that matches their size. Drill a hole at each of your four pencil marks. Then, gently tap the anchors into the holes until they are flush with the wall.
Secure Standoff Bases to Wall
With the anchors in place, you can attach the standoff bases. Your mounting hardware kit contains barrels (the bases) and caps. For this step, you only need the barrels and the screws.
- Hold one standoff barrel over a wall anchor.
- Align the hole in the barrel with the hole in the anchor.
- Use your drill or a screwdriver to drive the screw through the barrel and into the anchor.
- Tighten the screw until the base is firmly secured to the wall. Do not overtighten, as this can damage the anchor.
- Repeat this process for the other three locations.
You have now installed the core mounting hardware. These four secure bases are ready to help you install your new frames in the final step.
Step 5: Mount Your Floating Acrylic Frame

You have reached the final and most rewarding step. This is where your project comes together and your artwork gets its moment to shine. You will now mount your frames and see the beautiful floating effect come to life.
Peel the Final Protective Film
This is your last chance to handle the acrylic sheets before they are on the wall. Carefully peel the remaining protective film from the back of the acrylic. This will reveal the crystal-clear surface. Static electricity can attract dust, so work cleanly.
Pro Tip 🧤: To avoid fingerprints on the glossy surface, you should wear clean, soft cotton gloves. Always handle the frame by its edges. This prevents smudges on the main viewing area and keeps your display looking flawless.
Attach Frame to Standoff Bases
With the film removed, you are ready to hang your art. This part may be easier with a helper, especially for larger frames.
- Carefully lift your artwork and the attached acrylic.
- Align the four holes in the acrylic with the four standoff bases you secured to the wall.
- Gently slide the acrylic over the threaded barrels of the mounting hardware. The frame should now be resting on the bases, creating the floating gap between the art and the wall.
Screw on the Standoff Caps
The final touch is securing your artwork in place. The caps are the front part of your mounting hardware. They screw onto the bases and hold the acrylic firmly.
- Take one standoff cap and thread it onto one of the bases.
- Hand-tighten the cap until it is snug. You should not use tools or overtighten, as too much pressure can crack the acrylic sheets.
- Repeat this for the remaining three corners.
Step back and admire your work! You have successfully created and installed a professional-looking floating acrylic frame. These beautiful floating acrylic frames add a modern, high-end touch to any room.
Customizing Your DIY Acrylic Picture Frames
You can take your project to the next level with a few creative touches. These ideas help you personalize your diy acrylic picture frames to perfectly match your style and home decor.
Paint Hardware for a Custom Look
Your standoff hardware does not have to be silver. You can easily paint it to match your room’s color scheme.
- Clean the hardware with a degreaser to remove any oils.
- Lightly sand the surface to help the primer stick.
- Apply a thin coat of metal primer and let it dry completely.
- Spray thin, even coats of your chosen paint color. Hold the can 6-8 inches away and use sweeping motions.
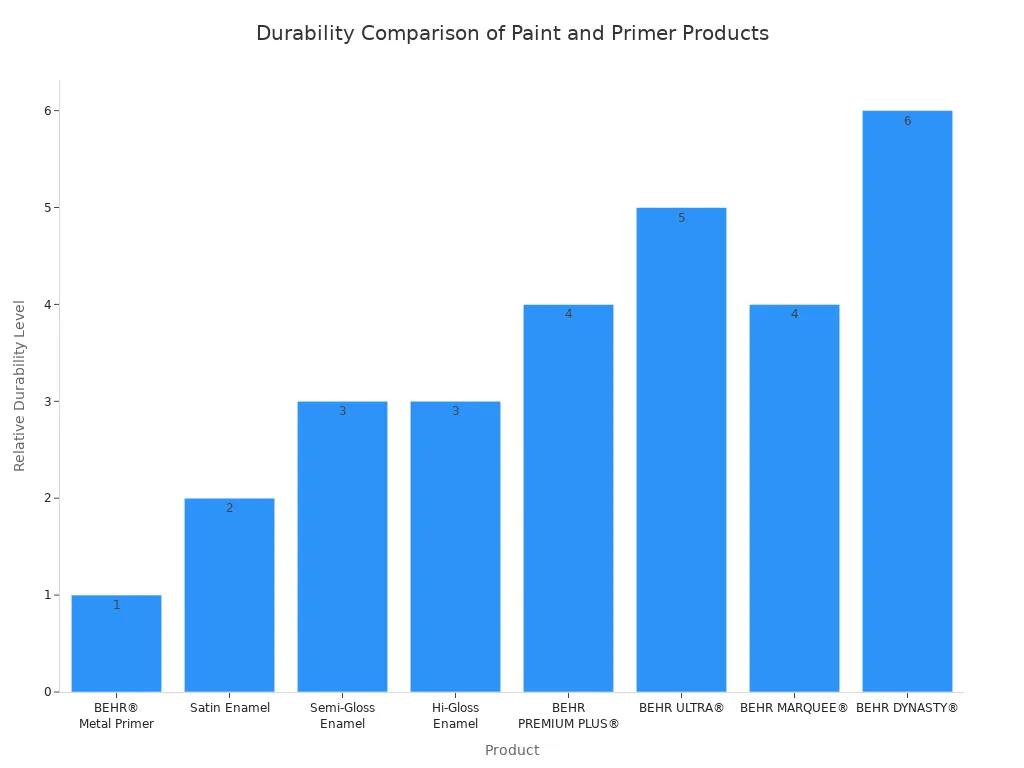
For the best results, choose a durable paint. Enamel paints offer a hard finish that resists wear.
| Product Type | Sheen/Line | Durability Level | Key Features |
|---|---|---|---|
| Primer | BEHR® Metal Primer | Medium-Low | Specifically for metal |
| Paint | Satin Enamel | Medium-High | Pearl-like finish, resists moisture and fading |
| Paint | Semi-Gloss Enamel | High | Sleek, radiant, hard finish, withstands wear |
| Paint | BEHR DYNASTY® | Most Advanced | Most stain repellent, scuff resistant, fast-drying |
Create a Two-Panel Sandwich Frame
For a different look, you can sandwich your art between two acrylic sheets. This method makes your art appear to float inside the glass and is perfect for showcasing pieces with unique paper edges.
- Drill holes through both acrylic sheets at the same time.
- Peel only the protective film from the two inner surfaces.
- Place your art on the back panel and carefully lay the front panel on top.
- Mount the entire sandwich photo frame using your standoff hardware.
Advanced Idea 💡: You can also try more advanced designs. Consider using a perforated metal sheet as a backing for an industrial look. Or, use a much larger piece of acrylic to create a wide, clear border around your art.
Clean and Maintain Your Frame
Keeping your floating acrylic frames looking new is simple. You must avoid harsh chemicals.
- Cleaning: Never use ammonia-based glass cleaners. They can damage the acrylic. Instead, use a dedicated anti-static cleaner like Brillianize or Plexus with a clean microfiber cloth.
- Scratches: You can fix minor scratches yourself. Apply a small amount of plastic polish or non-gel toothpaste to the scratch. Then, gently rub the area in a circular motion with a soft cloth for about a minute.
Congratulations on completing your project! You have created a high-end piece of decor with your own hands. This guide shows that making affordable diy acrylic frames is a simple and rewarding task.
You can now proudly display your art in custom floating acrylic frames. Enjoy your beautiful new wall decor and use your skills for many more projects to come! 🎉
Your new floating acrylic frames add a professional, modern touch to any space.
FAQ
What thickness of acrylic should I use?
You should choose an acrylic sheet that is 1/8-inch to 1/4-inch thick for most projects. This thickness provides good rigidity without being too heavy. Thicker acrylic offers more durability for larger frames. Your local hardware store can help you select the best option.
How do I prevent the acrylic from cracking when I drill?
You can avoid cracks with the right technique. Use a drill bit made for plastic or a step bit. You must apply light, steady pressure and drill at a medium speed. Placing a piece of scrap wood underneath gives the acrylic support.
Can I frame something thicker than a photo?
Yes, you can frame thicker items like pressed flowers or fabric. You will need to purchase standoff hardware with a longer barrel. This creates a larger gap between the wall and the acrylic, giving your object enough space.
How much weight can a floating frame hold?
The weight capacity depends on your standoff hardware and wall anchors. You should always check the manufacturer’s specifications for the standoffs. Using the correct wall anchors for your wall type (drywall, plaster, or brick) is essential for a secure installation. ✅
See Also
Debunking Acrylic Tray Misconceptions: Simple DIY Projects for Your Home
Your Comprehensive Handbook to Mastering Acrylic Table Stand Applications
Ten Ingenious Methods for Decorating Small Acrylic Trays Indoors
Discover Ten Chic Approaches to Revitalize Rooms Using Acrylic Trays
Exploring Circular Acrylic Tray Designs and Their Everyday Practical Applications

