
If you want to seal acrylic keychains at home, uv resin gives you the best results. Skip Mod Podge, since it can peel or look streaky. You do not need fancy tools, but make sure you sand the edges and work in a warm spot. Beginners can do this!
Materials for Sealing Acrylic Keychains
Essential Supplies
Before you start, gather everything you need. Here’s a handy list to keep you organized:
- UV resin (the main sealant)
- UV lamp or flashlight for curing
- Nitrile gloves and a mask
- Soft brush or silicone tool
- Sandpaper (fine grit)
- Lint-free cloth
- Rubbing alcohol
- Plastic or silicone mat to protect your table
ヒント Always work in a well-ventilated area. Open a window or use a fan to keep the air fresh. If you can, set up in a garage or outside. This helps keep you safe from fumes.
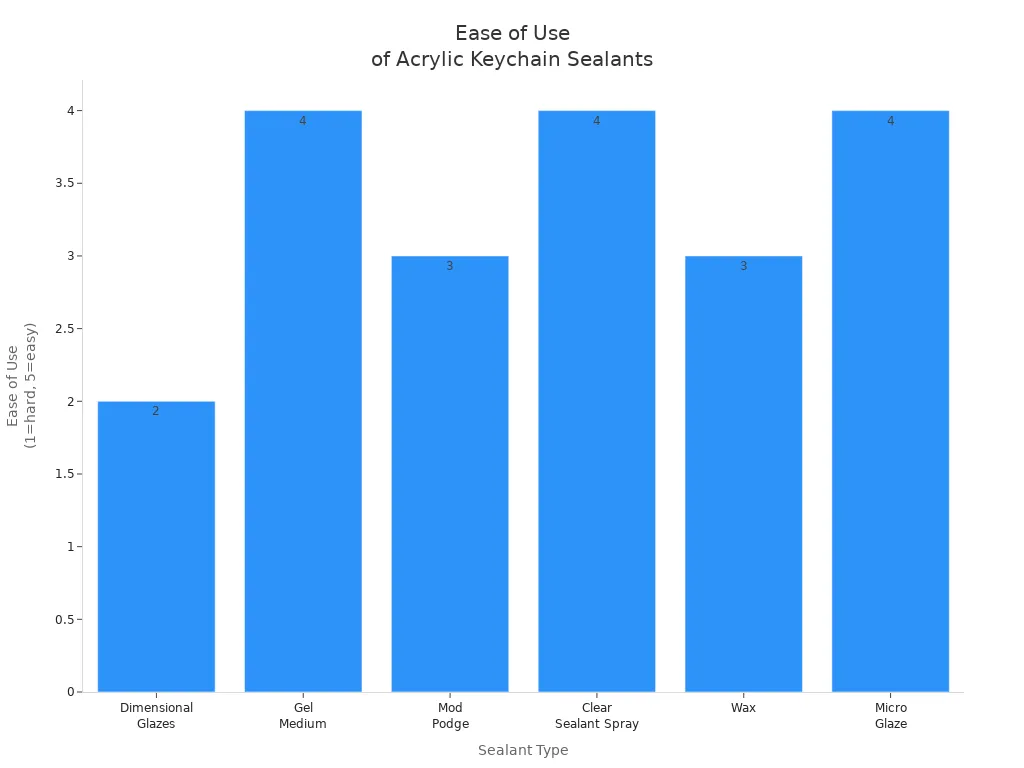
You might wonder about other sealants. Here’s a quick look at some options:
| Sealant Type | Effectiveness | Ease of Use |
|---|---|---|
| Dimensional Glazes | Adds shine, not full protection | Can trap bubbles, tricky to apply |
| Gel Medium | Good protection, can be tinted | Easy, but brushstrokes show |
| Mod Podge | Good protection, can be tinted | Easy, but slow to cure |
| Clear Sealant Spray | Low to moderate protection | Easy, needs outdoor use |
| Wax | Good protection, can discolor | Fairly easy, may change look |
| Micro Glaze | Water resistant, leaves a sheen | Easy, can use matte spray after |
Preparing Your Acrylic Keychain
You want your acrylic keychain to last and look great. Start by cleaning the surface with rubbing alcohol and a lint-free cloth. This removes any oils or dust that could stop the uv resin from sticking. If the surface feels too smooth, lightly sand it with fine-grit sandpaper. This gives the resin something to grip.
Surface prep matters. When you clean and roughen the acrylic, you help the resin bond better. This means your keychain stays sealed and shiny for longer.
Safety First: Wear gloves and a mask. Uncured resin can irritate your skin and lungs. Always protect yourself and keep your workspace clean.
How to Seal Acrylic Keychains
Applying UV Resin
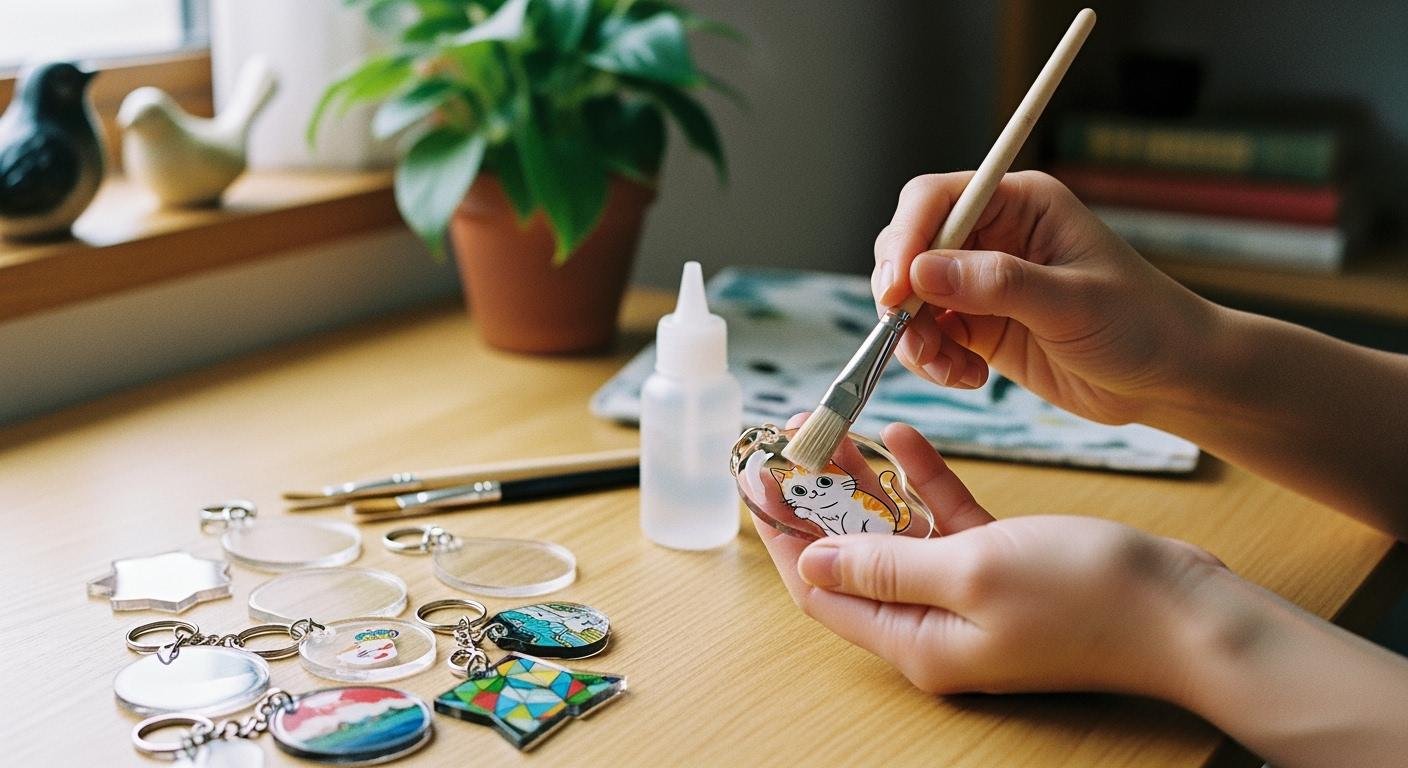
You have your supplies ready and your acrylic keychain is clean. Now you can start sealing. Here’s a simple step-by-step guide to help you apply uv resin for a smooth, even finish:
- Place your acrylic keychain on a silicone mat. This protects your table from spills.
- If you want to add a vinyl design or decal, transfer it onto the acrylic now. Press it down well so it sticks.
- Squeeze a small blob of uv resin in the center of the keychain.
- Gently tilt and rotate the acrylic so the resin spreads toward the edges. You can use a silicone-tipped tool or a toothpick to help guide the resin. Try not to let it flow into the keychain hole.
- If you see any dimples or thin spots, add a drop of resin at a time to fill them in.
- Wipe away any overflow with a paper towel and a bit of rubbing alcohol.
ヒント Precision applicators like squeeze bottles or fine-tip tools make it easier to control where the resin goes. They also help you pop any bubbles that show up.
If you want to add glitter or other decorations, sprinkle them on before you cure the resin. You can also layer decals or tiny stars between coats for a custom look.
Curing and Drying
Once you have an even coat of uv resin, it’s time to cure it. Place the keychain under a UV lamp. Most uv resin cures in about 60 seconds, but always check the instructions on your resin bottle. If you want extra durability, you can add a second thin coat and cure again.
Sometimes, you might notice bubbles, streaks, or sticky spots. Here are some quick fixes:
- Bubbles: Warm the resin slightly before using it. Mix slowly and watch for bubbles as you spread it. If you spot any, use a toothpick or a quick pass with a small torch to pop them.
- Cloudy Finish: Make sure your workspace is dry and your resin is mixed well. Moisture can cause a hazy look.
- Sticky Surface: If the resin feels tacky after curing, try curing it for another minute. Make sure your lamp is strong enough and your workspace is warm.
- Peeling or Poor Adhesion: Double-check that you cleaned and sanded the acrylic before starting. A rough surface helps the resin stick better.
| Troubleshooting Step | Why It Helps |
|---|---|
| Clean and degrease the surface | Removes oils and dust that stop resin from bonding. |
| Roughen smooth surfaces | Gives the resin something to grip onto. |
| Use a primer for resin | Helps the resin stick even more, especially on slick acrylic. |
Finishing Touches
After the final coat cures, let the acrylic keychain cool. Check if the resin feels smooth and hard. If the hole for the keyring closed up, use a small drill to reopen it.
Want to make your keychain extra special? You can add another layer of uv resin over glitter, decals, or painted designs. Cure each layer before adding the next. This keeps everything sealed in and gives your keychain a glossy, professional look.
To keep your sealed acrylic keychains looking new, store them in a cool, dry place. Avoid direct sunlight. Use a small pouch or a sealed container to protect the finish from dust and scratches.
When it’s time to clean your keychain, remove it from your keys. Wipe it gently with a microfiber cloth. If it gets dirty, soak it in lukewarm water with a little dish soap. Rinse and dry it with a lint-free towel. Buff it with a dry cloth to bring back the shine.
注: Sealing with uv resin not only makes your acrylic keychain look great, but it also protects it from scratches and water. With these easy steps, you can seal acrylic keychains at home and enjoy your creations for a long time.
You can seal acrylic keychains at home with just a few steps. UV resin keeps your designs bright and strong for years. Try different finishes and see what you like best.
- Acrylic keychains sealed with UV resin often last 5–10 years.
- Epoxy resin may show yellowing after a few months.
よくあるご質問
How do I fix bubbles in the resin?
Use a toothpick to pop bubbles before curing. You can also warm the resin a little to help bubbles rise and disappear.
Can I use a hair dryer instead of a UV lamp?
No, a hair dryer will not cure UV resin. You need a UV lamp or flashlight to harden the resin properly.
What if my keychain feels sticky after curing?
Try curing it under the UV lamp for another minute. If it still feels sticky, wipe it gently with rubbing alcohol.
See Also
Debunking Acrylic Tray Myths with Simple DIY Solutions
10 Innovative Ideas for Decorating Small Acrylic Trays
Guide to Choosing and Maintaining White Acrylic Trays
Unique Ideas for Displaying Items with Acrylic Stands
Understanding Diamond Polishing: Its Role in Acrylic Production

