
You want to create a beautiful, modern acrylic photo block. This sleek photo display style is incredibly popular, with the market for the acrylic face mount growing steadily each year. You can create your own diy acrylic photo block right at home. We will show you three simple methods for affixing photos onto acrylic.
You can:
- Adhere photo prints with a clear adhesive sheet.
- Transfer your photo with a liquid medium.
- Print your photo directly onto clear sticker paper.
注: These accessible techniques mimic a professional process called face mounting. This mounting method helps you mount your favorite photo to acrylic for a gallery-quality finish.
What is Acrylic Face Mounting?
You can think of face mounting as the process of bonding a photographic print directly to a sheet of acrylic. This technique creates a seamless, high-gloss display. The light refracts through the acrylic, making the colors in your photo appear more vibrant and creating a sense of depth. It is a popular choice for artists and galleries. This process is also known as photo face mounting.
The Professional Method
Professionals use a specific method for gallery-quality results. This process involves specialized equipment and materials to ensure a perfect, bubble-free bond.
The photo print is positioned behind a sheet of optically clear acrylic. A permanent, transparent adhesive joins the front of the photo to the back of the acrylic. A rigid backing material, like aluminum or another piece of acrylic, is then applied to the back of the print for stability.
This professional mounting method completely encases the photo, protecting it from dust, moisture, and UV rays. The result is a durable and stunning piece of art.
DIY-Friendly Alternatives
You do not need a professional studio to achieve a similar look. The process of mounting photos on plexiglass can be done right at home. You can create a beautiful display with accessible materials and a little patience. This blog will guide you through three great methods for your DIY mounting project.
You will learn how to:
- Use double-sided adhesive sheets for a direct bond.
- Transfer only the ink from your photo onto the acrylic.
- Print your image on clear sticker paper for easy application.
Each technique offers a unique way to get that sleek, modern finish for your favorite photo.
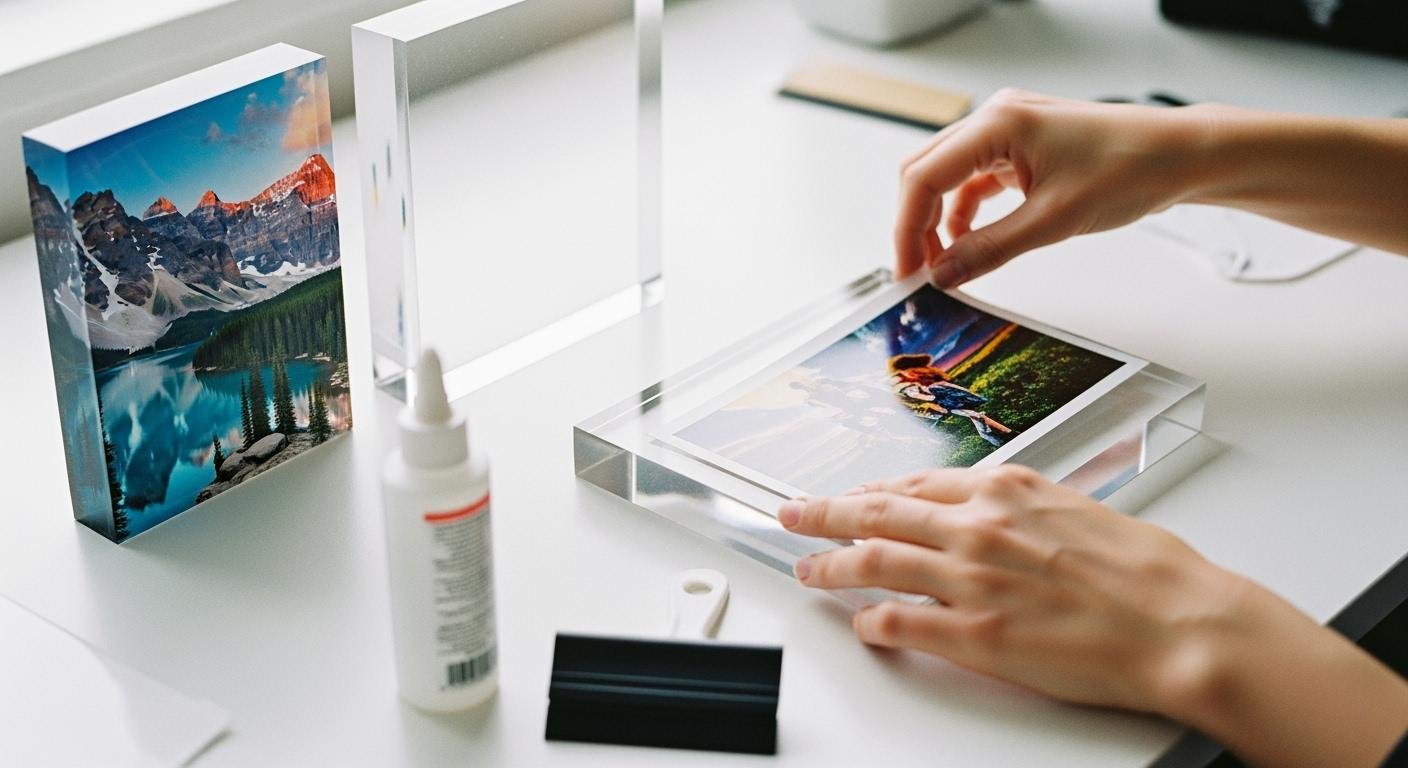
Method 1: Use Clear Adhesive Sheets
This method is the most direct way for you to try face mounting at home. You will use a special double-sided adhesive sheet to bond your photo directly to the acrylic. This technique creates a permanent, seamless look. The key is to use an optically clear adhesive designed specifically for this purpose.
Materials Needed
Before you begin, gather your supplies. Having everything ready will make the process smooth and easy.
- A high-quality acrylic sheet
- Your photo print
- Optically clear double-sided adhesive sheet
- A soft microfiber cloth
- A rubber brayer or a squeegee
- A cutting mat and a craft knife
How to Adhere the Photo
Patience is your best tool for this mounting process. Work slowly and carefully to achieve a professional-looking result.
- Prepare Your Surfaces: First, inspect and clean your acrylic sheet. Gently wipe it with a microfiber cloth to remove any dust or fingerprints. Ensure your photo is also clean and handle it by the edges.
- Apply the Adhesive: Cut the optically clear adhesive sheet to the exact size of your photo. Carefully peel back one side of the protective liner. Apply the adhesive to the front of your photo, starting from one edge and smoothing it down to prevent bubbles.
- Mount the Photo: Now, peel the second liner from the adhesive. Carefully position your photo, adhesive side down, onto the acrylic. To adhere photo prints without bubbles, start at one edge and slowly lower the rest of the photo onto the surface.
- Secure the Bond: Use your brayer or squeegee to apply firm, even pressure. Work from the center of the photo out to the edges. This step pushes out any trapped air bubbles and ensures a strong bond.
- Let It Set: Allow the mounted photo to rest for a few hours. This gives the adhesive time to cure completely, creating a durable and beautiful display.
ヒント Always read the manufacturer’s instructions that come with your adhesive. Different products may have specific recommendations for application or curing times.
Method 2: Use a Liquid Transfer Medium

This unique method transfers the ink from your photo directly onto the acrylic. You are not sticking the paper down; you are moving the image itself. This process creates a beautiful, semi-transparent look where the image becomes part of the acrylic. This is a fun and almost magical way to complete your photo mounting project.
Required Materials
You will need a few specific items for this technique. Common craft products like Mod Podge Photo Transfer Medium or other gel mediums work perfectly.
- An acrylic sheet
- A laser-printed photo, mirrored or flipped horizontally
- Photo transfer medium
- A foam brush or paintbrush
- A soft cloth or sponge
- A bowl of water
Important Note: You must use a photo printed from a laser printer or a photocopy. An inkjet-printed photo will not work because the ink will smear when it gets wet.
The Transfer Process
This process requires patience, especially during the drying stage. Follow these steps carefully for the best results.
- Apply the Medium: Place your photo face up. Use your foam brush to apply a thick, even layer of the photo transfer medium over the entire image. Make sure you cannot see the photo through the white medium.
- Position the Photo: Carefully place the photo, medium-side down, onto your clean acrylic sheet. Gently smooth it out with your fingers to remove any large air bubbles.
- Let It Dry: This is the most critical step. You must let the medium dry completely.
- It is suggested to let the transfer sit for at least an hour. You can use a hair dryer to speed this up.
- For the very best results, wait 2 to 3 days before the next step to ensure the film is fully cured.
- If the entire image does not transfer later, it likely means the medium was not allowed to dry long enough.
- Remove the Paper: Dampen a soft cloth or sponge and gently rub the paper backing. The paper will start to peel away in small bits, revealing your transferred photo underneath. Continue this process until all the paper is gone.
- Seal Your Image: Let the acrylic dry completely one last time. You can apply a thin top coat of the same medium or a clear acrylic sealer to protect the image. This final coat will also help adhere photo details that may have lifted slightly.
Method 3: Print on Clear Sticker Paper
Using clear sticker paper is perhaps the most straightforward way to create your acrylic photo block. This technique involves printing your image directly onto a transparent, adhesive sheet. You then apply it to the acrylic. This method offers a quick and clean mounting process with fantastic results. The final product is a durable and waterproof display for your favorite photo.
Materials for Your Acrylic Photo Block
You only need a few items to get started on this simple project.
- A thick acrylic block (a 4×6 stamp block works perfectly)
- A home printer (inkjet or laser)
- Clear, printable sticker paper
- A squeegee or credit card
Pro Tip: You must choose sticker paper that is compatible with your printer. Brands like Avery and Royal Elements offer options for both inkjet and laser printers. Inkjet paper often requires a clear sealing spray after printing your photo, while laser paper is typically ready to use right away.
Application Steps
Follow these steps to get a smooth, bubble-free finish on your acrylic photo block. This process will help you adhere photo designs perfectly.
- Print Your Photo: First, print your selected photo onto the clear sticker paper. Follow the instructions included with your paper, as you may need to adjust your printer settings for the best quality.
- Prepare the Surface: Clean your acrylic block thoroughly to remove any dust or fingerprints. A clean surface is essential for a flawless application.
- Apply the Sticker: Peel the backing from your printed photo sticker. For a bubble-free application, you can lightly spray the acrylic surface with a solution of water and a tiny drop of dish soap. This allows you to slide the sticker into the perfect position.
- Remove Bubbles: Once the photo is in place, use a squeegee or the edge of a credit card. Start from the center and push outwards to squeeze out any water and air bubbles.
- Let It Dry: Wipe away any excess water and let your new photo display dry completely. The high-quality sticker paper is often scratch-resistant and waterproof, protecting your image for years to come.
Pro Tips to Mount Photos on Acrylic
Following a few expert tips can make a huge difference in your final product. These simple steps will help you create a flawless acrylic photo block with a professional finish.
Prepare Your Workspace
A clean workspace is the secret to a perfect mount. You should aim to create a controlled environment with minimal dust.
- Control the Climate: Work in a room with a temperature between 65-73°F. Keep humidity levels below 65% to protect your photo and help the adhesive cure properly.
- Clean Your Acrylic: Use a soft microfiber cloth to clean your acrylic sheet. You can use a simple mix of mild dish soap and water. Specialized cleaners like Novus or Brillianize are also great because they reduce static and repel dust.
- Dust Everything: Gently use a soft bristle brush to remove any loose particles from your work surface and your photo before you begin the mounting process.
Achieve a Bubble-Free Finish
Air bubbles are the biggest challenge when you mount photos on acrylic. The right tool makes all the difference. A rubber brayer is your best friend for this task. It is designed to apply even pressure and smooth materials perfectly. When you apply your photo or adhesive sheet, roll the brayer from the center outwards. This motion pushes any trapped air to the edges, giving you a bubble-free finish.
Use a squeegee or credit card to press your photo into tight corners, but rely on the brayer for smoothing the main surface.
Choose the Right Photo Print
The type of photo you choose has a big impact on your acrylic photo block. For the best results, pay attention to the paper finish and image resolution.
- Paper Finish: You should avoid glossy paper. It creates strong reflections that can distract from your image. Instead, choose a photo with a matte or luster finish. These papers reduce glare and look fantastic behind acrylic.
- Image Resolution: A high-resolution photo will look sharp and clear. You should aim for a minimum resolution of 150 DPI (dots per inch). While 100 DPI can work for some print types, 150 DPI ensures your image looks crisp and detailed.
You now have three easy methods for your own DIY acrylic face mount. You can use adhesive sheets, a transfer medium, or clear sticker paper for your project. With the right materials and some patience, you can create a stunning acrylic photo block. You could even design a multi-photo collage or an engraved frame. Pick a method and turn your favorite photo into a beautiful display.
For more inspiration, you can search for examples on community forums. A Google image search for
acrylic site:community.glowforge.comis a great way to see what others have made.
よくあるご質問
Can I use an inkjet print for the transfer method?
You should not use an inkjet print for the liquid transfer method. The water-based ink will smear and ruin your project.
Reminder: You must use a laser print or a photocopy for this technique. The heat-fused toner is what allows the image to transfer correctly.
What is the best type of acrylic to use?
You can use any clear, cast acrylic sheet. For a freestanding block, choose one that is at least 0.75 inches thick. This thickness gives the piece stability and a premium feel. Thinner sheets work well if you plan to put your project in a frame.
How do I clean my finished acrylic photo block?
You can keep your acrylic display looking great with gentle cleaning.
- First, dust the surface with a soft microfiber cloth.
- For fingerprints, use a simple mix of mild soap and water.
- Always avoid harsh chemical cleaners containing ammonia or alcohol.
Why does my photo transfer look cloudy?
A cloudy finish usually means tiny paper fibers are still on the acrylic. You can fix this by gently rubbing the area again with a damp cloth. Applying a clear sealer coat also helps make the image appear clear and vibrant.
See Also
Innovative Display Ideas: Acrylic Table Stands for Stunning Showcases
Ten Clever Home Styling Tips Using Small Acrylic Trays
Debunking Acrylic Tray Myths: Simple DIY Solutions for Creative Use
Elevate Your Decor: Ten Chic Transformations Using Acrylic Trays
Your Comprehensive Handbook: Mastering Acrylic Table Stands for Displays

