
You want to create stunning acrylic photo blocks. Many DIY projects go wrong with a few common mistakes.
- Using the wrong paper for your photo.
- Choosing an incompatible method for the acrylic.
- Skipping surface prep on the acrylic block.
- Rushing when you put a photo on the block.
These frustrating errors are entirely preventable. The cultural shift towards personalization makes this a great project. You can create a flawless picture with the right step-by-step instructions. These instructions help you make a professional picture and a perfect photo for your favorite photos.
Mistake #1: Wrong Photo Paper & Ink
The foundation of a great acrylic photo block is the print itself. Your choice of paper and ink can make or break the final result. Many people grab standard office paper, leading to a disappointing outcome.
Problem: Standard Paper Bleeds & Wrinkles
You printed a beautiful picture, but the colors bled during application. This happens because common adhesives are often acidic. The acid affects the ink on standard paper, causing it to spread beyond its original lines. This creates a blurry “halo” effect around the edges of your image.
Paper also reacts to humidity. It naturally expands and contracts. When you mount a regular piece of paper, it has no room to move. This lack of space causes the paper to buckle, ripple, or even tear. Your perfect picture can quickly develop ugly wrinkles and dents, ruining the smooth finish you want for your acrylic project.
Solution: Use High-Quality Photo Paper
You must choose paper designed for high-quality photos. Avoid regular copy paper. Instead, select a heavyweight, resin-coated photo paper. These papers are made to hold vibrant ink and resist moisture. They provide a stable base for your image.
Recommended Paper Types for Acrylic Mounting:
- Satin/Lustre Paper: This finish offers great color saturation with minimal glare.
- Metallic Paper: This option gives your photo a unique, almost three-dimensional look with a high-gloss finish.
Using the right paper ensures your photos look sharp and professional. It is the first step toward a flawless final product.
Pro Tip: Ensure Ink is Fully Cured
Patience is essential after printing your photo. Applying adhesive to wet ink will cause immediate problems. You can easily check if your ink is cured.
- Does the print smear with a light touch?
- Are some areas still shiny or wet-looking?
If you see these signs, the ink is not ready. A freshly printed picture needs time to dry completely. Let your print sit for at least 24 hours before you attempt to mount it. This simple step prevents smudges and ensures a crisp, clean transfer to the acrylic.
Mistake #2: Choosing the Wrong Method
After printing a perfect picture, your next step is choosing an application method. Many people fail here because they do not match the method to their materials. This mismatch can instantly ruin your project.
Problem: Mismatched Method & Materials
You cannot use just any method for any print. For example, a heat press is a popular tool, but it will destroy a standard inkjet or laser print. The intense heat will melt the ink and the paper. Similarly, using a liquid adhesive on special sublimation paper can cause the ink to run. Another common error involves clear adhesive films. If you do not print your picture as a mirror image, your final photo will appear backward on the acrylic.
Solution: Match Method to Your Print Type
You must select a method that works with your specific print. The two main categories are cold mounting and heat press.
- Cold Mounting: This is the best choice for standard photos. It uses pressure instead of heat, which protects your print. You can use a pressure-sensitive adhesive film or a liquid optical adhesive. These methods are ideal for non-porous materials like acrylic and work well with lustre paper prints.
- Heat Press (Sublimation): This method is only for sublimation prints. It uses special ink and paper. The heat turns the ink into a gas, which bonds directly with the acrylic surface.
Which Method Should You Use? If you have a standard inkjet or laser print, use a cold mounting method. If you have a sublimation printer and ink, use a heat press.
Pro Tip: Test on a Scrap Piece First
Before you commit your favorite photo to the final block, always perform a test. Use a small, scrap piece of acrylic and a test print. This allows you to check your alignment technique and see how the adhesive behaves. A quick test can save you from a costly and frustrating mistake.
Mistake #3: Poor Acrylic Block Preparation
You might think your new acrylic block is ready to go right out of the package. This assumption often leads to failure. A perfectly clean surface is non-negotiable for a strong, bubble-free bond for your picture.
Problem: Dust & Oils Prevent Adhesion
Even a brand-new acrylic block has invisible enemies on its surface. Oils from your fingers and tiny dust particles create a barrier. This barrier stops the adhesive from making full contact with the acrylic. When you apply your photo, these spots can cause bubbles, weak adhesion, or edges that lift over time. You cannot achieve a professional-looking picture if the foundation is contaminated. A dirty surface will ruin the clarity and bond of your final acrylic block.
Solution: Clean the Block with Isopropyl Alcohol
You must properly clean the acrylic block before application. Isopropyl alcohol is the perfect tool for this job. It cuts through grease and removes static, which helps repel new dust.
How to Clean Your Acrylic Block
- Apply a small amount of isopropyl alcohol to a lint-free microfiber cloth.
- Gently wipe the entire surface of the acrylic where the photo will be placed.
- Let the surface air dry completely before you proceed.
For best results, use an alcohol solution that is safe for acrylic.
- A concentration of around 60-70% isopropyl alcohol is very effective.
- You can achieve this by mixing alcohol with purified water at a ratio of about 2 to 1.
Pro Tip: Work in a Clean, Dust-Free Area
Cleaning your acrylic block is only half the battle. You must also work in a clean environment. Dust in the air can settle on your prepared surface in seconds. To minimize this risk, prepare your workspace. Use an air purifier with a HEPA filter. These filters are excellent at trapping tiny particles, including dust as small as 0.3 microns. Good lighting also helps you spot any stray dust on the acrylic block before you attach your picture. A clean space ensures your hard work results in a flawless photo display.
Mistake #4: Errors When You Put a Photo on the Block
The final step, attaching a picture to the acrylic, is where precision matters most. Rushing this stage can undo all your careful preparation. You need a steady hand and the right technique when you put a photo on the block.
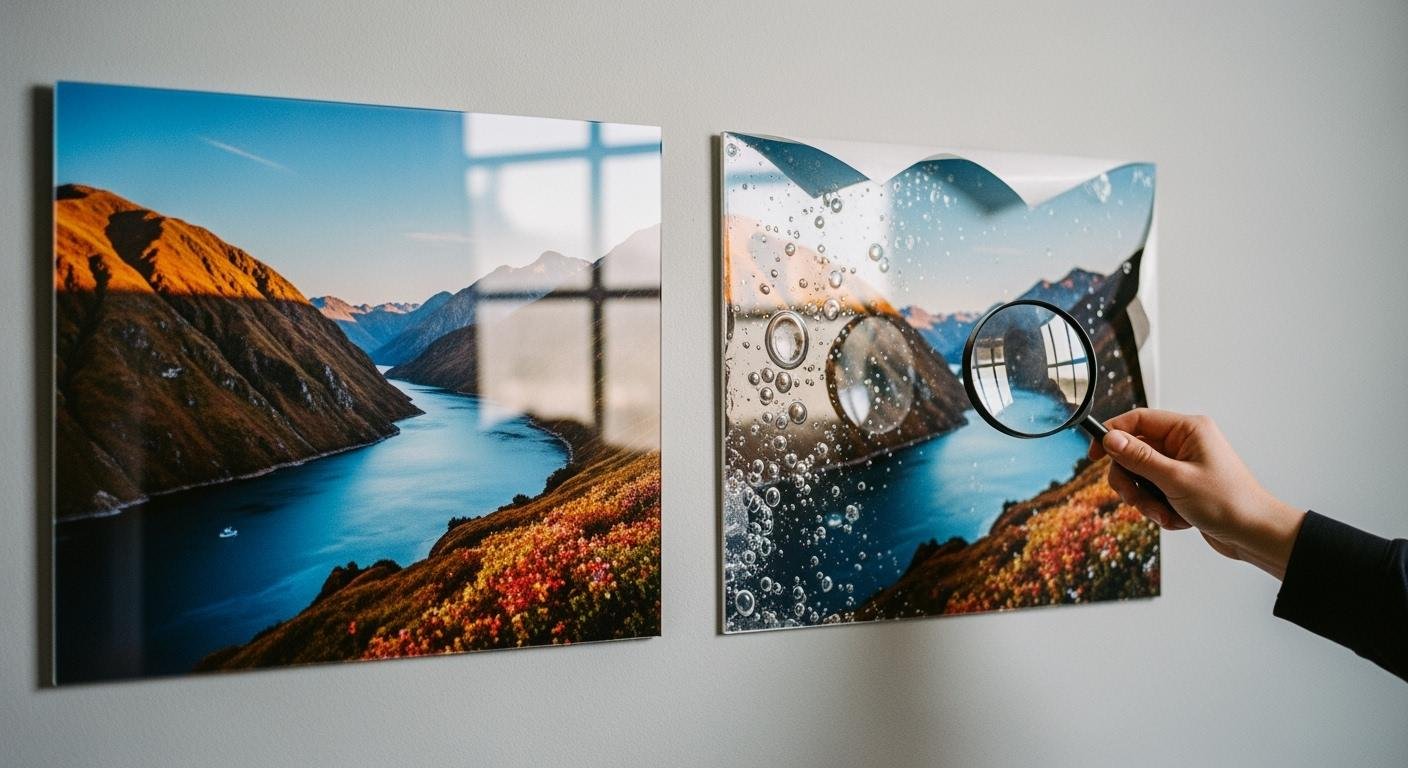
Problem: Bubbles, Misalignment, & Lifting Edges
You carefully place your picture, only to find ugly air bubbles trapped underneath. Misalignment is another common frustration, leaving your picture crooked on the acrylic block. These issues often happen when you try to apply the entire photo at once. Bubbles can also appear later. Environmental factors like heat can cause some adhesives to shrink, pulling the picture away from the acrylic. Using too much adhesive can create the same problem, leading to bubbles and edges that lift over time. These flaws ruin the smooth, professional look of your photos.
Solution: How to Properly Attach a Picture
You can avoid these problems with a careful application method. This technique helps you attach a picture with precision.
The Hinge Method for a Perfect Application
- Peel back only one inch of the adhesive liner from the top of your photo.
- Carefully align that exposed edge with the top of the acrylic block. Take your time to position the picture perfectly.
- Once aligned, press that edge down firmly.
- Slowly pull the remaining liner away with one hand while smoothing the picture down with the other. This process pushes air out as you go.
This method gives you maximum control when attaching a picture, ensuring a straight and bubble-free result.
Pro Tip: Use a Brayer from the Center Outward
Your hands can leave oils and apply uneven pressure. For a truly flawless finish, you should use a brayer. A brayer is a small roller that provides firm, even pressure. After attaching a picture, roll the brayer from the center of the picture out toward the edges. This technique forces any remaining air bubbles out.
There are several types of brayers you can use:
- Soft Rubber Brayers are excellent for applying even pressure across your photo.
- Hard Rubber Brayers are great for general craft and gluing projects.
- Acrylic Brayers are a fantastic choice because they are hard and will not pick up adhesive.
Using a brayer is the final step to properly put a photo on an acrylic block and secure your beautiful picture. This simple tool makes a huge difference when you put a photo on your acrylic.
You can create amazing acrylic photo blocks. Avoid common mistakes like poor material choice, rushed application, and skipping prep work. Your success comes from patience. You must match the right technique to your materials. When you properly put a photo on an acrylic block, you create a lasting piece of art. Your beautiful picture will look professional.
Well-made acrylic photo blocks can last for decades. Your high-quality picture on an acrylic block can preserve its sharp details and vibrant colors for over 20 years.
Following these steps helps you confidently make durable, professional-quality acrylic photo blocks. You will be proud to display your finished picture.
よくあるご質問
Can I use a regular glue stick for my photo?
You should avoid using a regular glue stick. These adhesives are not strong enough for a permanent bond on acrylic. They are also often not acid-free, which can damage your photo over time and cause discoloration. Use a pressure-sensitive adhesive film or liquid optical adhesive instead.
Why does my photo look backward on the acrylic?
Your photo appears backward if you used a clear adhesive film and forgot to print a mirror image. The image is viewed through the acrylic, so you must reverse it beforehand. This ensures the final product displays correctly.
How do I fix a small bubble after application?
You can sometimes fix a small bubble with a pin. pin
Gently prick the center of the bubble with a fine needle. Then, use a brayer or a soft cloth to press the air out through the tiny hole. Work slowly from the outside of the bubble inward.
What is the best paper for this project?
You should use a high-quality, heavyweight photo paper.
- Satin or Lustre Paper: Offers great color with low glare.
- Metallic Paper: Creates a vibrant, high-gloss look.
Always check the adhesive instructions for specific paper recommendations. This ensures the best compatibility and a professional finish.
See Also
Unveiling Acrylic Tray Truths: Simple DIY Projects and Creative Concepts
Choosing and Maintaining White Acrylic Trays: A Comprehensive Care Guide
Your Essential Handbook: Mastering the World of Acrylic Table Stands
Exploring Round Acrylic Trays: Innovative Designs and Everyday Applications
Edge-Lit Acrylic Signs: Understanding Their Definition, Mechanics, and Uses

