
An acrylic block is an essential tool in your crafting kit. The arts and crafts market has shown strong growth, increasing from $44.47 billion in 2024 to an expected $47.35 billion in 2025. You can see this popularity in the tools we use.
Clear acrylic blocks serve a primary function. They are reusable, clear handles for your unmounted stamps. Using clear acrylic blocks allows you to achieve precise placement. You can also apply even pressure, which is key to getting a perfect stamped image every time.
Using Acrylic Blocks for Stamping
Using acrylic blocks for stamping is their main purpose. These tools are your best friend for getting clean, professional-looking images. You can use them with two popular types of stamps. Clear photopolymer stamps stick directly to the block. Red rubber stamps need a cling cushion to adhere. Understanding how to use acrylic blocks correctly is the first step to great results.
Mounting Your Stamp
Mounting your stamp is simple. You place the stamp onto the acrylic block. The natural tack of a clear stamp holds it in place. Red rubber stamps require a bit more preparation if they are unmounted.
-
Clear Photopolymer Stamps: Peel your stamp from its backing sheet. Press the smooth side firmly onto one of your clear acrylic blocks. The stamp will cling securely. The transparency of both the stamp and the block lets you see exactly where you are stamping. This makes layered designs much easier.
-
Red Rubber Stamps: These stamps often give very crisp, fine details. Their opaque backing makes alignment tricky. You can add a sticker guide to the back for perfect placement. To do this, place the sticker on your stamping block, peel the backing, and then press the block onto the back of the rubber stamp. For unmounted rubber stamps, you will need to add a cling cushion. You can use a specialty product like Crafter’s Companion EZMOUNT to make your rubber stamps ready for acrylic blocks for stamping.
Inking the Mounted Stamp
Proper inking is key to a perfect impression. The goal is to cover the stamp design with a thin, even layer of ink. This is an important part of learning how to stamp with an acrylic block.
First, choose the right ink for your project. Different inks produce different results.
| Ink Pad Type | Best For | Notes |
|---|---|---|
| Quick Dry & Finesse Inks | Stamping detailed images | These are designed for crisp images. |
| Water Reactive Inkpads | Blending and distress effects | These inks dry slowly, so they are not ideal for sharp images. |
| Metallic Inkpads | Adding shimmer and metallic detail | These have a generous drying time for blending. |
Once you have your ink, gently tap the ink pad onto the surface of the mounted stamp. Avoid pressing the stamp hard into the ink pad. This can cause ink to get into the small details or onto the edges of the stamp, resulting in a messy image. Knowing how to stamp with an acrylic block means controlling your ink.
Tip: New clear stamps sometimes have a residue that causes ink to bead up. You can “season” the stamp by rubbing it with a pencil eraser or stamping it a few times on scrap paper. This helps the ink stick evenly.
Pro-Tips for a Perfect Impression
You have a mounted and inked stamp. Now you are ready to make your mark! Following these tips for using acrylic blocks for stamping will help you avoid common mistakes and achieve a flawless image every time. This is the final step in how to use acrylic blocks.
| Problem | Avoidance Strategy |
|---|---|
| Distortion | Apply even, gentle pressure. Let the weight of the acrylic stamping blocks do the work. |
| Ink Beading | Season new stamps by rubbing them with an eraser or a stamp cleaner. |
| Residue | Clean new stamps thoroughly before their first use. |
Here is how to stamp with an acrylic block for a great result:
- Place your paper on a soft surface. A foam mat or a mouse pad works perfectly. This surface helps the stamp make full contact with the paper, preventing any skipping in the final image.
- Position your clear acrylic blocks over the paper. Look through the block to align the design exactly where you want it.
- Press down with firm, even pressure. Do not rock the acrylic block back and forth. This can smudge the ink and blur your design.
- Hold the block steady for a few seconds. This gives the ink time to transfer completely from the stamp to the paper.
- Lift the block straight up to reveal your beautiful, crisp impression.
Following these guidelines for acrylic blocks for stamping ensures you get the most out of your tools. Your projects will look more polished and professional with these simple techniques for using acrylic blocks for stamping. Consistent results from using acrylic blocks for stamping make crafting more enjoyable.
Creative Uses for Your Acrylic Block
Your acrylic block is more than just a handle for stamps. It is a multi-purpose tool that can unlock new creative possibilities in your crafting projects. You can move beyond stamping and explore techniques that add unique textures and effects to your work.
As a Reusable Ink Palette
You can use your block as a convenient, non-porous palette. Simply press your ink pads or scribble with water-based markers directly onto the block’s surface. You can then pick up the color with a water brush to paint your stamped images. This gives you complete control over shading and blending.
Creative Tip: Try inking the side of your block and pressing it onto paper. This technique allows you to create custom patterns like plaids or stripes for unique backgrounds.
The Ink Smooshing Technique
The ink smooshing technique creates beautiful, watercolor-style backgrounds. It is simple to do and produces stunning results, like a gorgeous sunset effect.
- Swipe one or more ink colors directly onto your acrylic block.
- Lightly spray the inked surface with water. More water creates a softer look, while less water results in more intense color.
- Flip the block over and press it firmly onto your cardstock.
- Lift the block straight up to reveal a unique, blended background.
- Let the paper air dry or use a heat tool to speed up the process.
As a Pressing and Smoothing Tool
The smooth surface and even weight of clear acrylic blocks make them excellent pressing tools. When you glue down delicate paper elements, you can place the block on top to apply gentle, even pressure while the adhesive dries. This helps you achieve a flat, secure bond without leaving fingerprints. It also works perfectly for smoothing out vinyl decals and removing air bubbles.
For Photography and Display
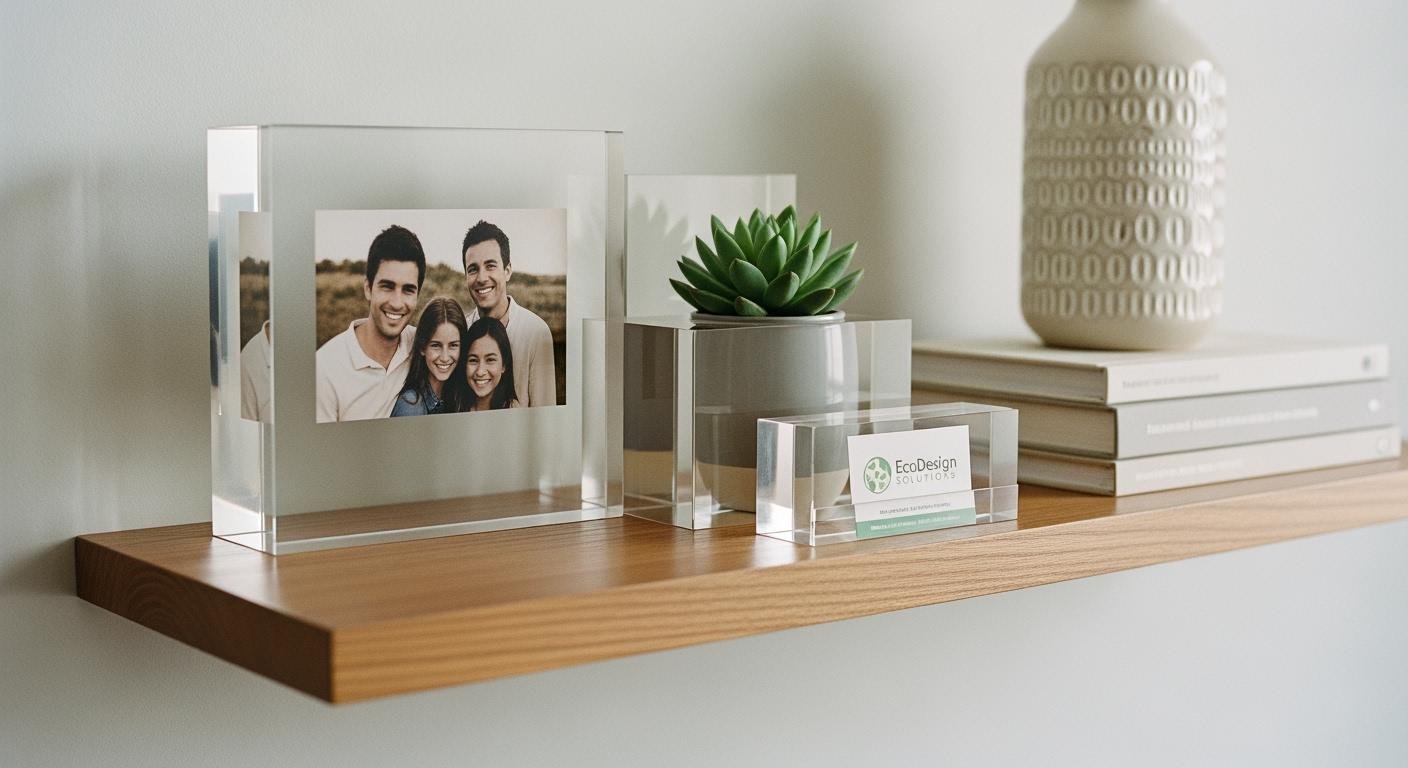
You can elevate your project presentation with clear acrylic blocks. Use them in your photography to make your handmade items shine.
- Place a block behind jewelry to add depth and a clean, modern look.
- Use blocks as risers to give small items a floating appearance.
- Create natural reflections that enhance the sparkle of gems or metallic elements.
You can also use blocks of different sizes and heights as pedestals. This creates an elevated, layered effect for displaying small collectibles or your favorite art pieces.
Choosing and Caring for Your Blocks
Selecting the right tools and caring for them properly helps you get the best results. Your clear acrylic blocks are an investment in your craft. The right choice makes your stamping easier and more precise.
Why Size and Shape Matter
You should choose a stamping block that is slightly larger than your stamp. A block that is too big can be hard to handle. You may want to own a few different sizes for convenience. The shape and design of your clear acrylic blocks also affect your comfort and control.
| Caraterística | Impact on Comfort & Control |
|---|---|
| Finger Grips | These grooves give you better control and reduce hand fatigue. |
| Thickness | A thicker block keeps your fingers away from the ink. |
| Smooth Edges | These are easy to clean but can sometimes be slippery. |
Choosing Clear Acrylic Blocks with Grids
Many clear acrylic blocks come with etched grid lines. These lines offer several advantages for precise stamping.
- They help you align your stamps perfectly straight every time.
- The etched lines are permanent and will not wear off with cleaning.
- The grid, combined with the clear acrylic block, lets you see exactly where you are placing your image.
Cleaning and Storing Your Block
Proper care keeps your acrylic block in great condition. Avoid using cleaners with alcohol or ammonia, as they can damage the surface. You should also avoid paper towels, which can leave scratches. Instead, use a soft microfiber cloth to clean your blocks.
Proper storage protects your tools from scratches and damage.
- Wrap each block in a soft cloth or tissue paper.
- Store your blocks vertically, like books on a shelf.
- Keep them away from direct sunlight and heat to prevent warping.
Following these simple care steps ensures your tools will last for many years.
Your acrylic block is a fundamental tool that improves your stamping. It brings precision and ease to all your crafting projects. You will find it essential for:
- Placing stamps exactly where you want them.
- Switching between different stamp designs effortlessly.
- Using grid lines for perfect alignment.
Beyond stamping, you can use it for ink techniques or as a pressing tool. Embrace this simple item to make your crafting experience easier, more accurate, and more creative.
FAQ
Why won’t my clear stamp stick to my block?
Your stamp or block may have dust or oils on its surface. You can clean both with a stamp cleaner or mild soap and water. A clean surface helps the stamp cling securely. Make sure both items are completely dry before use.
Can I use any ink with my acrylic block?
Yes, you can use any type of ink with your acrylic block. The block itself is non-porous and works with all inks. You should choose your ink based on your stamp type and the paper you are using for the best results.
What is the best way to clean my acrylic block?
You should clean your block with a soft, lint-free cloth, like a microfiber towel. Use a dedicated stamp cleaner or a bit of mild soap and water. Avoid harsh chemicals or alcohol. These can cause the acrylic to crack or become cloudy.
Do I need a block for every stamp size?
You do not need a block for every single stamp. A good starting set includes a small, a medium, and a large block. You should choose a block that is slightly larger than the stamp you are using for better control and visibility.
See Also
Exploring Acrylic Blocks: Understanding Their Definition, Features, and Uses
Unveiling Round Acrylic Trays: Designs and Everyday Practical Applications Explained
Discovering Acrylic Aquariums: Their Definition, Key Features, and Diverse Applications
Debunking Acrylic Tray Myths: Unleashing Creativity with Simple DIY Projects
Compact Acrylic Trays: Ingenious and Versatile Solutions for Everyday Storage Needs

