
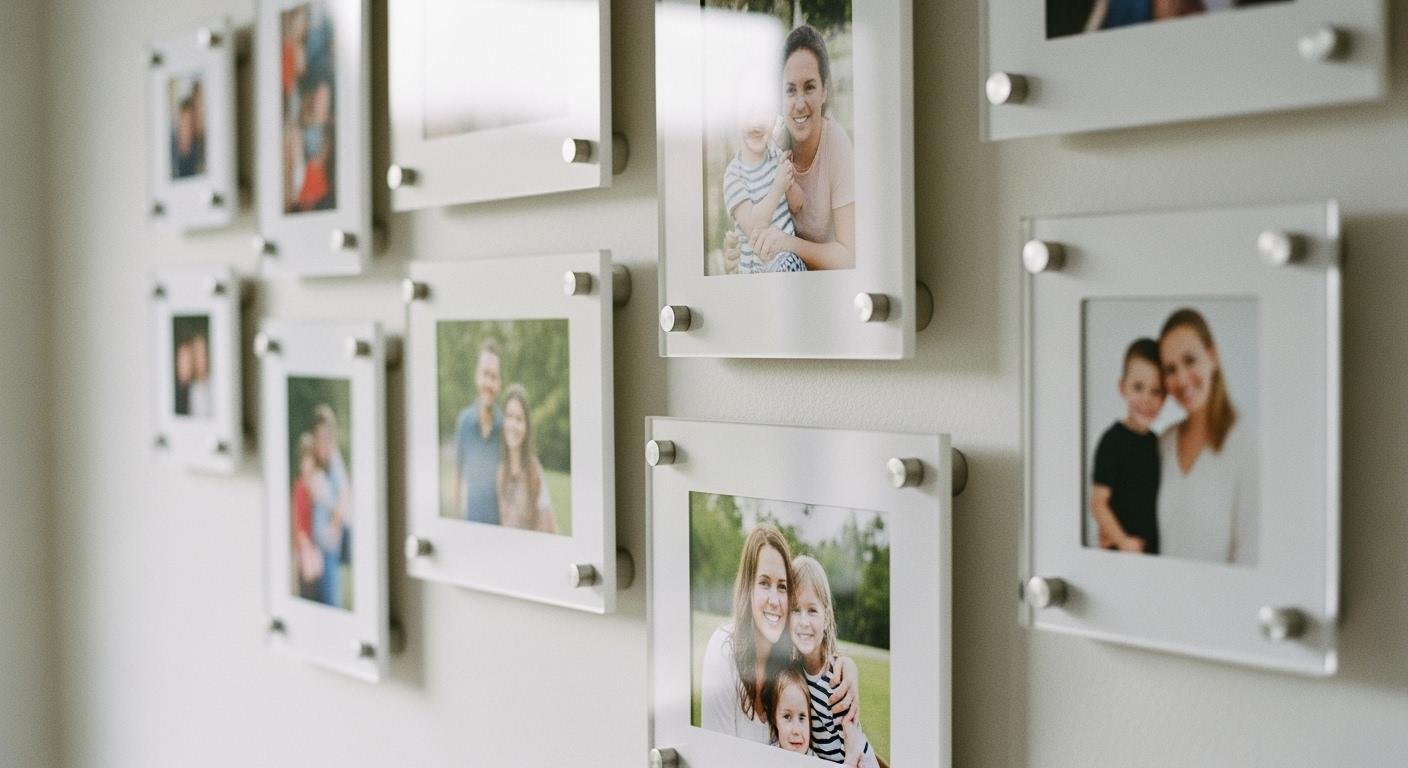
Imagine your favorite photos appearing to float weightlessly on the wall. This creates a clean, museum-quality display right in your own home. This modern aesthetic is a popular trend in home décor, and you can achieve it easily. The secret is the versatile acrylic photo frame.
Did you know? Search interest for ‘frameless acrylic photo frame’ has surged by 168% year-over-year, showing a strong preference for this minimalist look.
Many stylish designs now include acrylic frames, making personalization simple. Ready to turn your cherished memories into a stunning work of art?
Why Use Acrylic Photo Frames?
You might wonder what makes modern acrylic photo frames so special. They offer more than just a pretty look. They combine style, clarity, and strength. This makes them a fantastic choice for your home. Let’s explore the key benefits.
The Unmistakable Floating Effect
The main appeal of an acrylic photo frame is its signature floating effect. Your photo is sandwiched between two clear panels. These panels are held to the wall by metal standoff posts. This design pushes the frame away from the wall, creating a soft shadow. Your image appears to hover in mid-air for a truly captivating display.
Superior Clarity and Photo Vibrancy
Your photos deserve to be seen in their best light. Acrylic offers superior clarity compared to glass. It allows up to 92% of light to pass through. This means your photos will look incredibly sharp and vibrant. Unlike glass, which can absorb light and dull colors, acrylic has almost zero light absorption. This ensures the true colors of your memories shine through without any green tint or distortion.
A Versatile Fit for Any Home Décor
Acrylic photo frames fit seamlessly into any design style. Their minimalist, frameless look complements everything from modern to rustic home décor. Whether you have a colorful, eclectic space or a neutral, calming room, these frames let your photos take center stage. They add a touch of sophistication without clashing with your existing decorations.
Pro Tip 💡: The hardware on acrylic frames often comes in different finishes like chrome, gold, or black. You can match these to other metal accents in your room, such as light fixtures or cabinet pulls, for a cohesive look.
Built-in Durability and UV Protection
Accidents happen, but acrylic is built to last. It is 10 to 20 times more shatter-resistant than traditional glass. This makes it a much safer option, especially in a home with children or pets. Many acrylic photo frames also come with built-in UV protection. This feature helps shield your precious photos from sunlight, preventing fading and keeping them beautiful for years to come.
Step 1: Select the Right Frames
Choosing the perfect frame is the first exciting step in building your gallery wall. You need to consider style, size, and hardware to get the look just right. Let’s break down how to select the right acrylic frame features for your space.
Choosing Your Acrylic Photo Frame Style
You have several great styles to choose from. Each one offers a unique presentation for your photos. The most popular options for acrylic photo frames include:
- Acrylic Sandwich: This is the classic floating style. Your photo is held between two clear acrylic panels, which are mounted to the wall with standoffs.
- Face Mounting: In this method, your photo is attached directly to the back of a single sheet of acrylic for a sleek, high-gloss finish.
- Box Frames: These are modern acrylic boxes that encase your photo, adding depth and a three-dimensional feel to your display.
Deciding on Frame Size and Orientation
Think about your photos and your wall. Most acrylic wall photo frames come in standard sizes that match common photo prints, like 4×6, 5×7, and 8×10 inches. You can also find customised acrylic photo frames for unique art sizes. Decide if your image looks best vertically (portrait) or horizontally (landscape). This choice will influence your entire gallery layout.
Quick Tip: Before you buy, measure your wall space! This helps you visualize how many frames will fit and what sizes will look best together. Getting the right acrylic frame features is key.
Understanding Standard vs. Premium Thickness
The thickness of the acrylic panels also matters. Standard thickness is great for most projects and looks clean and minimalist. If you want a more substantial, high-end look, consider premium thickness. Thicker panels feel more durable and create a more dramatic shadow effect on the wall.
Matching Hardware Finishes to Your Style
The small metal posts that hold the frame to the wall are called standoffs. They are essential for the floating look. These hardware pieces come in various finishes, allowing you to match the right acrylic frame features to your room’s decor. Popular choices for an acrylic photo frame include:
- Polished Chrome
- Matte Black
- Brushed Gold or Champagne
Matching these finishes to your light fixtures or cabinet pulls creates a polished, cohesive look for your acrylic wall photo frames.
Step 2: Create a Stylish Photo Wall
Now that you have your frames, it’s time for the fun part. You get to design the layout! How you arrange your frames determines the mood of your room. Let’s explore a few popular options to help you create a stylish photo wall that tells your story.
The Symmetrical Grid Layout
Do you love a clean, organized look? The symmetrical grid is perfect for you. This layout creates a sense of formal balance and sophistication. It works beautifully in entryways, home offices, or above a console table. You arrange equally sized frames in a precise grid pattern.
- Classic Grid: Use a set of identical frames, like six 20×24 inch frames, for a polished appearance. Black and white photography looks especially striking in this format.
- Modern Grid: You can also mix a few different sizes. For example, try arranging four 18×18 inch frames with four 18×24 inch frames for a contemporary twist.
For a balanced look, a good rule of thumb is to leave 2-3 inches of space between each frame. This keeps your gallery wall from feeling cluttered while ensuring the display looks like a single, cohesive piece of art.
The Eclectic Salon-Style Hang
If you want your personality to shine, the salon-style hang is your go-to. This layout feels more organic and creative. It allows you to mix different sizes, orientations, and even types of art. You can combine your acrylic wall photo frames with paintings, illustrations, and other sentimental objects.
To get started, choose your largest or most powerful piece of art. This will be your “anchor.” Place it slightly off-center and then build your collection around it. Add smaller works and objects, creating a dynamic and personal tapestry of memories. Don’t be afraid to mix in non-traditional items like textiles or decorative plates to add texture and interest to your gallery wall.
The Minimalist Linear Arrangement
For a simple yet impactful statement, try a minimalist linear arrangement. This layout emphasizes clean lines and simplicity. You just line up frames of the same size in a straight row, either horizontally or vertically. This works wonderfully above a long sofa or a headboard, creating a calm and orderly feeling.
When hanging your display, treat the entire row of acrylic wall photo frames as one piece of art. The ideal height for the centerline of your arrangement is generally between 57 to 60 inches from the floor. This places your gallery wall at a comfortable eye level.
Pro Tip: Map Your Layout on the Floor
Before you grab your drill, take a moment to plan. This one step will save you from making unwanted holes in your wall!
Lay all your frames on the floor in the arrangement you have in mind. Move the pieces around until the spacing and balance feel just right. This allows you to see the final composition and make adjustments easily. Once you are happy with the layout, you can start the installation with confidence.
Step 3: Installation and Final Touches
You have your frames and a beautiful layout planned. Now it’s time to bring your vision to life. Proper installation is key to getting that professional, secure finish. Let’s walk through the final steps to get your art on the wall.
Essential Tools for a Perfect Install
Gathering your tools beforehand makes the installation process smooth and easy. You don’t need a professional toolbox, just a few key items. Here is what you will need to hang your acrylic photo frames perfectly:
- Measuring tape
- A bubble level (or a level app on your phone)
- A pencil or painter’s tape for marking
- A drill with the appropriately-sized drill bit
- A screwdriver
- Wall anchors (these are crucial for drywall)
How to Measure and Mark Your Wall
Accurate measurements are the secret to a flawless gallery wall. Take your time with this step to avoid extra holes.
First, decide on the height. A good rule is to hang art at eye level. For rooms where you mostly stand, like hallways, the center of your display should be about 65 inches from the floor. In rooms where you sit, like a living room, aim for 60 inches. If you are hanging a group of frames, treat the entire collection as one piece and center the whole arrangement at eye level.
Pro Tip 💡: A simple way to visualize placement is to imagine your wall divided into four equal sections from floor to ceiling. Your artwork should hang in the third section from the bottom.
Once you know your height, use painter’s tape to mark where the top of your frame will go. This lets you step back and check the placement without leaving pencil marks. Use your level to make sure the tape is perfectly straight. Then, measure down to mark the exact spots for your drill holes. Double-check every measurement before you drill!
Mounting Standoffs for a Secure Hold
The standoff hardware gives your acrylic photo frame its signature floating look and provides a very secure hold. Don’t worry, these mounts are incredibly strong.

Installing them is straightforward. For most homes with drywall, here is the process:
- Drill Pilot Holes: At the spots you marked, drill small pilot holes. Make sure your drill bit matches the size of the wall anchors you are using.
- Insert Wall Anchors: Gently tap a wall anchor into each hole until it is flush with the wall. This step is vital because it prevents the screws from pulling out of the drywall over time.
- Attach the Standoff Barrels: Screw the hollow part of the standoff (the barrel) into each wall anchor. Tighten them until they feel snug and secure against the wall.
- Mount Your Frame: Place your acrylic photo frame over the barrels. The pre-drilled holes in the frame should line up perfectly.
- Secure the Caps: Finally, screw the standoff caps through the frame and into the barrels. Hand-tighten them to hold your art securely in place.
Highlighting Your Art with Ambient Light
The right lighting makes your new gallery wall the true focal point of the room. It adds drama and draws attention to your cherished photos.
Track lighting is a fantastic and versatile option. You can aim each light directly at a specific frame, creating a gallery-like atmosphere. Because the lights are adjustable, you can easily change them if you rearrange your art. Another great choice is a picture light, which you mount directly above the frame for a more focused, intimate glow.
Light Like a Pro: For the most accurate color representation, use light bulbs with a color temperature of 3000K. This is the professional standard used in most art galleries. It provides a clean, neutral light that is warm enough to feel inviting but won’t distort the true colors in your photographs.
More Stylish Ways to Display Memories
Your walls are not the only place for photos. You can find many other stylish ways to display memories throughout your home. Let’s explore some creative ideas that go beyond the gallery wall.
Creating Depth with Layered Displays
You can create a stunning 3D effect on any flat surface. This technique adds visual interest to a mantel, shelf, or console table. Start with a large piece of art as your backdrop. Then, place a smaller tabletop acrylic photo frame in front of it. This simple layering makes your display feel dynamic and curated. The clear design of the tabletop acrylic photo frame ensures the background art is still visible.
Styling Tabletops with Vignettes
A vignette is a small, beautiful grouping of objects. You can easily style a tabletop acrylic photo frame into a charming display. Here are some styling tips:
- Start with a base. Use a stack of books or a decorative tray.
- Mix different heights. Place your tabletop acrylic photo frame next to a taller vase and a shorter candle.
- Add life. A small potted plant or fresh flowers will bring energy to your vignette.
This is a wonderful way to frame kids’ artwork. To style a tabletop acrylic photo frame with your child’s masterpiece, pair it with their favorite small toy and a colorful book for a personal touch.
Using Acrylic Photo Blocks
For a chic and modern look, try an acrylic photo block. These are solid, freestanding blocks of acrylic that give your photo a beautiful, three-dimensional appearance. They are a great alternative to a traditional tabletop acrylic photo frame. Their thick, polished design makes them perfect for desks, nightstands, and bookshelves. Popular sizes like 6×6 or 8×8 inches make a big impact without taking up too much space, enhancing your home décor.
As Unique Room Dividers
You can use acrylic photo frames in a truly unique way. Suspend them from the ceiling to create a custom room divider. This is a fantastic solution for open-plan living spaces. You can define different zones without building a wall. Special hardware kits use ceiling-to-floor cables to hang a series of large acrylic photo frames. This creates a floating, see-through partition that is both functional and artistic.
You now know the key steps to create your own floating gallery. You can select the perfect acrylic photo frame, design a stylish layout, and install it with care. These versatile acrylic photo frames are a simple yet powerful update for any home décor. Now you are ready to transform your home and elevate your home décor.
Go ahead and start your project today. You will love seeing your beautifully displayed memories! ✨
FAQ
How do I clean my acrylic photo frames?
You should use a soft, microfiber cloth to clean your frames. If needed, you can dampen the cloth with a little water. Avoid glass cleaners or paper towels, as they can scratch the surface. A gentle wipe keeps them looking crystal clear. ✨
Will my acrylic frames turn yellow?
High-quality acrylic frames include UV protection. This important feature prevents them from turning yellow over time, even in sunny spots. Your frames will stay clear and beautiful for years. You can display your photos without any worry.
Can I easily change the photo inside?
Yes, it’s very simple! You just unscrew the four standoff caps on the front. This lets you separate the two acrylic panels. Swap out the photo, put the panels back together, and screw the caps back on.
Are acrylic frames safe for a child’s room?
Absolutely! Acrylic is much stronger and more shatter-resistant than glass. This makes it a safer choice for homes with children or pets. You get a stylish look without the risk of dangerous broken glass if an accident happens.
See Also
Innovative Display Ideas: Acrylic Tabletop Stands for Eye-Catching Showcases
Ten Elegant Methods to Revitalize Your Space Using Acrylic Trays
Discover Ten Ingenious Home Styling Techniques with Small Acrylic Trays
Organize Your Tabletop Elegantly: Large Acrylic Trays for Chic Spaces
Your Comprehensive Handbook: Mastering Acrylic Table Stands for Displays

