

You probably know how messy craft supplies can get. Without storage boxes, you face limited space, clutter, and trouble finding what you need. When you organize craft supplies with the right boxes—like tackle boxes, clear shoe boxes, or even containers you already own—your supplies stay tidy and easy to grab. Most crafters save almost four hours a week and cut setup and cleanup time down to just a few minutes. Ready to make your crafting time more fun?
Sort and Categorize Craft Supplies
Group by Type or Use
You can make your crafting life much easier when you group your craft supplies by type or use. Start by pulling everything out so you can see what you have. Think about the crafts you love most and how you like to work. Do you reach for paper, beads, or fabric first? Place similar items together. For example, put all your paper in one pile, beads in another, and tools in their own spot.
- Paper
- Beads
- Adhesives
- Fabric
- Tools
When you sort your supplies this way, you create a system that helps you find what you need fast. You will spend less time searching and more time making things. This method also keeps your space neat and inspires you to finish projects. If you use some items more often, keep them close by. Less-used supplies can go in higher or lower spots.
Tip: Use clear boxes or jars for small items. You can see everything at a glance and nothing gets lost.
Declutter and Decide What to Keep
Now that you have sorted your supplies, it is time to declutter. Set aside some time just for this task. Make three piles: keep, donate or sell, and trash. If something is broken or dried out, toss it. If you have supplies you never use, think about giving them to a friend or a local school.
- Focus on one category at a time.
- Throw away anything that is broken or unusable.
- Donate or sell items you do not need but are still good.
- Keep only what you love and use.
- Store your favorites in your chosen boxes.
Label your boxes if you want to stay organized. Plan to do a quick clean-up every season. You will enjoy your space more and always know where everything is. When you organize craft supplies this way, you make crafting fun and stress-free.
Choose Storage Boxes for Organizing Craft Supplies
Size and Shape Options
When you organize craft supplies, picking the right size and shape for your storage solutions makes a huge difference. Large bins work well for bulky items like yarn or fabric. Smaller boxes fit beads, buttons, or thread. Vertical storage helps you see vinyl rolls and grab them fast. If you use consistent totes and labels, you spend less time searching and more time creating. Stackable storage bins save space and keep your supplies tidy. You can mix white and clear bins to make your craft area look simple and calm. Easy access to tools encourages you to finish projects, and well-organized crafters often complete twice as many projects.
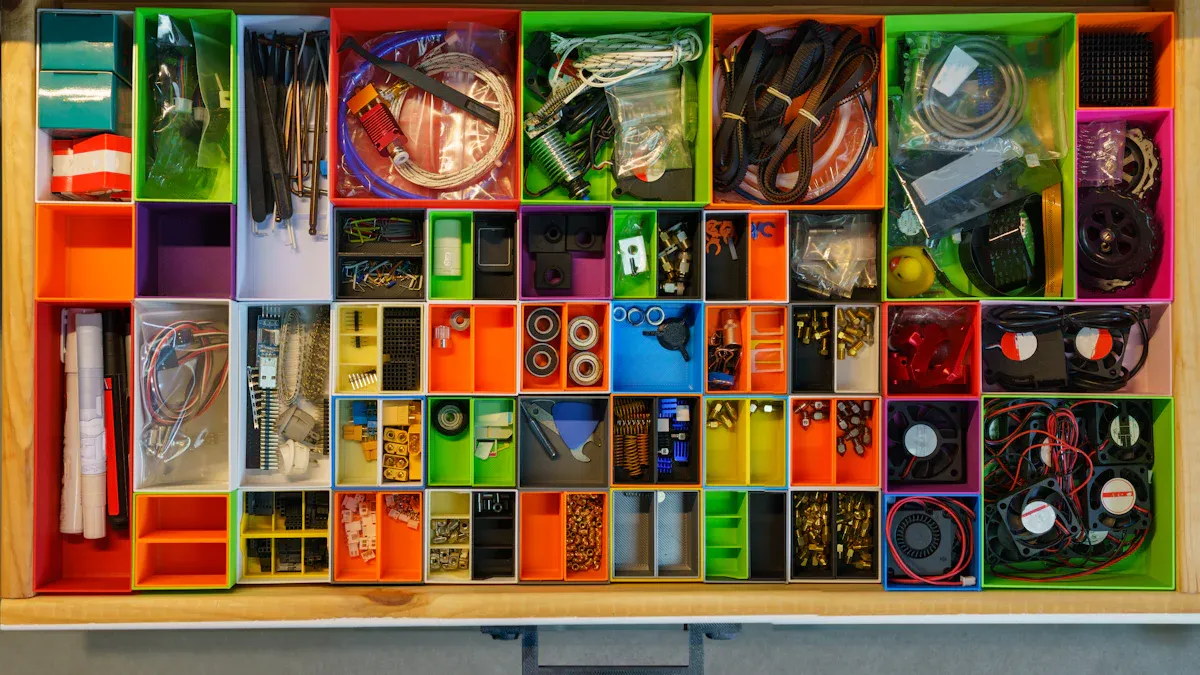
Tip: Try tackle boxes, toolboxes, clear shoe boxes, or under-bed bins for flexible storage solutions. These options let you customize your setup and keep everything within reach.
Material and Durability
You want storage solutions that last. Most popular bins use tough plastic like polypropylene. These stackable storage bins resist cracks and keep your supplies safe. Some brands, like ArtBin and Dial Industries, offer clear, sturdy boxes with secure lids. Blick Archival Storage Boxes use acid-free material and metal edges for extra protection. Here’s a quick look at some choices:
| Storage Box Name | Material | Description |
|---|---|---|
| ArtBin Solutions Boxes | Translucent plastic | Many sizes and setups for craft supplies. |
| ArtBin Sidekick Storage Bin | Polypropylene | Tough, clear tote with secure closure. |
| Dial Industries Tuft Totes with Lids | Extra-sturdy plastic | Clear bins perfect for arts and crafts. |
| Blick Archival Storage Boxes | Acid-free material | Strong metal edges for archival-quality storage. |
Plastic bins are easy to clean and stack. If you want to help the environment, look for fabric bins made from recycled materials or reuse containers you already have.
Clear vs. Opaque Boxes
Clear storage solutions let you see what’s inside, so you find items quickly. This works well in busy craft rooms. Opaque boxes hide clutter and give your space a neat look. You might use clear bins for items you grab often and opaque bins for things you don’t need every day.
-
Clear Storage Boxes
- Let you see contents fast
- Help manage inventory
- Can show clutter if not organized
-
Opaque Storage Boxes
- Hide mess and keep things looking clean
- Make it harder to find items quickly
If you want to save money, use old bottles, mason jars, cookie tins, or shoeboxes as storage solutions. Tote bags and reusable canvas bags also work well for organizing craft supplies.
Label and Identify Craft Supplies
Simple Labeling Methods
You want to find your craft supplies fast, so you need clear labels. When you label everything, you save time and avoid messes. Professional organizers suggest a few easy ways to make your labels stand out:
- Write dual-purpose labels. Add not just the name, but also when or how you use the item. For example, write “Red cardstock – holiday cards & Valentine’s projects” instead of just “Red cardstock.”
- Use computer-generated labels. Programs like Canva, Excel, or Word help you create neat templates. Print them and stick them on your bins.
- Try stickers. Pre-printed stickers or sticker letters work well on smooth, flat containers.
- Grab a label maker. These tools create small, neat labels for narrow spaces. You can pick different sizes and colors.
- Use bookplates. These add a decorative touch and make your labels look special.
When you label everything, you cut down on lost items. Studies show that good labeling systems help you keep track of your supplies. You will spend less time searching and more time creating.
Tip: Make it a habit to label everything as soon as you add new items to your collection.
Color Coding Ideas
Color coding makes it even easier to spot what you need. Your brain loves color groups, so you find things faster. You can use colored labels, bins, or even washi tape to sort your supplies. Here’s a simple way to set up your color system:
| Color Category | Craft Type |
|---|---|
| Blue | Sewing |
| Green | Paper crafts |
| Yellow | Embellishments |
| Red | Adhesives and functional items |
- Color coding helps you organize in busy or low-light rooms.
- It lines up with how your brain sorts things.
- You can grab the right box without reading every label.
When you label everything and use color coding, you make your craft area work for you. You will notice fewer misplaced items and a smoother crafting process.
Maximize Storage Space for Craft Supply Organization
Stacking and Vertical Storage
You can make your craft area feel bigger by stacking bins and using vertical storage. Shelves, pegboards, and wall-mounted bins help you use every inch of space. When you store items vertically, you see everything at a glance. You grab what you need faster and keep your supplies tidy. Vertical storage systems let you locate items up to 28% faster than horizontal setups. You also save money because well-designed vertical storage costs less per cubic inch. Try floating shelves or pegboards for tools and supplies. Stackable bins work well for paper, yarn, or fabric. You can even use magnetic strips on the wall for small metal tools.
Tip: Light-colored walls and furniture make your space look larger and brighter.
| Strategy | Description |
|---|---|
| Using vertical space effectively | Install shelves and wall-mounted bins to keep craft supplies organized and accessible. |
| Organizing supplies by usage | Create zones for items you use often and keep them within easy reach. |
| Budget-friendly storage | Repurpose everyday items and use affordable bins for organization. |
Wall, Closet, and Under-Bed Solutions
You can use the back of your closet door with an over-the-door organizer. Wheeled storage bins slide under your bed and give you easy access. Labeled plastic bins protect your supplies from dust and stack neatly. Wall-mounted bins work well for small items and keep your workspace clear. Try DIY storage with upcycled materials for a personal touch. Rolling carts move wherever you need them and hold your favorite supplies.
- Over-the-door organizers fit tools and small items.
- Wheeled bins make under-bed storage simple.
- Labeled bins keep everything sorted and easy to find.
Bookshelves and Baskets
Bookshelves help you organize larger supplies. You can use baskets to group items by type, like stamps or stencils. Wicker baskets look nice and adapt to different sizes. Wall-mounted bins add extra storage above your shelves. Floating shelves give you more vertical space. Pegboards let you hang tools and supplies where you can see them.
- Install floating shelves for extra storage.
- Use pegboards for flexible tool storage.
- Add wall-mounted bins for small items.
You keep your craft supplies accessible and tidy when you use these strategies. Your space stays neat, and you spend more time creating.
Organizing Craft Supplies: Setup Guide
Step-by-Step Checklist
You want your craft space to work for you, not against you. Setting up a craft supply organization system can feel easy when you follow a clear checklist. Professional organizers use these steps to help you get started:
-
Empty and Clean the Space
Take everything out of your craft area. Wipe down shelves, drawers, and bins. A clean space helps you see what you have and gives you a fresh start. -
Group and Sort Supplies
Put similar items together. Make piles for stamps, needlepoint materials, colored pencils, and other categories. This step helps you see what you own and what you use most. -
Evaluate Supplies
Look for duplicates or things you never use. Decide if you want to donate, toss, or keep each item. You will feel lighter and more focused when you let go of clutter. -
Find Appropriate Containers
Choose bins, boxes, or baskets that fit your supplies. Pick shallow drawers instead of deep ones so you can see everything. Shallow containers keep your items visible and easy to grab. -
Organize by Workflow
Think about how you craft. Place supplies you use together in the same spot. This makes your creative process smoother and saves time. -
Maximize Vertical Space
Use shelves, wall-mounted bins, or pegboards. Vertical storage keeps your workspace open and tidy. You can reach your supplies quickly and keep your area clutter-free. -
Label Everything
Add clear labels to every box and bin. Use color coding if you like. Labels help you find what you need fast and keep your system working.
Tip: Avoid deep, overstuffed drawers. They hide supplies and make it hard to stay organized. Shallow bins and clear containers work best for craft supply organization.
Maintenance Tips
You want your craft supply organization to last. A few simple habits can keep your space neat and inspiring all year long.
- Set up zones for different projects. Keep all the supplies for each project together. This makes it easy to start and finish your crafts.
- Create a drop zone for current projects. Use open-top bins for things you grab often. You will always know where your work-in-progress lives.
- Write down an inventory of your materials. A simple list helps you track what you have and avoid buying doubles.
- Use a miscellaneous box for odd items. If something does not fit a category, drop it here. Sort this box every few months.
- Group categories even further if your collection grows. For example, split “paper” into “cardstock” and “patterned paper.”
- Label everything. Labels keep your system strong and help everyone in your home find supplies.
- Try a “one in, one out” rule. When you buy something new, let go of something old. This keeps your collection fresh and manageable.
- Clean up after each crafting session. Spend five minutes putting things back. Your space will stay ready for your next project.
- Use project trays for flexible organization. Move trays around as you work on different crafts.
- Choose vertical, clear storage for the best visibility. You will always see what you have and keep your area open.
- Review your craft supplies at least twice a year. Seasonal checks help you stay organized and match your supplies to your current interests.
Note: Experts say that regular reviews and small clean-ups make craft supply organization easier to maintain. You will spend less time searching and more time creating.
A good organization system grows with you. When you organize craft supplies and keep up with these tips, your creative space will always feel inviting and ready for your next idea.
You can transform your craft space by sorting supplies, picking the right storage boxes, labeling everything, and using every inch of space. When you set up your system, you make crafting easier and more fun. Here’s what you gain:
- You find your favorite tools fast and feel less stressed.
- Most crafters feel more inspired and motivated in tidy spaces.
- An organized area helps you enjoy crafting and boosts your mood.
Start today and enjoy a creative space that works for you!
FAQ
How do I choose the right size storage box for my craft supplies?
Think about what you want to store. Small items like beads fit in tiny boxes. Large items like fabric need bigger bins. Stackable boxes save space. Try to measure your shelf or drawer before you buy.
What can I use if I don’t want to buy new storage boxes?
You can use things you already have at home. Try these ideas:
- Shoe boxes
- Mason jars
- Cookie tins
- Tote bags
Tip: Reusing containers saves money and helps the planet.
How do I keep my craft supplies organized over time?
Set a timer for five minutes after each craft session. Put everything back in its place. Label new items right away. Review your supplies every few months. This habit keeps your space tidy.
Which storage boxes work best for small craft items?
| Item Type | Best Storage Option |
|---|---|
| Beads | Tackle box or pill case |
| Buttons | Small jars |
| Stickers | Accordion folder |
| Thread | Floss organizer |
You find small items faster when you use divided boxes.
See Also
Acrylic Trays: The Perfect Storage Solution for Any Space
Elevate Your Tabletop With Chic Large Acrylic Trays
10 Innovative Ideas for Decorating Small Acrylic Trays

