
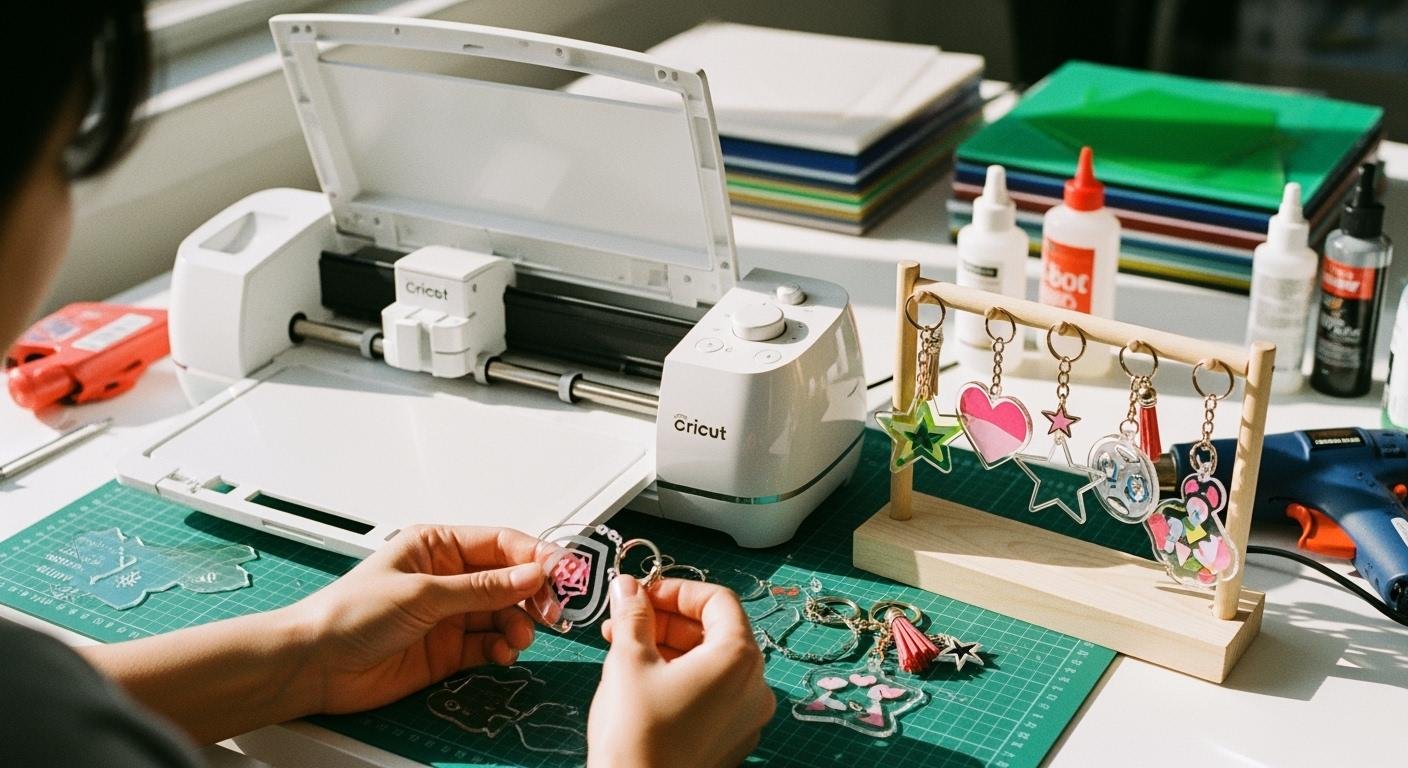
Yes, you can use Cricut make acrylic keychains that last. When you try diy acrylic keychains, you get strong results because:
- Permanent vinyl stands up to lots of use.
- Sealing with UV resin protects your design.
Jump into this cricut tutorial and see how easy it is to make acrylic keychains your way!
Materials Needed to Make Acrylic Keychains
Before you start making your own keychains, you need to gather the right supplies. Having the right materials makes the process smoother and helps your keychains last longer.
Cricut Machine and Tools
You can use any Cricut cutting machine for this project, including the Cricut Joy or Explore 3. Here’s what you’ll want on your craft table:
- Cricut machine (any model)
- Fine point blade
- StandardGrip cutting mat (blue or green)
- Weeding tool
- Scraper
- True control knife
- Transfer tape
Tip: Always move the white star wheels on your Cricut roller bar to the right when cutting special materials on Cricut. This helps prevent marks on your acrylic blanks.
Acrylic Blanks and Vinyl
Acrylic blanks come in different shapes and thicknesses. Thicker blanks feel sturdier and last longer. Here’s a quick guide:
| Thickness | Description |
|---|---|
| 2mm | Lightweight, budget option |
| 3mm | Standard, good balance |
| 5mm | Premium, extra durability |
| 8mm | Ultra-thick, statement piece |
You’ll also need:
- Permanent adhesive vinyl (SmartVinyl or regular)
- Acrylic keychain blanks (look for PMMA material for best results)
- Transfer tape
Keychain Hardware and Extras
To finish your keychain, grab these extras:
- Keychain rings and jump rings
- Pliers
- UV resin and UV light (for sealing)
- Gloves (optional for safety)
- Jewelry charms (for extra flair)
- Glitter or paint (for custom designs)
- Lint roller or tape (for cleaning up fragments)
You can find high-quality acrylic blanks and vinyl at places like Craft Cameleon or Amazon. Remember, the materials needed to make acrylic keychains can affect how long your project lasts and how good it looks.
How to Make Acrylic Keychains with Cricut
Ready to learn how to make keychains that look awesome and last? You can use your Cricut make acrylic keychains in just a few steps. Let’s walk through how to make keychains from start to finish.
Design in Cricut Design Space
Start by opening Cricut Design Space. Pick a shape or upload your own image. You can add text, patterns, or even your favorite emoji. Make sure your design fits the size of your acrylic blank. If you want intricate patterns, keep these tips in mind:
- Use a squeegee with a felt edge for smooth application later.
- Choose permanent adhesive vinyl like Oracal 651 for designs that last.
- Wear gloves to keep fingerprints off your vinyl.
You can use Cricut Joy, Explore, or Maker for this step. Just make sure your design is ready to cut.
Cut and Weed Vinyl
Now, let’s cut your design. Place your vinyl on the cutting mat and load it into your Cricut machine. Run the cut and check the results before unloading. Here’s a table with best practices for cutting and weeding:
| Best Practice | Description |
|---|---|
| Test Cuts | Run a few test projects to find the right depth and number of passes. |
| Check Cuts | Always check your cut before unloading the mat. |
| Weeding Tool | Use a weeding tool to lift a corner for easier weeding. |
| Clean Separation | If the design separates cleanly, start weeding. |
| Re-run Cuts | If the cut isn’t clean, re-run before unloading. |
| Use Natural Light | Hold vinyl up to a window to see cut lines. |
| Tape for Complex Designs | Tape complex designs to the window for easier weeding. |
| Invest in Bright Pad | Use a Bright Pad for intricate cut lines. |
| Use Transfer Tape | For simple designs, peel and stick. |
| Strong-Grip Transfer Tape | Use for difficult-to-lift designs. |
When you weed your vinyl, go slowly around letters and fine details. Use a weeding tool for small pieces. Remember to weed out the inside parts, too. If your design is tricky, cut it into smaller sections to make weeding easier.
Apply Vinyl to Acrylic
Before you stick your vinyl, clean your acrylic blank with alcohol. Dry it with a lint-free cloth. Remove any protective film. If you want to avoid air bubbles and misalignment, follow these steps:
- Clean the surface and dry it completely.
- Smooth the surface with a flat scraper if needed.
- For larger sheets, spray a little water mixed with dish soap.
- Start from one edge and work across, smoothing as you go.
- Use a squeegee to press the vinyl down firmly, working from the center out.
- Take your time to make sure the vinyl sticks well.
Transfer tape makes transferring your designs to your diy keychain much easier. Use StrongGrip Transfer Tape for glitter, shimmer, or foil vinyl. For regular vinyl, standard transfer tape works great.
Add Glitter and Seal
Want to make acrylic keychains sparkle? Add glitter or paint before sealing. After decorating, seal your design with UV resin. UV resin gives a smooth, professional finish and protects your vinyl and glitter from wear and tear. You won’t see brush lines, and your keychain will last longer.
Attach Keychain Hardware
Now, let’s talk about attaching hardware to your finished diy keychains. Use pliers to gently open the jump ring sideways. Slide the jump ring through the acrylic hole. Attach the lobster clasp or keychain ring onto the same jump ring. Use pliers to close the ring and check that it’s secure. Wipe the surface with a microfiber cloth to remove fingerprints. If you want extra security, you can glue the jump ring before closing.
Tips for Durable Keychains
You want your keychains to last, right? Here are some tips for how to make keychains that stand up to daily use:
- Mix a few drops of dish soap with warm water and gently wipe with a soft cloth.
- Dry with a microfiber towel. Avoid paper towels and ammonia-based cleaners.
- For stubborn dirt, use a dedicated plastic cleaner.
- Always sand edges before applying designs for better adhesion.
- Choose PMMA acrylic blanks for best results.
- Handle your keychain gently to avoid scratches.
- Minimize touching the surface to reduce fingerprints.
- Clean with alcohol if needed.
Here’s a table of common mistakes to avoid when you make acrylic keychains:
| Mistake to Avoid | Description |
|---|---|
| Hand-cutting complex shapes | Use laser cutting for intricate designs, not hand tools. |
| Working in cold temperatures | Acrylic gets brittle below 50°F (10°C); keep workspace warm. |
| Using low-quality materials | Avoid ‘craft acrylic’ from dollar stores; pick PMMA products. |
| Not sanding edges | Sand edges before applying designs for better adhesion. |
If you run into trouble, clean the acrylic with alcohol to help vinyl stick. Use clear vinyl on top of your design to prevent lifting or scratching. Handle your acrylic gently and keep it clean for the best results.
Now you know how to make acrylic keychains with Cricut make acrylic. Try different designs, colors, and finishes. You’ll love how easy it is to make acrylic keychains that last!
You can make acrylic keychains that last by following these steps: design, cut, weed, apply, decorate, seal, and assemble. Use Permanent Smart Vinyl for strong results. Try creative ideas like layering vinyl, adding names, or using fun shapes. Explore Cricut Design Space and let your imagination guide you!
FAQ
Can you use Cricut Joy to make acrylic keychains?
Yes, you can use Cricut Joy. It works well for small designs. You just need the right vinyl and acrylic blanks.
How do you keep vinyl from peeling off acrylic keychains?
Tip: Seal your vinyl with UV resin or clear acrylic spray. This helps protect your design and keeps it stuck for a long time.
What is the best way to clean acrylic keychains?
Use a soft cloth and mild soap. Avoid harsh cleaners. Dry with a microfiber towel to keep your keychain shiny and scratch-free.
See Also
Understanding Acrylic Trophies: Features, Uses, and Definitions
Debunking Acrylic Tray Myths with Simple DIY Solutions
Exploring Impact-Modified Acrylic: Definitions, Features, and Uses
Acrylic Cosmetic Organizers: Definitions and Practical Applications

