
You can create amazing personalized keychains! This keychain project for beginners is simple and very rewarding. With the personalized gifts market expected to grow by 6.7% annually, your custom keychain will be a trendy creation. This 2026 guide ensures you get a perfect result on your first try.
Your path to a perfect keychain involves four simple actions:
- Gather your materials.
- Apply your unique design.
- Seal the keychain for durability.
- Assemble the final piece.
Let’s start making your first of many diy acrylic keychains. These acrylic keychains are fun to make and share.
Supplies for DIY Acrylic Keychains
Gathering the right supplies is your first step to success. Choosing quality materials ensures your finished keychain looks professional and lasts a long time. Let’s look at the materials you will need.
Core Project Materials
You need a few basic items to start. These are the non-negotiable materials for any acrylic keychain project.
- Acrylic Keychain Blanks: These come in many shapes like circles, hearts, and hexagons. Most have a protective film you will peel off before decorating.
- Keychain Hardware: This includes the metal ring and chain. You can buy these in kits that often include jump rings and clasps.
Pro Tip: When you choose your acrylic blank, think about your design first. A complex design might need a larger, simpler shape like a circle or rectangle.
Design Application Tools
This is where your creativity shines! You can apply your design in several ways. Your choice of tools depends on the look you want for your acrylic keychains.
| Method | Tools Needed | Лучшее для |
|---|---|---|
| Vinyl Decals | Adhesive vinyl, cutting machine (optional) | Clean lines, text, and layered colors |
| Painting | Acrylic paint pens or fine-tip brushes | Hand-drawn art and organic looks |
| Bling | Rhinestones, gem glue, wax-tip pencil | Adding sparkle and a textured 3D effect |
Sealants for a Lasting Finish
You must protect your design from scratches and wear. A sealant creates a durable, glossy topcoat for your keychain. You can use a UV resin kit for a thick, glass-like finish or a clear spray sealant for a quicker, thinner coat.
Optional Customization Tools
Want to make your diy acrylic keychains extra special? These optional materials add unique flair. For a cute ‘kawaii’ style, you can add fake whipped cream and tiny plastic charms. You can also attach tassels or custom beads to your keychain. For that, you will just need a pair of needle nose pliers to open and close jump rings and sharp scissors to trim any threads.
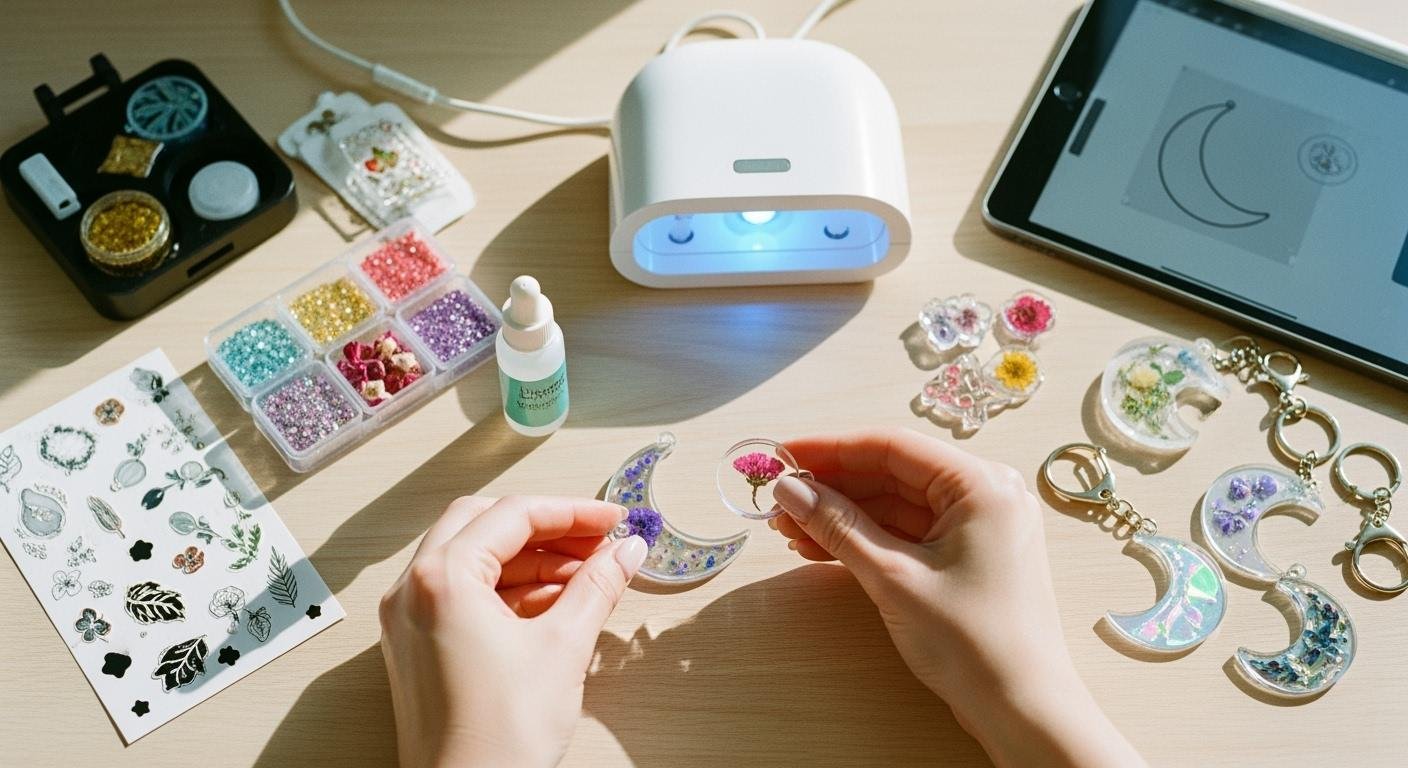
Creating Your Acrylic Keychains: A Guide
With your supplies ready, you can now move on to the fun part: making your keychain! This guide walks you through each step, from digital design to final assembly. Let’s get started.
Step 1: Prepare Your Artwork
A great keychain starts with a great design. Before you touch the acrylic, you need to design your artwork. You have many free tools available to help you create the perfect look.
- Online Designers: These are great because you don’t need to install anything. You can design from any computer or tablet with internet access.
- Desktop Software: You can install free programs on your Windows or macOS computer. These often have more features and are perfect for bigger projects.
- Mobile Apps: You can find free design apps for Android and iOS. These let you create designs right from your phone.
Pro Tip: For the best print quality, your image files matter. Always start with a high-quality image. A resolution of 300 DPI (dots per inch) is the standard for crisp prints. If your keychain is smaller than one inch, aim for 600 DPI to keep details sharp.
When you save your file, choose the right format.
- PDFs are a safe bet for most documents.
- High-resolution JPEGs or TIFFs work well for images.
- EPS or AI files are best for logos and illustrations because they are vector files. You can scale them to any size without losing quality.
Avoid using formats like PNG, GIF, or Word documents for printing, as they can cause issues with color or resolution.
Step 2: Apply Your Design to the Blank
Now you can transfer your art onto the acrylic. First, remember to peel the protective film off the side of the acrylic you plan to decorate. How you apply your design depends on the method you chose.
Method 1: Using Vinyl Decals This method gives you clean, sharp lines. It’s perfect for text and logos.
- Cut Your Design: Use a cutting machine to cut your design from adhesive vinyl. Remember to mirror the image if you are applying it to the back of the blank.
- Weed the Vinyl: Carefully remove the extra vinyl from around your design.
- Transfer the Design: Apply transfer tape over your vinyl decal. Peel the backing off the vinyl.
- Apply to Acrylic: Carefully place the decal on your acrylic blank. Use a scraper tool or credit card to press it down firmly, working from the center outwards to push out any air bubbles.
- Remove Tape: Slowly peel the transfer tape away, leaving your design on the keychain.
Method 2: Painting Directly on the Blank This is your chance to create a one-of-a-kind, hand-drawn piece.
- Clean the Surface: Wipe the acrylic blank with a soft cloth to remove any dust or fingerprints.
- Start Painting: Use acrylic paint pens or a fine-tip brush to draw your design. Let each color dry completely before adding another to prevent smudging.
- Let It Dry: Allow your finished design to dry fully according to the paint manufacturer’s instructions.
Method 3: Applying Rhinestones Add some sparkle for a glamorous 3D effect.
- Plan Your Placement: Lightly sketch your design or place the rhinestones without glue to plan your layout.
- Apply Glue: Use a precision-tip bottle to apply small dots of gem glue where you want the rhinestones.
- Place the Gems: Use a wax-tip pencil to easily pick up and place each rhinestone onto the glue dots.
- Let It Cure: Let the glue dry completely, which can take several hours. Avoid touching the keychain during this time.
Step 3: Seal Your Keychain for Protection
To make your diy acrylic keychains last, you need to protect the design. This step will lock and seal your keychain from scratches and wear.
Using Epoxy Resin for a Glossy Finish Epoxy resin creates a thick, durable, and glass-like coating.
- Read the Instructions: Always read the directions for your specific brand of resin first.
- Mix the Resin: In a well-ventilated area, measure and mix the resin and hardener in a disposable cup. Stir slowly for about 5 minutes until it’s fully combined.
- Pour the Resin: Carefully pour the mixed resin over your design. It will level itself out. Pour just enough to cover the design in a thin, even layer.
- Remove Bubbles: Use a heat gun or torch to pop any air bubbles. Hold it a few inches from the surface and move it back and forth.
- Let It Cure: Cover the keychain to protect it from dust. Let it cure in a warm, dry room. The ideal temperature is 70-75°F (21-24°C) with 40-50% humidity. It will be tack-free in about 24 hours and fully cured in 48-72 hours.
Using a Spray Sealant for a Quick Coat A clear acrylic spray sealant is a faster option for a thinner protective layer.
- Spray Outdoors: In a well-ventilated area, hold the can about 6-8 inches from the keychain.
- Apply Light Coats: Spray a light, even coat over the design.
- Dry and Repeat: Let it dry for about 15-20 minutes, then apply a second coat for extra protection.
Alternative Sealing Tip: For a simple, non-messy option, you can apply a layer of clear, permanent vinyl over your design. This adds a sturdy layer of protection for your acrylic keychains.
Step 4: Assemble the Hardware
You are on the final step! It’s time to turn your decorated acrylic piece into a functional keychain.
- Open the Jump Ring: Use two pairs of pliers to grab each side of the jump ring. Twist the ends apart—do not pull them straight out.
- Connect the Pieces: Slide the open jump ring through the hole in your acrylic blank and the loop on the keychain chain.
- Close the Jump Ring: Use the pliers to twist the jump ring back together until the ends meet perfectly.
Congratulations! You have just created one of many amazing diy acrylic keychains.
Pro Tips for a Flawless Finish
You are ready to take your skills to the next level. These professional tips will help you create a keychain that looks amazing and is free of common mistakes. Let’s make your project perfect.
Achieving a Bubble-Free Finish
Bubbles are the biggest enemy of a glossy resin finish. You can easily avoid them with a few simple tricks. A bubble-free finish starts with how you handle the resin.
- Mix Slowly, Pour Gently: When you mix your resin and hardener, stir slowly and carefully. Whipping the mixture creates a lot of air bubbles. Pour the resin slowly and close to the surface of your keychain.
- Work in a Warm Space: Resin loves warmth. Your workspace should be around 75-85°F (24-30°C). Cold resin is thick and traps tiny bubbles. You can warm your resin bottles in a warm water bath before mixing to make the resin thinner.
- Use a Torch for a Flawless Look: A torch is the best tool to get rid of bubbles after you pour. A quick pass of the flame heats the resin, which helps bubbles rise and pop. While a heat gun works, it can blow dust onto your wet project. A torch gives you that professional, glass-like surface.
Safety First! When using a torch, always start on the lowest setting. Keep the flame moving and never hold it in one spot for too long.
Design and Placement Best Practices
A great design needs great placement. You want your artwork to be centered and straight, especially for a double-sided keychain.
Using a 2D design program like Inkscape or Adobe Illustrator can help you plan your layout perfectly. Before you apply your design, make sure it is perfectly horizontal. This simple check ensures your final product looks balanced and professional. For double-sided acrylic keychains, this step is crucial for perfect alignment.
Creative Ideas for 2026
Let’s think beyond just looks. You can make your keychain smart! One cool idea is to embed a tiny NFC tag inside the resin.
What’s an NFC tag? It’s a small chip you can program with your phone. Anyone with a smartphone can tap the keychain to open a link or see information.
You could program the NFC tag to:
- Store emergency contact information.
- Link to a digital birthday card or a special video message.
This turns your creative project into a useful and interactive piece of tech.
You now know the four key stages: gathering your materials, applying a design, sealing your work, and assembling the final keychain. With these steps, you can create beautiful, custom acrylic keychains.
Now it’s your turn to start your first keychain project! 🎨 When you finish your amazing diy acrylic keychains, share them with other crafters. You can find vibrant communities in Facebook Groups or get inspiration on Pinterest.
ЧАСТО ЗАДАВАЕМЫЕ ВОПРОСЫ
Have a few more questions? You are in the right place! Here are answers to some common challenges you might face while making your keychains.
Why is my resin still sticky?
Your resin might be sticky for two main reasons. You may have mixed the parts incorrectly, or your room was too cold. Always measure your resin and hardener exactly. You should also work in a warm space around 75°F (24°C) for the best results.
How do I stop my vinyl from peeling?
You can prevent peeling with good prep and a strong seal. First, clean the acrylic blank with rubbing alcohol to remove oils. After applying your vinyl, you must seal it with epoxy resin or a clear spray. This protective layer locks your design in place.
Which sealant is better: resin or spray?
Your choice depends on the finish you want! ✨
- Resin gives a thick, glossy, glass-like dome and is very durable.
- Spray sealant is much faster to apply and provides a thinner, protective coat.
Both options work great to protect your design from everyday wear and tear.
Can I fix a mistake on my acrylic blank?
Yes, you can often fix mistakes if you act quickly! If you mess up with paint pens or misplace vinyl, you can usually remove it. Just use a cotton swab dipped in rubbing alcohol to wipe the mistake away before it dries or sets completely.
See Also
Elevate Your Modern Home Decor with Stylish Acrylic Trays for 2025
Unveiling Creative Acrylic Tray Truths: Simple DIY Ideas to Try Now
Your Comprehensive Guide to Selecting and Using Acrylic Table Stands
Discover Ten Ingenious Methods to Style Your Small Acrylic Trays
A Complete Guide to Choosing and Maintaining White Acrylic Trays

